

Modeling in General
General discussions about modeling topics.
General discussions about modeling topics.
Hosted by Jim Starkweather
Official: Airfix II Campaign

md72

#439

Member Since: November 05, 2005
entire network: 4,950 Posts
KitMaker Network: 564 Posts

Posted: Tuesday, October 08, 2013 - 03:18 PM UTC
Well, ya sold me, I just ordered decals for the RCAF wrap around scheme.


Berwickboy

Member Since: April 27, 2013
entire network: 450 Posts
KitMaker Network: 63 Posts
Posted: Thursday, October 10, 2013 - 10:01 AM UTC
Well, progress is slow but the F-84 is coming on.
The cockpit is due to have finishing touches, a final paint coat, weathering and decals for the side panel. Weight has been added to the splitter plate in the nose, fishing weights held in place with Blue Tack. A rudimentary joystick is in place and seatbelts added to the seat. Wings are stuck together, the jetpipe painted and glued in place. Photos will follow in the next few days but I warn you, I am not a tidy modeller.
I am also taking on a challenge, the Whaleback RAF Rescue Launch. Why a challenge? because there are no instructions or decals, it came from my late Uncles stash so they are long gone. Fortunately the box illustration will give me most of the information I need.
The hull and deck have been stuck together, that is the easiest part, the cabin and bridge are next.
Have you ever had that moment when you go to use a part which you think is on your cutting mat, and you can't find it, I have, tonight! I could have sworn I had the bridge back but can't find it anywhere. I looked on the bench, the floor, the rubbish bag even my person, but no. Where was it? ON THE SPRUE. That was a worrying 10 minutes. Onwards and upwards.


Torchy

#047

Member Since: September 13, 2005
entire network: 2,016 Posts
KitMaker Network: 237 Posts

Posted: Thursday, October 10, 2013 - 11:31 PM UTC
Quoted Text
Some really cool projects here. Love the diversity.
@ Andy... That is lovely... Is it a functioning model as well? Does it come worked open like that?
Hi Robert

Yes and yes
 piston,cams,pushrods ,rockers and valves all work
smashing little model
Build pics up soon
Andy

Berwickboy
Member Since: April 27, 2013
entire network: 450 Posts
KitMaker Network: 63 Posts
Posted: Saturday, October 12, 2013 - 06:49 AM UTC
As I am working on the RAF launch with no instructions or decals, and making a little bit of 'heavy weather' (only because I don't have the instructions) would people mind if I did a bit of a whiffer? I am only thinking of the finish not the construction. thank you

Jessie_C

Member Since: September 03, 2009
entire network: 6,965 Posts
KitMaker Network: 609 Posts

Posted: Saturday, October 12, 2013 - 10:16 AM UTC
There are no objections to 'what if' schemes in the rules, but just in case you change your mind, the instructions are available on line here. Since the kit is in the current Airfix catalogue, I'll bet that their missing parts department would provide a new set of decals and instructions if you asked them.
Removed by original poster on 10/13/13 - 12:38:48 (GMT).
Berwickboy
Member Since: April 27, 2013
entire network: 450 Posts
KitMaker Network: 63 Posts
Posted: Sunday, October 13, 2013 - 12:47 AM UTC
Thank you Jessie, I have bookmarked that page.
Here is my first progress photo, it took me a heck of a while to download this but hey, I did it. Just needs rear windows adding, weathering and side instrument panels adding before closing up. Happy, happy, happy

Here is my first progress photo, it took me a heck of a while to download this but hey, I did it. Just needs rear windows adding, weathering and side instrument panels adding before closing up. Happy, happy, happy

oldtimer

Member Since: May 11, 2007
entire network: 210 Posts
KitMaker Network: 34 Posts

Posted: Sunday, October 13, 2013 - 06:14 AM UTC
Looking good Mike.
Keep up the good work.
Happy modelling
Martin

Keep up the good work.
Happy modelling
Martin
Jessie_C
Member Since: September 03, 2009
entire network: 6,965 Posts
KitMaker Network: 609 Posts
Posted: Sunday, October 13, 2013 - 02:38 PM UTC
Hi Mike,
Here's a little photo posting tip. The URL for your picture is http://gallery3.kitmaker.net/data/500/thumbs/Thunder-1.jpg
If you erase the "/thumbs" out of it, you'll get the large size picture like this:

I really like the Airfix F-84. It captures the elegant shape of the aircraft very well, and the cockpit is far superior to the Italeri kit.
Here's a little photo posting tip. The URL for your picture is http://gallery3.kitmaker.net/data/500/thumbs/Thunder-1.jpg
If you erase the "/thumbs" out of it, you'll get the large size picture like this:
I really like the Airfix F-84. It captures the elegant shape of the aircraft very well, and the cockpit is far superior to the Italeri kit.

North4003

Member Since: August 01, 2012
entire network: 960 Posts
KitMaker Network: 175 Posts
Posted: Monday, October 14, 2013 - 01:57 PM UTC
Here is what I'll be working on this time. This is a 1959 or so Airfix kit of the Ju 87B. The model has legions of rivets and raised panel lines. No cockpit; Karl and Lotar must be content to sit on posts inside the beast. No upper air intake or lower one either. The shape does say Stuka though. The decals are toast, I have to source some aftermarket ones or be creative. I'm thinking about a Regia Aeronautica or Condor Legion version.
http://www.flickr.com/photos/100645499@N04/10282243196/
http://www.flickr.com/photos/100645499@N04/10282243196/
Jessie_C
Member Since: September 03, 2009
entire network: 6,965 Posts
KitMaker Network: 609 Posts
Posted: Tuesday, October 15, 2013 - 04:14 AM UTC
Oh, that's the one with the strange inflated bomb, too. I remember doing that such a long time ago!

tinbanger
Member Since: February 04, 2008
entire network: 2,507 Posts
KitMaker Network: 141 Posts

Posted: Tuesday, October 15, 2013 - 04:29 AM UTC
Jessica some one is at the door!
"Dong"

"Dong"

Jessie_C
Member Since: September 03, 2009
entire network: 6,965 Posts
KitMaker Network: 609 Posts
Posted: Tuesday, October 15, 2013 - 05:34 AM UTC
I'm always a Freud of making slips like that...
North4003
Member Since: August 01, 2012
entire network: 960 Posts
KitMaker Network: 175 Posts
Posted: Tuesday, October 15, 2013 - 03:05 PM UTC
Here is my work thus far on the JU87B circa 1957 tooling. The kit is more like one of the early wooden kits. I sourced some Magyar Légierő decals from a Matchbox kit, so she is going to be a HAF Stuka.
My modeling philosophy, build what you have on hand, be thrifty, be creative.


My modeling philosophy, build what you have on hand, be thrifty, be creative.
Berwickboy
Member Since: April 27, 2013
entire network: 450 Posts
KitMaker Network: 63 Posts
Posted: Friday, October 18, 2013 - 08:48 AM UTC
I've just fininshed getting down and dirty. The F84 fuselage has been joined, rubbed and scraped, painted along the lines to see if the joins are good and left for later.
I have drilled out the gun ports in the nose, added a missing strut to the front leg and done something new, I have added foil to the inside of the wing wheel wells as they are natural metal. The finish is not brilliant but as I am only making it for this build and my own use, I am not worrying too mush. Next time I will add the foil before joining the wings together. I might not do it in the nose as it is very awkward.
How's everyone else getting on?
Have a great weekend, i shall be watching Moto GP, World and British Superbikes, quite a few titles in the offing here.
Jessie_C
Member Since: September 03, 2009
entire network: 6,965 Posts
KitMaker Network: 609 Posts
Posted: Friday, October 18, 2013 - 11:00 AM UTC
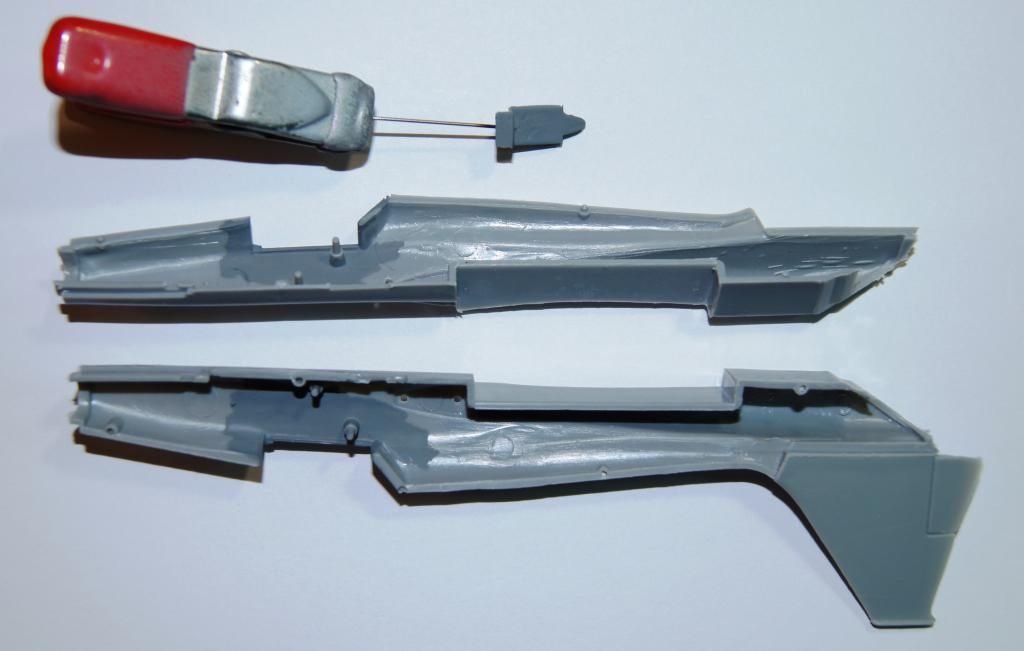
Airfix forgot the other two gun muzzles in the wing roots. You can see one here just below the leading edge. While you're in a drilling mood...
md72
#439
Member Since: November 05, 2005
entire network: 4,950 Posts
KitMaker Network: 564 Posts
Posted: Friday, October 18, 2013 - 07:47 PM UTC
Finally got started on the F-5A. A little clean up and some interior gray.
Berwickboy
Member Since: April 27, 2013
entire network: 450 Posts
KitMaker Network: 63 Posts
Posted: Saturday, October 19, 2013 - 01:26 AM UTC
Thank you Ms Cooper
md72
#439
Member Since: November 05, 2005
entire network: 4,950 Posts
KitMaker Network: 564 Posts
Posted: Saturday, October 19, 2013 - 04:30 AM UTC
Apparently I should avoid late night posting. Forgot to add this:


Berwickboy
Member Since: April 27, 2013
entire network: 450 Posts
KitMaker Network: 63 Posts
Posted: Saturday, October 19, 2013 - 09:50 AM UTC
I must admit I am not a neat modeler as witnessed by this photograph but hey, I am making progress. If you're wondering the seat belts are made from an old adhesive dressing (not again) the side panels are from a Microscale F4 sheet and the photo was taken in my garage where my workbench is.

North4003
Member Since: August 01, 2012
entire network: 960 Posts
KitMaker Network: 175 Posts
Posted: Saturday, October 19, 2013 - 02:07 PM UTC
Quoted Text
I must admit I am not a neat modeler as witnessed by this photograph but hey, I am making progress. If you're wondering the seat belts are made from an old adhesive dressing (not again) the side panels are from a Microscale F4 sheet and the photo was taken in my garage where my workbench is.
Mike, very nice build.
Berwickboy
Member Since: April 27, 2013
entire network: 450 Posts
KitMaker Network: 63 Posts
Posted: Sunday, October 20, 2013 - 10:19 AM UTC
Oh dear! I have had a mixed evening. First, whilst checking the model I noticed the starboard rear window was loose. I couldn't remove it as it was lodged in place by the cockpit assembly so I removed the ejector seat and then spent half an hour trying to put it back in. After much cussing, scraping, removing old glue and fiddling with a knife and dental pick, it was back in place. I glued it in with trusty old Mek-Pak and slumped back into my plastic chair.
Whilst I had the ejector seat out I replaced the 'bandage' belts with masking tape, much better looking.
I then turned to filling in the wing root gaps, this is where I found out how to use Vajello white putty properly, partly thanks to a Humbrol video on using filler. I squirted some out into a palette and added a drop of Acrylic thinner, using a paintbrush I applied it to the gap, left it a few minutes, and ran a damp cotton bud along the joint, I was delighted with the result, any excess cleans off easily and the joint needs no further work.
Next on the job list, adding the canopy, masking the cockpit, intake, jetpipe and wheel wells, the latter I will do so with the closed doors supplied in the kit for the flying option.
Priming will be done with a Tamiya rattle can, another first, and then, break out my new airbrush, something I have never used before being a hardened brush man.
Onwards and upwards

AirLedge

Member Since: July 26, 2007
entire network: 292 Posts
KitMaker Network: 15 Posts

Posted: Sunday, October 20, 2013 - 10:27 AM UTC
Hi everyone,
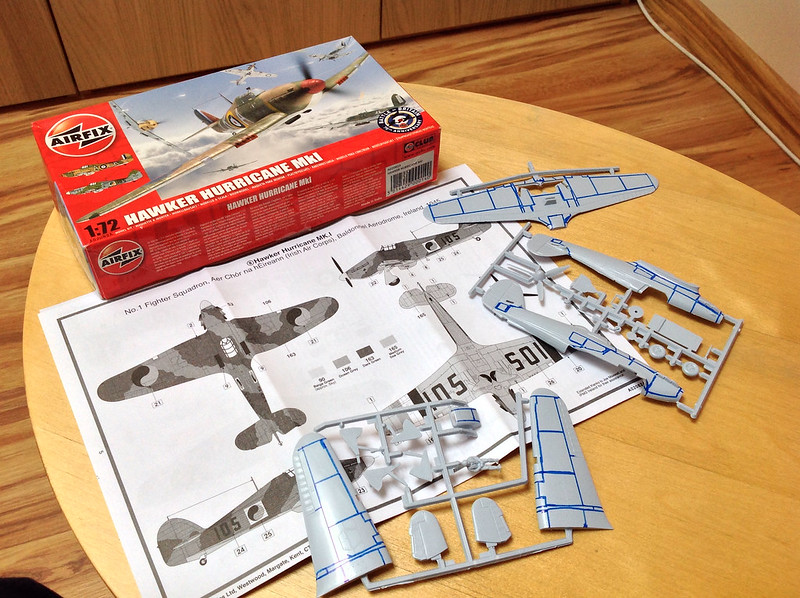
I've enlisted in this one, my first campaign in a while. I'm going to do the latest reboxing of the 1977 tooling of the 1/72 Hurricane. I might even try to rescribe the panel lines, what joy! Update photos to follow, thanks
I've enlisted in this one, my first campaign in a while. I'm going to do the latest reboxing of the 1977 tooling of the 1/72 Hurricane. I might even try to rescribe the panel lines, what joy! Update photos to follow, thanks
Jessie_C
Member Since: September 03, 2009
entire network: 6,965 Posts
KitMaker Network: 609 Posts
Posted: Sunday, October 20, 2013 - 03:59 PM UTC
Welcome to the fun, Mike!
AirLedge
Member Since: July 26, 2007
entire network: 292 Posts
KitMaker Network: 15 Posts
Posted: Monday, October 21, 2013 - 09:22 AM UTC
Thanks Jessica,
I made a start today by marking the panel lines with a cd marker and then rescribing with an Olfa p-cutter, first using the raised lines as a guide, then sanding and using masking tape. It's my first time rescribing panel lines so I'm pleased enough with the results so far, just took 20 minutes to do 1 wing!
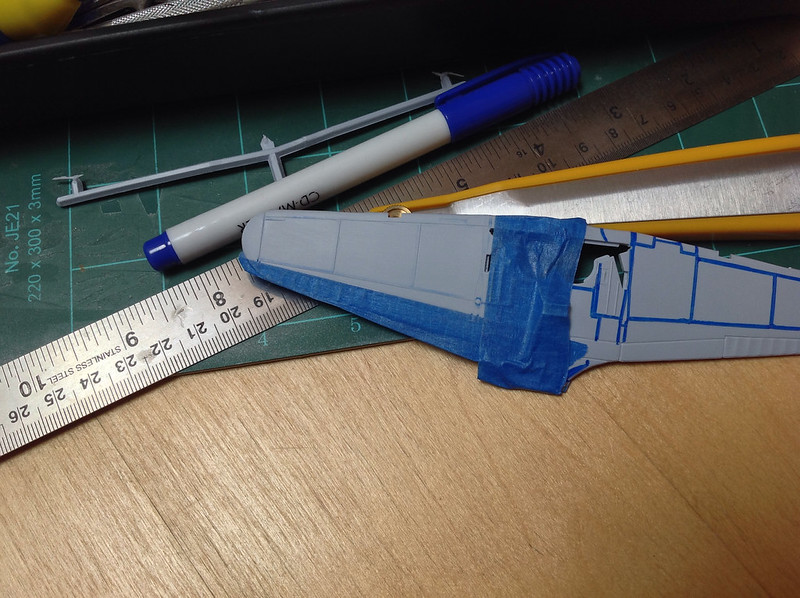
I made a start today by marking the panel lines with a cd marker and then rescribing with an Olfa p-cutter, first using the raised lines as a guide, then sanding and using masking tape. It's my first time rescribing panel lines so I'm pleased enough with the results so far, just took 20 minutes to do 1 wing!
 |

WEB HOSTING BY


Copyright ©2021 KitMaker Network and Kitmaker Network, a subsidiary of Silver Star Enterprises
All Rights Reserved. Please read our Conditions of Use and Privacy Policy.
All Rights Reserved. Please read our Conditions of Use and Privacy Policy.