


Modeling in General
General discussions about modeling topics.
General discussions about modeling topics.
Hosted by Jim Starkweather
Official: Airfix II Campaign

Berwickboy

Member Since: April 27, 2013
entire network: 450 Posts
KitMaker Network: 63 Posts
Posted: Wednesday, February 19, 2014 - 08:29 AM UTC
I might give up on the F84, it seems that everytime paint goes near, it screws up. The Rescue Launch is still underway however so I hope this will prove better


fandangoes

Member Since: November 29, 2007
entire network: 68 Posts
KitMaker Network: 7 Posts
Posted: Thursday, February 20, 2014 - 11:44 AM UTC
Thanks guys.
Berwickboy. Keep at it any model finished is good .I nearly gave up on the hampden , left it for a bit then came back to it.
About 3 coats of thinned paint brushed on games workshop chaos black undersides Hannants Xtracrylix topside RAF Dark Earth& British Deep Bronze green.Games workshop Tin Bitz with black wash on cowl fronts and exhaust all finished of with G/Workshop purity seal, which levels out the brush marks .
Elastic thread for rigging painted black. Glazing coated with Tamiya clear X-22.
Well here she is finished :-


Thank you Jessie c and everyone for a very interesting campaign
looking forward to the next one Airfix 3 .Just shows what can be done with some older kits and some TLC.
Johnny
Berwickboy. Keep at it any model finished is good .I nearly gave up on the hampden , left it for a bit then came back to it.
About 3 coats of thinned paint brushed on games workshop chaos black undersides Hannants Xtracrylix topside RAF Dark Earth& British Deep Bronze green.Games workshop Tin Bitz with black wash on cowl fronts and exhaust all finished of with G/Workshop purity seal, which levels out the brush marks .
Elastic thread for rigging painted black. Glazing coated with Tamiya clear X-22.
Well here she is finished :-
Thank you Jessie c and everyone for a very interesting campaign
looking forward to the next one Airfix 3 .Just shows what can be done with some older kits and some TLC.
Johnny

Jessie_C

Member Since: September 03, 2009
entire network: 6,965 Posts
KitMaker Network: 609 Posts

Posted: Thursday, February 20, 2014 - 11:56 AM UTC
That's a fantastically nice Hampden! So who needs a modern wunderkit anyway?
Just a reminder for all our recent finishers, don't forget to post your pictures in the campaign gallery to show them off
Just a reminder for all our recent finishers, don't forget to post your pictures in the campaign gallery to show them off

jimb

Member Since: August 25, 2006
entire network: 2,539 Posts
KitMaker Network: 263 Posts
Posted: Friday, February 21, 2014 - 06:01 AM UTC
Very well done. Is it my imagination, or do most of the British WWII bombers look a little "ungainly"? Their fighters were so streamlined.
I really need to get in gear on my L1011!
Jim
I really need to get in gear on my L1011!
Jim


North4003

Member Since: August 01, 2012
entire network: 960 Posts
KitMaker Network: 175 Posts
Posted: Friday, February 21, 2014 - 12:18 PM UTC
I submit my entry into the AA Campaign; the Airfix (Now Dapol) OO Railway Water Tower.

Heres my progress from the first couple of days.

Heres my progress from the first couple of days.

almonkey
Member Since: March 23, 2003
entire network: 2,124 Posts
KitMaker Network: 369 Posts

Posted: Sunday, February 23, 2014 - 01:52 AM UTC
well just when i thought this build was going according to plan!
i had a small spray repair to do on the green just at the back of the cockpit, to stop any overspray i put a piece of masking tape just over the grey section, however it was across the fuselage decal that hadn't been sealed, so when i removed the tape this happened-

however, as bad as it looks i had quite a few repair options-
1- ask airfix for a new sheet
2- repair the letter with the left over fuselage band cut to fit.
3- i have a generic set of R.A.F. codes that although the wrong colour could be put on and painted over.
4- just paint over the missing bits, because i was going to paint over the letters anyway.
which is what i did-

and the builds back on track!
i had a small spray repair to do on the green just at the back of the cockpit, to stop any overspray i put a piece of masking tape just over the grey section, however it was across the fuselage decal that hadn't been sealed, so when i removed the tape this happened-
however, as bad as it looks i had quite a few repair options-
1- ask airfix for a new sheet
2- repair the letter with the left over fuselage band cut to fit.
3- i have a generic set of R.A.F. codes that although the wrong colour could be put on and painted over.
4- just paint over the missing bits, because i was going to paint over the letters anyway.
which is what i did-
and the builds back on track!

jimb
Member Since: August 25, 2006
entire network: 2,539 Posts
KitMaker Network: 263 Posts
Posted: Tuesday, February 25, 2014 - 04:06 AM UTC
So, I finally decided to show you guys some progress on my Ancient Airfix II submission. Here's what I'm building. It's the Airfix Lockheed L1011:
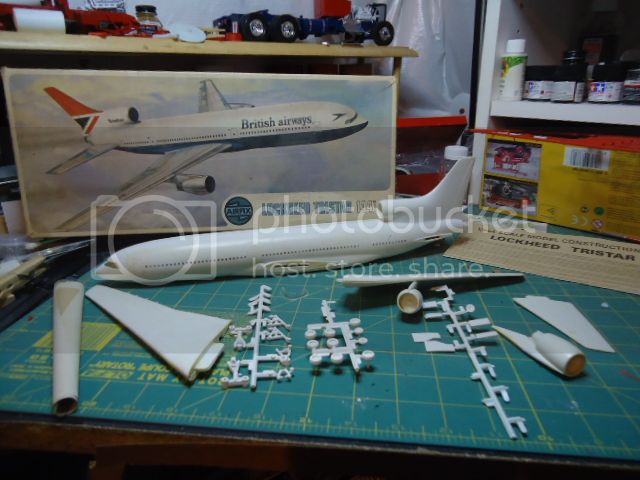
I cannot remember where I got this kit from. I do remember that I purchased it back in 1993 or 1994 while I was stationed at Ft. Polk, LA; and I really didn't have any set plans for it. Yes, that curled up thing in the lower left hand corner are the decals. So I purchased the Two Six Eastern Airlines decals for this build:

The plan now is to build it as Eastern Airlines Flight 401, December 1972. The only issue with the decals is that the Two Six decals have the registration number as N301EA, where Flight 401 was N310EA. Should be an easy fix. I say that now!
Anyway, here is a link about Flight 401 for those of you who are not familiar with it. Growing up in Miami, FL, back in the 1970s & 1980s I can assure you just about everyone knew about Flight 401.
http://en.wikipedia.org/wiki/Flight_401
So, here is the build as it stands now. Hard to believe that I've been working on this kit on & off (mostly off) for the last 21 years!


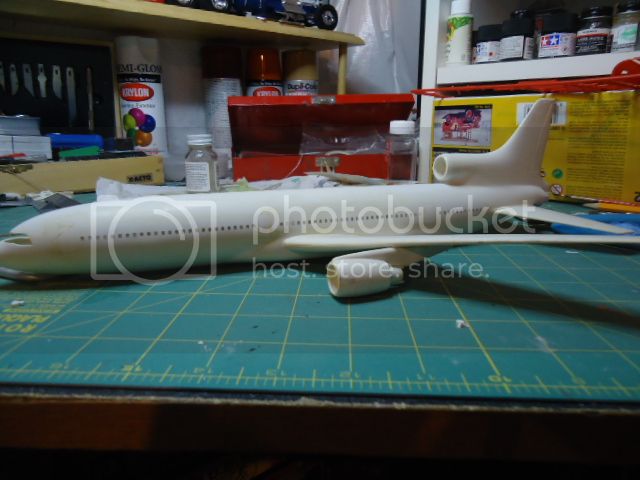
Jim

I cannot remember where I got this kit from. I do remember that I purchased it back in 1993 or 1994 while I was stationed at Ft. Polk, LA; and I really didn't have any set plans for it. Yes, that curled up thing in the lower left hand corner are the decals. So I purchased the Two Six Eastern Airlines decals for this build:

The plan now is to build it as Eastern Airlines Flight 401, December 1972. The only issue with the decals is that the Two Six decals have the registration number as N301EA, where Flight 401 was N310EA. Should be an easy fix. I say that now!
Anyway, here is a link about Flight 401 for those of you who are not familiar with it. Growing up in Miami, FL, back in the 1970s & 1980s I can assure you just about everyone knew about Flight 401.
http://en.wikipedia.org/wiki/Flight_401
So, here is the build as it stands now. Hard to believe that I've been working on this kit on & off (mostly off) for the last 21 years!


Jim
Berwickboy
Member Since: April 27, 2013
entire network: 450 Posts
KitMaker Network: 63 Posts
Posted: Friday, February 28, 2014 - 12:24 PM UTC
Just to show I have not abandoned this build here are a few (poor phone) pictures.
 I have stripped the Thunderstreak and am reverting to the kit deacals, however, you might notice the finish looks awful, all will be revealed.
 This is progress with the ex RAF Rescue Launch. I have added detail into the cabin using Plasticard and rod together with a ladder (RAF Rescue set) various bits from the spares box and controls from the Tamiya Perkasa MTB, just to give it more life. The masking tape is on the rear window prior to painting. since this photo I have added a seat.
I have stripped the Thunderstreak and am reverting to the kit deacals, however, you might notice the finish looks awful, all will be revealed.This is progress with the ex RAF Rescue Launch. I have added detail into the cabin using Plasticard and rod together with a ladder (RAF Rescue set) various bits from the spares box and controls from the Tamiya Perkasa MTB, just to give it more life. The masking tape is on the rear window prior to painting. since this photo I have added a seat.
amegan

#243

Member Since: March 21, 2008
entire network: 996 Posts
KitMaker Network: 63 Posts

Posted: Monday, March 03, 2014 - 12:33 PM UTC
Progress on the Matador and a companion kit I found


The missing steering wheel was fabricated from resistor lead, bent and soldered using solder paint.


Some finishing and weathering still to do, no decals for the Matador, missing from the kit
The missing steering wheel was fabricated from resistor lead, bent and soldered using solder paint.
Some finishing and weathering still to do, no decals for the Matador, missing from the kit
amegan
#243
Member Since: March 21, 2008
entire network: 996 Posts
KitMaker Network: 63 Posts
Posted: Monday, March 03, 2014 - 12:39 PM UTC
and a couple of shots of the DUKW


md72
#439
Member Since: November 05, 2005
entire network: 4,950 Posts
KitMaker Network: 564 Posts

Posted: Monday, March 03, 2014 - 12:50 PM UTC
That Matador just screams England!. Too bad about the bloke driving it, looks like a gaping chest wound and he's lost both his legs... 
Too bad about the bloke driving it, looks like a gaping chest wound and he's lost both his legs... 
Berwickboy
Member Since: April 27, 2013
entire network: 450 Posts
KitMaker Network: 63 Posts
Posted: Tuesday, March 04, 2014 - 08:14 AM UTC
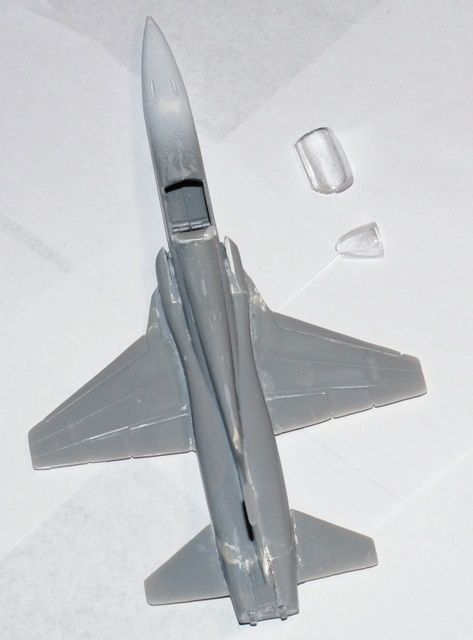
The observant amongst you will have noticed that the Thunderstreak has changed colour and has reverted to Natural Metal, well, Silver. After rattle can spraying the Tamiya primer I tried brushing the camouflage, the PRU Blue was good but the Grey and Green topcoat was a disaster. I stripped off the paint and decided to use the kit scheme. Now then, I rattle can sprayed the Silver and made a right pigs ear of it, the moral here, make sure you spray in good light i.e. daylight. Rubbing this down I thought of a different tack and after painting, yes brushwork again, the Red patches, I applied the Silver using Rub and Buff. I am now on my way to the workbench to tidy up and leave it till daylight to apply a clear coat of Gloss varnish. The doors are only temporary, the u/c and drop tanks are prepared and waiting finishing. My only problem with the build to resolve is the Port tailplane keeps falling off so I shall revert to Superglue in a (hopefully not) vain attempt to keep it in place.
Here's a couple of up to date pictures


Here's a couple of up to date pictures
md72
#439
Member Since: November 05, 2005
entire network: 4,950 Posts
KitMaker Network: 564 Posts
Posted: Tuesday, March 04, 2014 - 08:54 AM UTC
Struggling along with my F-5, got the fuselage patched up and sanded to shape. Now I'm building up the canopy and opening up so that they match (wonder if I got the wrong glass in the box). Might have pic's after the camera battery recharges.
amegan
#243
Member Since: March 21, 2008
entire network: 996 Posts
KitMaker Network: 63 Posts
Posted: Tuesday, March 04, 2014 - 10:40 AM UTC
Quoted Text
That Matador just screams England!.
To add insult to injury he has got a US pattern helmet on, and the DUKW's driver has a British beret on. Life has trampled in with big boots on, may not have much time over the next few weeks, we'll see
md72
#439
Member Since: November 05, 2005
entire network: 4,950 Posts
KitMaker Network: 564 Posts
Posted: Tuesday, March 04, 2014 - 12:54 PM UTC
Missed the helmet..... Too hard to mold a Tommy's Pan?
md72
#439
Member Since: November 05, 2005
entire network: 4,950 Posts
KitMaker Network: 564 Posts
Posted: Tuesday, March 04, 2014 - 07:38 PM UTC
Slow painful progress. I'm happy enough with the fuselage. but now I'm having to build up the canopy parts to be level with the fuselage and each other.


North4003
Member Since: August 01, 2012
entire network: 960 Posts
KitMaker Network: 175 Posts
Posted: Sunday, March 09, 2014 - 04:08 AM UTC
Nice work being done on the AAII. I'm working on the OO scale 1/76 water tank. I'm planning on finishing today.
Berwickboy
Member Since: April 27, 2013
entire network: 450 Posts
KitMaker Network: 63 Posts
Posted: Sunday, March 09, 2014 - 10:49 AM UTC
I progress (albeit slowly) with the F84. The finish is rubbish but I just want to finish it by campaign end. Today I removed the closed undercart doors and the last canopy masking, that needs a lot of tlc. The nose leg is now in place as are the nose doors, however, being the chubby person like what I am, dexterity and I are not friends, the starboard door went on beautifully, the port door, took nearly 20 minutes 
My other project, the modified RAF Whaleback is one of the most pleasant builds I have had. Trying to improve some areas of the kit have meant using my imagination and boy, is it fun. I have modified the turret openings, added cabin detail, added fastenings to 4 storage boxes and scratchbuilt a firehose to go onto the Oerlikon mount. I will post photos soon when the cabin has been painted.
Onwards and upwards
Berwickboy
Member Since: April 27, 2013
entire network: 450 Posts
KitMaker Network: 63 Posts
Posted: Monday, March 10, 2014 - 09:38 AM UTC
You have bad experiences and then, Hey Presto, things go right  The Thunderstreak is no longer legless (unlike the builder) it is on it's wheels, admittedly upside down drying out. I have given it a light coat of Klear (I still have an original bottle)and hope to decal tomorrow.
One problem, and this is a cautionary tale, Airfix fail to show the underside of the plane so I have to rely on the boxart for the position of the underside Stars and Bars and USAF. They also fail to tell you to apply decals BEFORE adding the outer pylons. Guess I'll be cutting and fitting as I will not remove the pylons, yes, I'm a lazy so and so.
The Thunderstreak is no longer legless (unlike the builder) it is on it's wheels, admittedly upside down drying out. I have given it a light coat of Klear (I still have an original bottle)and hope to decal tomorrow. One problem, and this is a cautionary tale, Airfix fail to show the underside of the plane so I have to rely on the boxart for the position of the underside Stars and Bars and USAF. They also fail to tell you to apply decals BEFORE adding the outer pylons. Guess I'll be cutting and fitting as I will not remove the pylons, yes, I'm a lazy so and so.
amegan
#243
Member Since: March 21, 2008
entire network: 996 Posts
KitMaker Network: 63 Posts
Posted: Monday, March 10, 2014 - 10:54 AM UTC
Finished the Matador, and the DUKW as far as possible. Unfortunately the Matador decals are missing so it will have to remain as it is until I can ask Airfix for a set.
The Matador is still an attractive kit and the mould quality is pretty good, this one suffered by having been started and the cab assembly is slightly wrong but couldn't be changed


The DUKW also fits together pretty well and there were 2 sets of decals in the box (average is OK, 1 per kit).
These two little kits made a nice change,


src="http://gallery3.kitmaker.net/data/500/n_P1050219.jpg" />
Enjoyed these builds, looking forward to Airfix3
The Matador is still an attractive kit and the mould quality is pretty good, this one suffered by having been started and the cab assembly is slightly wrong but couldn't be changed
The DUKW also fits together pretty well and there were 2 sets of decals in the box (average is OK, 1 per kit).
These two little kits made a nice change,
src="http://gallery3.kitmaker.net/data/500/n_P1050219.jpg" />
Enjoyed these builds, looking forward to Airfix3
md72
#439
Member Since: November 05, 2005
entire network: 4,950 Posts
KitMaker Network: 564 Posts
Posted: Monday, March 10, 2014 - 11:33 AM UTC
No clue how British trucks were marked during WWII. But, I just tracked down some 1/72 transfers from Archer Transfers to put the S/N and Star on my 1/72 GMC tanker truck.
amegan
#243
Member Since: March 21, 2008
entire network: 996 Posts
KitMaker Network: 63 Posts
Posted: Monday, March 10, 2014 - 11:46 AM UTC
This truck modelled in this kit had regimental badges front and rear, serial numbers on both doors and the word "Gazala" across the front of the roof. I have sent an enquiry to Airfix, they are usually pretty good
md72
#439
Member Since: November 05, 2005
entire network: 4,950 Posts
KitMaker Network: 564 Posts
Posted: Monday, March 10, 2014 - 11:55 AM UTC
No way Archer could have helped there. I've had excellent luck with Airfix replacing parts in the past, I doubt you'll have a problem. I had one part was replaced for free, the other one they wanted 3 pounds for shipping. Probably more than I spent for the kit, but not bad for shipping halfway around the world.
amegan
#243
Member Since: March 21, 2008
entire network: 996 Posts
KitMaker Network: 63 Posts
Posted: Monday, March 10, 2014 - 12:08 PM UTC
If they want that much it might be cheaper to buy another kit If Airfix 3 arrives I have just got hold of an old Il-2 complete with very pronounced rivets, look like fun. Another old kit next, Matchbox HP Victor K2 tanker
If Airfix 3 arrives I have just got hold of an old Il-2 complete with very pronounced rivets, look like fun. Another old kit next, Matchbox HP Victor K2 tanker 
Quasimofo
Member Since: November 30, 2012
entire network: 105 Posts
KitMaker Network: 18 Posts

Posted: Wednesday, March 12, 2014 - 01:05 PM UTC
Unfortunately I've had to drop out of the campaign. I've had major paint issues with the 737 and ended up having to strip it down tonight to start from scratch. There's no way I'll ever get things half way painted before the deadline.

 |

WEB HOSTING BY


Copyright ©2021 KitMaker Network and Kitmaker Network, a subsidiary of Silver Star Enterprises
All Rights Reserved. Please read our Conditions of Use and Privacy Policy.
All Rights Reserved. Please read our Conditions of Use and Privacy Policy.