

Modeling in General
General discussions about modeling topics.
General discussions about modeling topics.
Hosted by Jim Starkweather
Official: Ancient Airfix campaign

Jessie_C

Member Since: September 03, 2009
entire network: 6,965 Posts
KitMaker Network: 609 Posts

Posted: Saturday, September 22, 2012 - 08:49 AM UTC
The Campaign Gallery is now ready for our pictures. For those wanting to find it the old fashioned way, it lives in Campaigns » Currently Active Campaigns » Ancient Airfix Assemblers Campaign on the "GALLERY" tab at the top of your page.

Csouthwood

Member Since: September 01, 2012
entire network: 123 Posts
KitMaker Network: 16 Posts

Posted: Saturday, September 22, 2012 - 09:06 AM UTC
Sorry Jessy! It was meant as a generalisation, may I change it to 'Chaps and Chapesses'? lol Do we put all our pictures in there or is it just the completed model?
Jessie_C
Member Since: September 03, 2009
entire network: 6,965 Posts
KitMaker Network: 609 Posts
Posted: Saturday, September 22, 2012 - 10:21 AM UTC
Completed builds only please.

FAUST

#130

Member Since: June 07, 2002
entire network: 8,797 Posts
KitMaker Network: 1,186 Posts

Posted: Saturday, September 22, 2012 - 10:35 AM UTC
Ola Guys and gals.
Some very interesting builts here so far. Airfix surely has been very diverse in giving us modelers something to do.
1904 Jeremy Clarkson mode on:
When the Germans came to the stage in 1904 with their 1904 model the world was in for a surprise. Sturdy men in leather coats sat in the open body and drove their cars like their hair was on fire. With 90 raging horses under the bonnet it went careening over the racetracks of the world with staggering speeds of over 100 kilometers per hour. The 4 cilinder in line engine left all the other opponents in its wake crying over their own technical shortcomings... It is indeed the fastest car... In the world!
1904 Jeremy Clarkson mode off
Since it will be some time before I visit my parents again and I can dig out the other 1904 Merc I have I already started on this one. And god do I have to restrain myself from not detailing several things on this kit. It is very basic. I assembled the chassis. All 4 parts. Had to get rid of pushout marks on all of them. Alignment was a bit of work as the whole chassis had to be straight. But the 4 parts form a square that easily gets distorted as long as the glue has not dried. Then I replaced the engine grill with some real mesh and added a rim around that. Assembled the main body parts as well.

Still need to do clean up on the radiator


With friendly greetz
Robert
Some very interesting builts here so far. Airfix surely has been very diverse in giving us modelers something to do.
1904 Jeremy Clarkson mode on:
When the Germans came to the stage in 1904 with their 1904 model the world was in for a surprise. Sturdy men in leather coats sat in the open body and drove their cars like their hair was on fire. With 90 raging horses under the bonnet it went careening over the racetracks of the world with staggering speeds of over 100 kilometers per hour. The 4 cilinder in line engine left all the other opponents in its wake crying over their own technical shortcomings... It is indeed the fastest car... In the world!
1904 Jeremy Clarkson mode off
Since it will be some time before I visit my parents again and I can dig out the other 1904 Merc I have I already started on this one. And god do I have to restrain myself from not detailing several things on this kit. It is very basic. I assembled the chassis. All 4 parts. Had to get rid of pushout marks on all of them. Alignment was a bit of work as the whole chassis had to be straight. But the 4 parts form a square that easily gets distorted as long as the glue has not dried. Then I replaced the engine grill with some real mesh and added a rim around that. Assembled the main body parts as well.
Still need to do clean up on the radiator
With friendly greetz
Robert

FAUST
#130
Member Since: June 07, 2002
entire network: 8,797 Posts
KitMaker Network: 1,186 Posts
Posted: Saturday, September 22, 2012 - 10:53 PM UTC
@ Jessica
Thanks by the way for sharing that link to the Airfix tribute forum. It is a really fun site and I have enjoyed reading up the history of the company so far.
Thanks by the way for sharing that link to the Airfix tribute forum. It is a really fun site and I have enjoyed reading up the history of the company so far.
FAUST
#130
Member Since: June 07, 2002
entire network: 8,797 Posts
KitMaker Network: 1,186 Posts
Posted: Sunday, September 23, 2012 - 08:08 AM UTC
I have another installment in my 1904 Merc episode.
I really enjoy building this little 50 year old kit. When I saw it in the box I had my reservations if I could get something decent out of it but with every step I get ideas of what to do with painting and trying to make it look like a scaled 1904 Merc.
Added the steering to the frontaxle. And added the exhaustpipe. Added the chaindrive and cleaned out the drivechains Also sanded all the wheels. Everything is assembled in such a way that I can put everything together easily after painting. So the rolling chassis layout

Added the oilpan. And some other doodads to the carriage.

Also the driveshaft from engine to drivechain was too short. It is possible I made a mistake in building but I'd be bummed if I know where. Everything is built as it should and everything else fits. So I decided to replace it with an Evergreen rod.

On the boxart it is visible that the original car had a decoratice rim following the contours of the seat shell. It is possible that the folks at Airfix included this detail. But it is also very possible it was a moldline. Anyway it looked not very nice so I sanded it smooth. And replaced it with some thin copperwire.

And two pics of all the above stuff dryfitted together. It starts to look like a car


More to come.
With friendly greetz
Robert Blokker
I really enjoy building this little 50 year old kit. When I saw it in the box I had my reservations if I could get something decent out of it but with every step I get ideas of what to do with painting and trying to make it look like a scaled 1904 Merc.
Added the steering to the frontaxle. And added the exhaustpipe. Added the chaindrive and cleaned out the drivechains Also sanded all the wheels. Everything is assembled in such a way that I can put everything together easily after painting. So the rolling chassis layout
Added the oilpan. And some other doodads to the carriage.
Also the driveshaft from engine to drivechain was too short. It is possible I made a mistake in building but I'd be bummed if I know where. Everything is built as it should and everything else fits. So I decided to replace it with an Evergreen rod.
On the boxart it is visible that the original car had a decoratice rim following the contours of the seat shell. It is possible that the folks at Airfix included this detail. But it is also very possible it was a moldline. Anyway it looked not very nice so I sanded it smooth. And replaced it with some thin copperwire.
And two pics of all the above stuff dryfitted together. It starts to look like a car
More to come.
With friendly greetz
Robert Blokker

phantom_phanatic309
#372

Member Since: March 10, 2010
entire network: 2,568 Posts
KitMaker Network: 126 Posts

Posted: Monday, September 24, 2012 - 08:59 AM UTC
Some cool builds here.
Mathew, its always great to see an Airfix ship. Clunky in places yes, but they do have a charm all of their own. I did consider doing HMS Hotspur from the recent WWII destroyers box set, but what I was planning would've meant a fair bit of converting which would have broken the as near as poss OOB rule.
Robert, the Merc is going great. Look forward to seeing the finished result.


Torchy

#047

Member Since: September 13, 2005
entire network: 2,016 Posts
KitMaker Network: 237 Posts

Posted: Thursday, September 27, 2012 - 02:36 AM UTC
Hi all 
There are some real golden oldies so far,a really great cross section from the Airfix catalogue.
Here's my

Some love big pins and knockouts to sand and fill

Shes not going together too bad for a 50 year old kit

More pics soon
Andy
There are some real golden oldies so far,a really great cross section from the Airfix catalogue.
Here's my
Some love big pins and knockouts to sand and fill
Shes not going together too bad for a 50 year old kit
More pics soon
Andy

FAUST
#130
Member Since: June 07, 2002
entire network: 8,797 Posts
KitMaker Network: 1,186 Posts
Posted: Thursday, September 27, 2012 - 06:26 AM UTC
@ Stephen
Thanks for the compliments. Lookin forward what you will bring to the campaign.
@ Andy
That is a cool looking bus you got there. I saw that kit several times on Ebay still thinking of buying it. How long is the vehicle?
And the 1904 Merc Episode continues.
Added the gear lever and what I think should be the brake. Also the other controls are added. The steeringwheel had a semicircle inside it which I damaged to a quarter ring when I cleaned it up. So I replaced it with a ring from copperwire.

Also dryfitted the front fenders to align the support struts.

Fast forward a bit. All the parts of the kit (57!!!) are added. All fender supports are aligned. And all subassemblies are made for the ease of airbrushing. And now it is sitting in first primer stage. I always like the looks of a kit in a uniform grey primer coat. I also love the cruel honesty of said primer as it shows without mercy where you have been sloppy. And I found some parts that could benefit a light sanding with the good old fiberglass pen.


So I got a bit of clean up to do. Then another coat of primer (Already did some of that before I started typing this) and then in the weekend I think it is time to get the Airbrush out of the toolbox and start slinging some paint.
Thanks for the compliments. Lookin forward what you will bring to the campaign.
@ Andy
That is a cool looking bus you got there. I saw that kit several times on Ebay still thinking of buying it. How long is the vehicle?
And the 1904 Merc Episode continues.
Added the gear lever and what I think should be the brake. Also the other controls are added. The steeringwheel had a semicircle inside it which I damaged to a quarter ring when I cleaned it up. So I replaced it with a ring from copperwire.
Also dryfitted the front fenders to align the support struts.
Fast forward a bit. All the parts of the kit (57!!!) are added. All fender supports are aligned. And all subassemblies are made for the ease of airbrushing. And now it is sitting in first primer stage. I always like the looks of a kit in a uniform grey primer coat. I also love the cruel honesty of said primer as it shows without mercy where you have been sloppy. And I found some parts that could benefit a light sanding with the good old fiberglass pen.
So I got a bit of clean up to do. Then another coat of primer (Already did some of that before I started typing this) and then in the weekend I think it is time to get the Airbrush out of the toolbox and start slinging some paint.
Torchy
#047
Member Since: September 13, 2005
entire network: 2,016 Posts
KitMaker Network: 237 Posts
Posted: Thursday, September 27, 2012 - 11:25 PM UTC
Hi all
Some lovely big lumps on the rear of the seats!!!

Shes all done,just awaiting some primer but its raining out

hope the picture helps with the dimensions Robert,and shes just over 2 1/2 " wide,I got the kit from Ebay and paid £10 for it.The early box ones go for silly money,but I dont build boxes!!!
Love your wee 1904 Merc,what colour is it going to be?
More pics soon
Andy
Some lovely big lumps on the rear of the seats!!!
Shes all done,just awaiting some primer but its raining out
hope the picture helps with the dimensions Robert,and shes just over 2 1/2 " wide,I got the kit from Ebay and paid £10 for it.The early box ones go for silly money,but I dont build boxes!!!
Love your wee 1904 Merc,what colour is it going to be?
More pics soon
Andy
FAUST
#130
Member Since: June 07, 2002
entire network: 8,797 Posts
KitMaker Network: 1,186 Posts
Posted: Friday, September 28, 2012 - 08:55 AM UTC
Ola Andy
That is quite a big model as well. Might have to put it on the hunt list as well. Would be fun to convert it to something Steampunkish.
And don't talk about prices. I managed to score a few old Pyro kits a while back for really neat prices. And after checking Ebay I noticed I was very lucky indeed.
As for the colors. I think I'm going to do the colors as they are on the box. I believe it was exactly that car that raced on Brooklands in 1904. Also it fits the OOTB rule. Kit out of the box. Color from the box. So red chassis white carriage and trying to lift it up by paint.
That is quite a big model as well. Might have to put it on the hunt list as well. Would be fun to convert it to something Steampunkish.
And don't talk about prices. I managed to score a few old Pyro kits a while back for really neat prices. And after checking Ebay I noticed I was very lucky indeed.
As for the colors. I think I'm going to do the colors as they are on the box. I believe it was exactly that car that raced on Brooklands in 1904. Also it fits the OOTB rule. Kit out of the box. Color from the box
. So red chassis white carriage and trying to lift it up by paint. 
md72
#439

Member Since: November 05, 2005
entire network: 4,950 Posts
KitMaker Network: 564 Posts

Posted: Friday, September 28, 2012 - 04:49 PM UTC
Lots of good work going on, even some subjects I'd never seen before.
As this is a remembrance of kits gone by, I think it's appropriate that we also take a moment to honor the aircrews who sacrificed limb and life to fill our empty cockpits.

May they model in peace.
As this is a remembrance of kits gone by, I think it's appropriate that we also take a moment to honor the aircrews who sacrificed limb and life to fill our empty cockpits.
May they model in peace.


DaveCox

Member Since: January 11, 2003
entire network: 4,307 Posts
KitMaker Network: 788 Posts

Posted: Saturday, September 29, 2012 - 12:11 AM UTC
Just signed up - got the old E-Type Jag on fleabay


camogirl

Member Since: October 20, 2005
entire network: 1,045 Posts
KitMaker Network: 57 Posts

Posted: Saturday, September 29, 2012 - 11:03 PM UTC
Been really quite recently from me but managed to sneak an hour at the bench. Last time you saw this (page 1 of thread) fuselage together and the wings had been filled and sanded. Was that way this morning just fired up the trusted airbrush and got the paint on the fuselage, wings, struts etc.
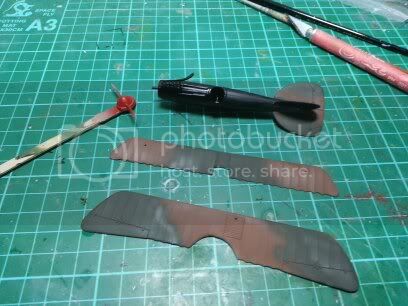
Now its just a case of letting it dry, get it together, future, decal, future, slight weather and then varnish.
Its a nice quick little kit to build oob. Think I might have to get myself the Eduard 1/48 kit of the Albatross as really like the look of the plane
Now its just a case of letting it dry, get it together, future, decal, future, slight weather and then varnish.
Its a nice quick little kit to build oob. Think I might have to get myself the Eduard 1/48 kit of the Albatross as really like the look of the plane

Torchy
#047
Member Since: September 13, 2005
entire network: 2,016 Posts
KitMaker Network: 237 Posts
Posted: Sunday, September 30, 2012 - 12:37 AM UTC
Quoted Text
As this is a remembrance of kits gone by, I think it's appropriate that we also take a moment to honor the aircrews who sacrificed limb and life to fill our empty cockpits.
May they model in peace.
That made me laugh
oldtimer
Member Since: May 11, 2007
entire network: 210 Posts
KitMaker Network: 34 Posts

Posted: Sunday, September 30, 2012 - 07:54 AM UTC
Quoted Text
Quoted Text
As this is a remembrance of kits gone by, I think it's appropriate that we also take a moment to honor the aircrews who sacrificed limb and life to fill our empty cockpits.
May they model in peace.
Brilliant absolutely brilliant!
DaveCox
Member Since: January 11, 2003
entire network: 4,307 Posts
KitMaker Network: 788 Posts
Posted: Tuesday, October 02, 2012 - 08:13 AM UTC
Loads of gems out there - just scored the Ferrari 250LM (1968 kit) and Ford 3-litre GT (1969 kit) at a very good price so that'll be three builds for me!
DaveCox
Member Since: January 11, 2003
entire network: 4,307 Posts
KitMaker Network: 788 Posts
Posted: Friday, October 05, 2012 - 09:37 PM UTC
Starting the E-type this morning - flash city, grotty moulding.......I don't know what this is going to turn out like.


FAUST
#130
Member Since: June 07, 2002
entire network: 8,797 Posts
KitMaker Network: 1,186 Posts
Posted: Friday, October 05, 2012 - 09:52 PM UTC
@ Dave
Wow that is some flash indeed. But I have noticed on my merc you can actually with some time and care create something really neat out of it. So I'm pretty sure we'll see a nice and shiny E-type from you.
It actually brings back some fond memories. I drove around in a white E-type for a few days for a photoshoot. The owner handed it to me just like that. Assigment: Shoot it in some typical Dutch settings. He wanted to have them in his house and garage. It was a drag stepping in and out of that thing. The sil to step over in the vehicle is very wide and there is absolutely no way of doing it anyway decent (fun for women in miniskirt). It is close to crawling in and out. But people turning their heads when you drive by with the engine at low growl and the absolutely beautiful design made me fall in love with it. Oh how I wish I had the money to own one.
Nice detail. As I heard the cars first owner was Queen guitarist Brian May. It even had Mays original license plates (MAY-001) in the booth.
Looking forward what you will do with it.
Wow that is some flash indeed. But I have noticed on my merc you can actually with some time and care create something really neat out of it. So I'm pretty sure we'll see a nice and shiny E-type from you.
It actually brings back some fond memories. I drove around in a white E-type for a few days for a photoshoot. The owner handed it to me just like that. Assigment: Shoot it in some typical Dutch settings. He wanted to have them in his house and garage. It was a drag stepping in and out of that thing. The sil to step over in the vehicle is very wide and there is absolutely no way of doing it anyway decent (fun for women in miniskirt
). It is close to crawling in and out. But people turning their heads when you drive by with the engine at low growl and the absolutely beautiful design made me fall in love with it. Oh how I wish I had the money to own one. Nice detail. As I heard the cars first owner was Queen guitarist Brian May. It even had Mays original license plates (MAY-001) in the booth.
Looking forward what you will do with it.
DaveCox
Member Since: January 11, 2003
entire network: 4,307 Posts
KitMaker Network: 788 Posts
Posted: Friday, October 05, 2012 - 10:39 PM UTC
Thanks Robert,
It's actually cleaning up quite quickly. The biggest problem is the wear on the moulds - locations and pins have ceased to match up, so there's a lot of butt joints!
I reckon it'll take the rest of today to get to sub-assemblies for painting. It isn't going to be a long build!
It's actually cleaning up quite quickly. The biggest problem is the wear on the moulds - locations and pins have ceased to match up, so there's a lot of butt joints!
I reckon it'll take the rest of today to get to sub-assemblies for painting. It isn't going to be a long build!
camogirl
Member Since: October 20, 2005
entire network: 1,045 Posts
KitMaker Network: 57 Posts
Posted: Saturday, October 06, 2012 - 07:29 AM UTC
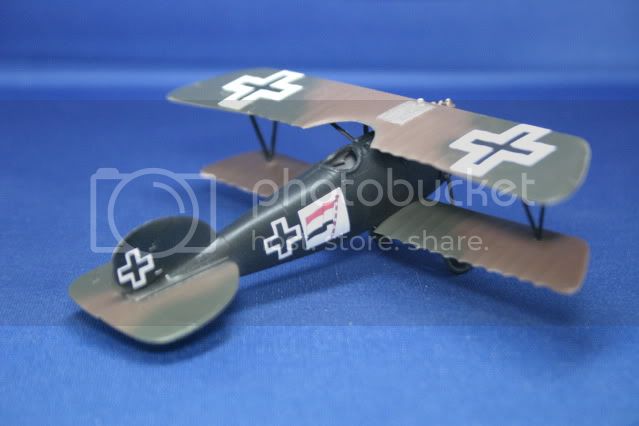
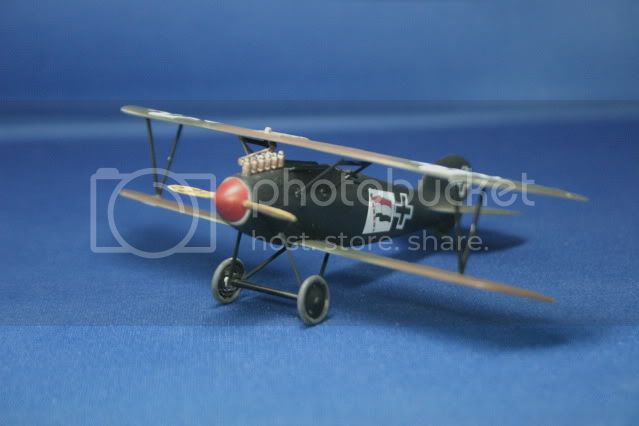
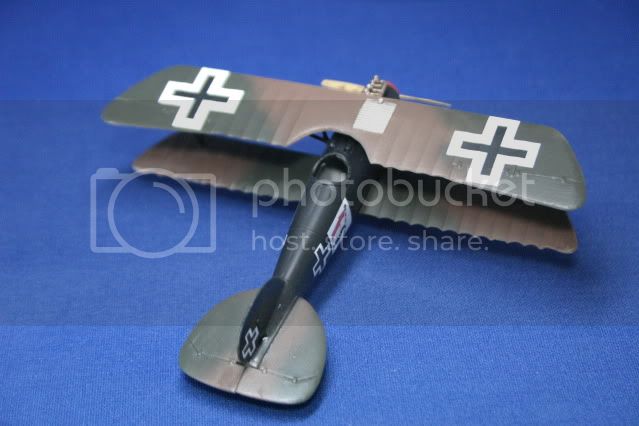
Im calling mine done. Built completely oob with no additions. Was a fab quick little build project for me as having problems finding the time to get near the bench at the moment 


Jessie_C
Member Since: September 03, 2009
entire network: 6,965 Posts
KitMaker Network: 609 Posts
Posted: Saturday, October 06, 2012 - 11:20 AM UTC
We have our first finisher! Congratulations
DaveCox
Member Since: January 11, 2003
entire network: 4,307 Posts
KitMaker Network: 788 Posts
Posted: Saturday, October 06, 2012 - 10:43 PM UTC
Calling the E-Type finished. I hope the newer LeMans cars are better moulded - probably are as they were out of production for longer.


Torchy
#047
Member Since: September 13, 2005
entire network: 2,016 Posts
KitMaker Network: 237 Posts
Posted: Sunday, October 07, 2012 - 12:19 AM UTC
Nice job Sam
Bloody ell Dave,you dont hang about!!!,silk purse mate
Andy
Bloody ell Dave,you dont hang about!!!,silk purse mate
Andy
DaveCox
Member Since: January 11, 2003
entire network: 4,307 Posts
KitMaker Network: 788 Posts
Posted: Sunday, October 07, 2012 - 12:24 AM UTC
Quoted Text
Bloody ell Dave,you dont hang about!!!,silk purse mate
Andy
Thanks Andy
Only just over 40 pieces, so it doesn't take long to assemble, and acrylics dry fast!
Great job on that Albatros Sam.
I cut my modelling teeth on some of these old kits when they cost 1shilling and tenpence each (less than 10 new pence!) and I remember doing all the old biplanes. Getting all those struts lined up led to some strange looking 'planes...........
 |

WEB HOSTING BY


Copyright ©2021 KitMaker Network and Kitmaker Network, a subsidiary of Silver Star Enterprises
All Rights Reserved. Please read our Conditions of Use and Privacy Policy.
All Rights Reserved. Please read our Conditions of Use and Privacy Policy.