

Modeling in General
General discussions about modeling topics.
General discussions about modeling topics.
Hosted by Jim Starkweather
Official: Ancient Airfix campaign

Jessie_C

Member Since: September 03, 2009
entire network: 6,965 Posts
KitMaker Network: 609 Posts

Posted: Saturday, March 16, 2013 - 11:42 AM UTC
I'd really love to see them re-issue the S.R.N.1. So far I've managed to miss getting it every time they've released it.

warreni

Member Since: August 14, 2007
entire network: 5,926 Posts
KitMaker Network: 271 Posts
Posted: Saturday, March 16, 2013 - 01:08 PM UTC
Quoted Text
I'd really love to see them re-issue the S.R.N.1. So far I've managed to miss getting it every time they've released it.
"Careful what you wish you may regret it,
Careful what you wish you may just get it.."
Metallica
:)
warreni
Member Since: August 14, 2007
entire network: 5,926 Posts
KitMaker Network: 271 Posts
Posted: Sunday, March 17, 2013 - 08:39 AM UTC
Everything was going well with the shrouds for Lieutenant Cook's ship. The first one I made out of ordinary cotton and it came out like this//


I had to made the other 10 using the thread supplied with the Airfix kit and was hoping they would come out less furry, but instead, after staining the white thread black I was greeted with this abomination..

Needless to say I am less than impressed with the Airfix thread and now have to find some other source. I am going to the local fishing tackle shop today to see if they have any 0.6mm line I can use for the vertical lines and some 0.3 for the horizontal ones. Hopefully they will have braided line. Failing that I will just have to order from the www as the local LHS has very little thread.
I had to made the other 10 using the thread supplied with the Airfix kit and was hoping they would come out less furry, but instead, after staining the white thread black I was greeted with this abomination..
Needless to say I am less than impressed with the Airfix thread and now have to find some other source. I am going to the local fishing tackle shop today to see if they have any 0.6mm line I can use for the vertical lines and some 0.3 for the horizontal ones. Hopefully they will have braided line. Failing that I will just have to order from the www as the local LHS has very little thread.

phantom_phanatic309

#372

Member Since: March 10, 2010
entire network: 2,568 Posts
KitMaker Network: 126 Posts

Posted: Sunday, March 17, 2013 - 09:22 AM UTC
Fingers crossed you'll find what you need.
I've always been intrigued as to how that part of the rigging is constructed as it isn't knotted as I always believed.
I've always been intrigued as to how that part of the rigging is constructed as it isn't knotted as I always believed.

warreni
Member Since: August 14, 2007
entire network: 5,926 Posts
KitMaker Network: 271 Posts
Posted: Sunday, March 17, 2013 - 09:40 AM UTC
Quoted Text
Fingers crossed you'll find what you need.
I've always been intrigued as to how that part of the rigging is constructed as it isn't knotted as I always believed.
Airfix supply a very good jig for making the shrouds and some clear instructions that you need to read a few times. When you have put all the thread in place you paint it with liquid glue of some sort, I used PVA so I kept the flexibility in the lines, and it glues everything together.
This article may interest you..http://www.anmm.gov.au/webdata/resources/pdfs/endeavour/Signals94_pp02-11_Endeavourstandingrigging.pdf
Jessie_C
Member Since: September 03, 2009
entire network: 6,965 Posts
KitMaker Network: 609 Posts
Posted: Sunday, March 17, 2013 - 09:46 AM UTC
Have you tried running it very quickly over a candle flame? That may help to clear the fuzzies off. Then there's the beeswax trick to try.
warreni
Member Since: August 14, 2007
entire network: 5,926 Posts
KitMaker Network: 271 Posts
Posted: Sunday, March 17, 2013 - 09:55 AM UTC
I suppose it can't get any worse so I will give it a go.. 
Hope it doesn't go up in flames..
It is all good practice for my 1/100 Heller HMS Victory.. gulp!
Hope it doesn't go up in flames..
It is all good practice for my 1/100 Heller HMS Victory.. gulp!

North4003

Member Since: August 01, 2012
entire network: 960 Posts
KitMaker Network: 175 Posts
Posted: Sunday, March 17, 2013 - 02:42 PM UTC
The rigging for the HMS Endeavor was similar to what I went through with my relatively simple hand railing. I ended up using craft wire for the top railing and nylon thread for the cable on the bottom of each stanchion. I tied a loop of the nylon thread to each stanchion and then applied crazy glue to the posts. To attach the craft wire I first had to remove the green paint from the wire. Next I used clothespins on every other stanchion and super glued the open stanchions, repeating the process for the previously covered ones.
The turntable bridge was originally painted black but I repainted it primer gray after looking through some railway publications.
A base for the turntable was prepared from 3/8 plywood. It was primed with tan latex paint and a witness hole was drilled in the center for future powered drive-shaft installation.
The turntable ring was glued to the base with white craft glue.
The following photo essay shows the rest of the scenic construction.

Supplies used in the base scenic detailing.

The base painted with acrylic earth brown and burnt umber.

Half of the turntable ring ballasted, mat medium being added to the base.

Ballast application.

Alcohol used as a wetting agent to help spread the mat medium.

The weathered turntable is shown sitting on its completed base.
The turntable bridge was originally painted black but I repainted it primer gray after looking through some railway publications.
A base for the turntable was prepared from 3/8 plywood. It was primed with tan latex paint and a witness hole was drilled in the center for future powered drive-shaft installation.
The turntable ring was glued to the base with white craft glue.
The following photo essay shows the rest of the scenic construction.
Supplies used in the base scenic detailing.
The base painted with acrylic earth brown and burnt umber.
Half of the turntable ring ballasted, mat medium being added to the base.
Ballast application.
Alcohol used as a wetting agent to help spread the mat medium.
The weathered turntable is shown sitting on its completed base.

c4willy
#305

Member Since: February 01, 2006
entire network: 1,673 Posts
KitMaker Network: 35 Posts

Posted: Sunday, March 17, 2013 - 06:09 PM UTC
Nice work on the turntable and display base looks damn good! All we need now is a train! LOL

amegan
#243

Member Since: March 21, 2008
entire network: 996 Posts
KitMaker Network: 63 Posts

Posted: Monday, March 18, 2013 - 11:38 AM UTC
Warren try mercerised thread, should be available from good drapers, failing that silk embroidery thread
warreni
Member Since: August 14, 2007
entire network: 5,926 Posts
KitMaker Network: 271 Posts
Posted: Monday, March 18, 2013 - 01:06 PM UTC
Thanks Andrew,
Jessie_C
Member Since: September 03, 2009
entire network: 6,965 Posts
KitMaker Network: 609 Posts
Posted: Tuesday, March 19, 2013 - 09:19 AM UTC
Dip it in a good strong cup of tea to colour it into a proper rope colour.
warreni
Member Since: August 14, 2007
entire network: 5,926 Posts
KitMaker Network: 271 Posts
Posted: Tuesday, March 19, 2013 - 10:17 AM UTC
Quoted Text
Dip it in a good strong cup of tea to colour it into a proper rope colour.
The only problem with that is that polyester doesn't take dye very well..
The other problem is that I am doing standing rigging which was permanent and painted with nice, black tar..
But thanks for the input Jessie.

spacewolfdad
Member Since: May 23, 2010
entire network: 642 Posts
KitMaker Network: 43 Posts

Posted: Tuesday, March 19, 2013 - 11:14 AM UTC
Hi Warren,
You could give this firm a try, I have traded with them and they are reliable. Here is their selection of ropes...
http://www.jbmodel.eu/index.php?main_page=index&cPath=47_56
Hope this helps.
All the best,
Paul
You could give this firm a try, I have traded with them and they are reliable. Here is their selection of ropes...
http://www.jbmodel.eu/index.php?main_page=index&cPath=47_56
Hope this helps.
All the best,
Paul
warreni
Member Since: August 14, 2007
entire network: 5,926 Posts
KitMaker Network: 271 Posts
Posted: Tuesday, March 19, 2013 - 11:52 AM UTC
Quoted Text
Hi Warren,
You could give this firm a try, I have traded with them and they are reliable. Here is their selection of ropes...
http://www.jbmodel.eu/index.php?main_page=index&cPath=47_56
Hope this helps.
All the best,
Paul
Thanks heaps for that Paul.

Murdo

Member Since: May 25, 2005
entire network: 2,218 Posts
KitMaker Network: 760 Posts

Posted: Thursday, March 21, 2013 - 10:24 AM UTC
Hi all,
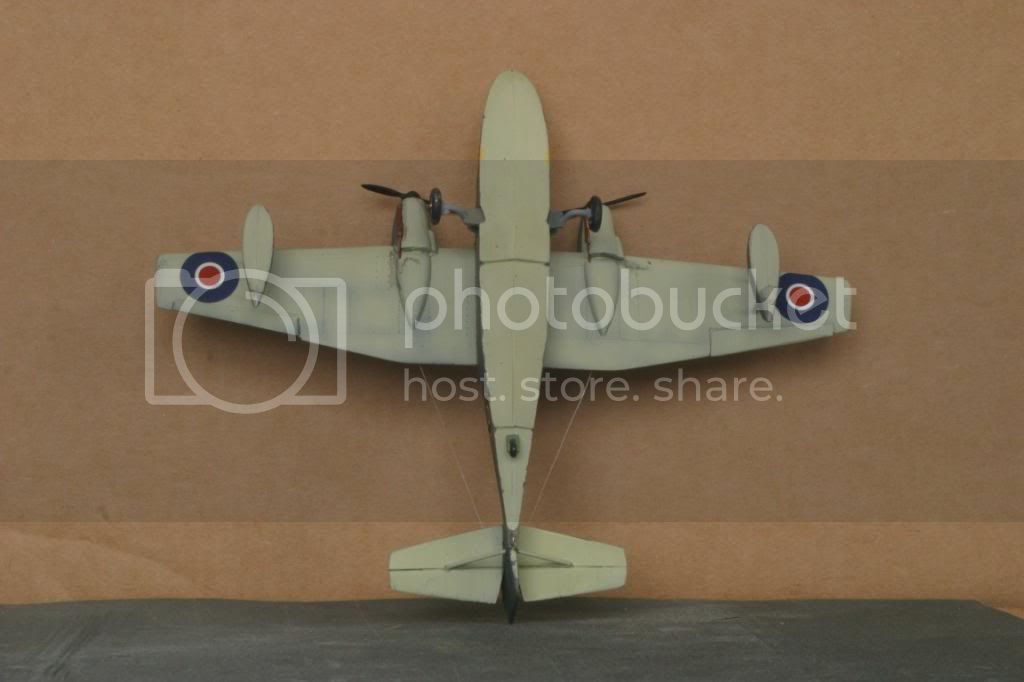
A quick update on the Gosling.
The hull or fuselage or whatever it's called on a flying boat went together well and I elevated myself to Advanced Modeller in pride.
I decided to prime the hull / fuselage so stuck some blue Tack on a stick and stuck it into the big gap where the wings would go on top. Sprayed the bottom and sides with Halford's grey primer then turned it over and sprayed the top... straight into the large gap where the stick was. This reduced my modelling status to what my eloquent fellow Scots would call "Dunderheid" level.
Having filled half the inside with primer the original side windows were a mess so I knocked them out and used Formula 560 Canopy glue to make new ones.

Then, once fully cured, touched them up with Klear - Cool, upped myself a grade (or two) to Mediocre Modeller... Wrong. Bad move, the windows turned into another mess as the Klear or Canopy glue crazed!

So, once again made new windows without putting Klear on them.
I then attached the wings. The kit float struts were in very poor shape and extremely fragile so I drilled holes in the floats, added some styrene rod which was sanded flush with the float. I then made new float struts from brass rod whish was fitted into hole in the styrene rod, angled correctly and glued in place. Sorry, not a geat picture:

The "output" type tubes on the fairing top were also a mess and one was almost completely missing so I had to make new ones from styrene. I also made styrene counterbalances for the elevators.
The Dark Slate Grey paint arrived on Tuesday and it's now been painted but I've no current pictures of it. However, it is in a much more advanced state than these ones show.
I'll get better and more (hopefully finished) pics this weekend.
A quick update on the Gosling.
The hull or fuselage or whatever it's called on a flying boat went together well and I elevated myself to Advanced Modeller in pride.
I decided to prime the hull / fuselage so stuck some blue Tack on a stick and stuck it into the big gap where the wings would go on top. Sprayed the bottom and sides with Halford's grey primer then turned it over and sprayed the top... straight into the large gap where the stick was. This reduced my modelling status to what my eloquent fellow Scots would call "Dunderheid" level.
Having filled half the inside with primer the original side windows were a mess so I knocked them out and used Formula 560 Canopy glue to make new ones.
Then, once fully cured, touched them up with Klear - Cool, upped myself a grade (or two) to Mediocre Modeller... Wrong. Bad move, the windows turned into another mess as the Klear or Canopy glue crazed!
So, once again made new windows without putting Klear on them.
I then attached the wings. The kit float struts were in very poor shape and extremely fragile so I drilled holes in the floats, added some styrene rod which was sanded flush with the float. I then made new float struts from brass rod whish was fitted into hole in the styrene rod, angled correctly and glued in place. Sorry, not a geat picture:
The "output" type tubes on the fairing top were also a mess and one was almost completely missing so I had to make new ones from styrene. I also made styrene counterbalances for the elevators.
The Dark Slate Grey paint arrived on Tuesday and it's now been painted but I've no current pictures of it. However, it is in a much more advanced state than these ones show.
I'll get better and more (hopefully finished) pics this weekend.
Jessie_C
Member Since: September 03, 2009
entire network: 6,965 Posts
KitMaker Network: 609 Posts
Posted: Thursday, March 21, 2013 - 10:44 AM UTC
Nice recovery It's always the self-inflicted modelling trials which are the worst.
With 10 days to go, the tension is mounting quickly. Still outstanding:
Mykroft: Brewster Buffalo
ianclasper: Space 1999 Eagle
phantom_phanatic309: 2001 Orion
firstcircle: HMS Daring
Warreni: HM Bark Endeavour
Murdo: Grumman Gosling
Nearly complete:
steph2102: Morris Cowley
North4003: Rail Turntable
When you finish, don't forget to post at least two images in the gallery.
It's always the self-inflicted modelling trials which are the worst.With 10 days to go, the tension is mounting quickly. Still outstanding:
Mykroft: Brewster Buffalo
ianclasper: Space 1999 Eagle
phantom_phanatic309: 2001 Orion
firstcircle: HMS Daring
Warreni: HM Bark Endeavour
Murdo: Grumman Gosling
Nearly complete:
steph2102: Morris Cowley
North4003: Rail Turntable
When you finish, don't forget to post at least two images in the gallery.
warreni
Member Since: August 14, 2007
entire network: 5,926 Posts
KitMaker Network: 271 Posts
Posted: Thursday, March 21, 2013 - 02:50 PM UTC
Quoted Text
Nice recovery
With 10 days to go, the tension is mounting quickly. Still outstanding:
Mykroft: Brewster Buffalo
ianclasper: Space 1999 Eagle
phantom_phanatic309: 2001 Orion
firstcircle: HMS Daring
Warreni: HM Bark Endeavour
Murdo: Grumman Gosling
Nearly complete:
steph2102: Morris Cowley
North4003: Rail Turntable
When you finish, don't forget to post at least two images in the gallery.
I already have the Ford in the mix Jessie and I will be waiting for a while for the rigging thread so don't worry about the Endeavour.
Cheers n beers
Warren
phantom_phanatic309
#372
Member Since: March 10, 2010
entire network: 2,568 Posts
KitMaker Network: 126 Posts
Posted: Friday, March 22, 2013 - 05:24 AM UTC
Just got a few spots of filler to sand back on the shuttle then its off to spraying. The nice easy colour scheme will help speed things along nicely.

md72
#439

Member Since: November 05, 2005
entire network: 4,950 Posts
KitMaker Network: 564 Posts

Posted: Friday, March 22, 2013 - 05:34 AM UTC
Don't give up on me yet! I'm all move in and ready to break out the modeling stuff this weekend. Need to reshoot the yellow wings and mask off for the stripes, figure out the walkways, decals and fiddly bits. There's hope. 


steph2102

Member Since: April 23, 2011
entire network: 735 Posts
KitMaker Network: 80 Posts

Posted: Friday, March 22, 2013 - 05:45 AM UTC
hello,
This weekend I will paint primer and Monday start red body and black chassis. if all go well, I should finish in time .
steph
This weekend I will paint primer and Monday start red body and black chassis. if all go well, I should finish in time .
steph
steph2102
Member Since: April 23, 2011
entire network: 735 Posts
KitMaker Network: 80 Posts
Posted: Saturday, March 23, 2013 - 05:19 AM UTC
hello,
rainy day, so I started painting
steph
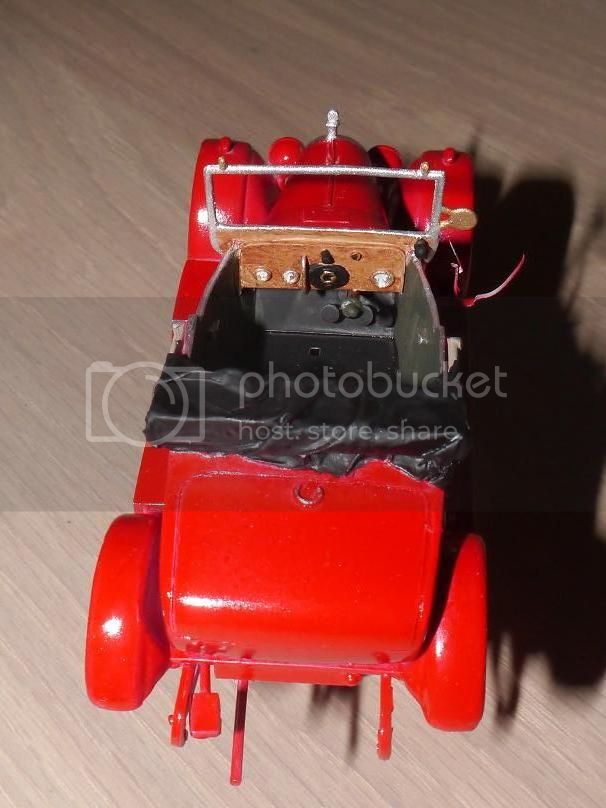

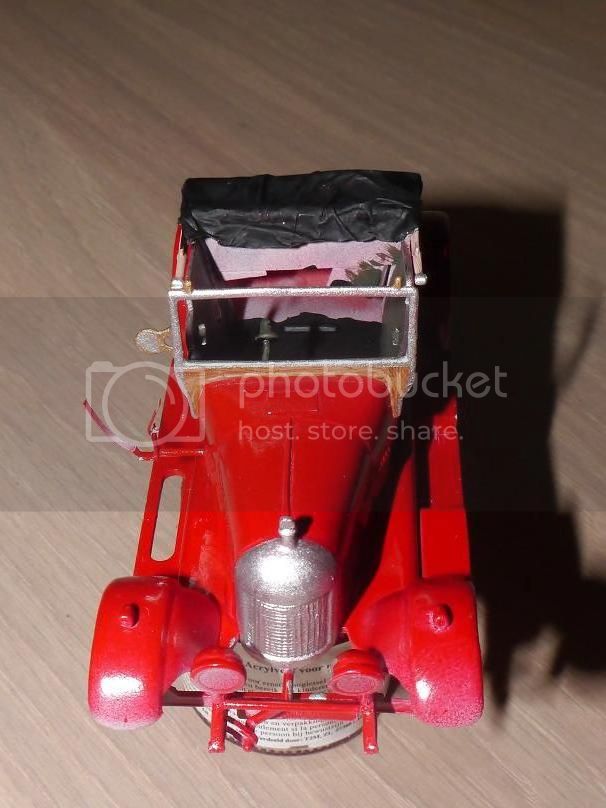
rainy day, so I started painting
steph
Murdo
Member Since: May 25, 2005
entire network: 2,218 Posts
KitMaker Network: 760 Posts
Posted: Saturday, March 23, 2013 - 05:33 AM UTC
The FAA Gosling is finally finished and pics uploaded to the campaign gallery. Thanks for running this Jessica, I enjoyed the speed build. I actually got a model finished for a change!
The pics:


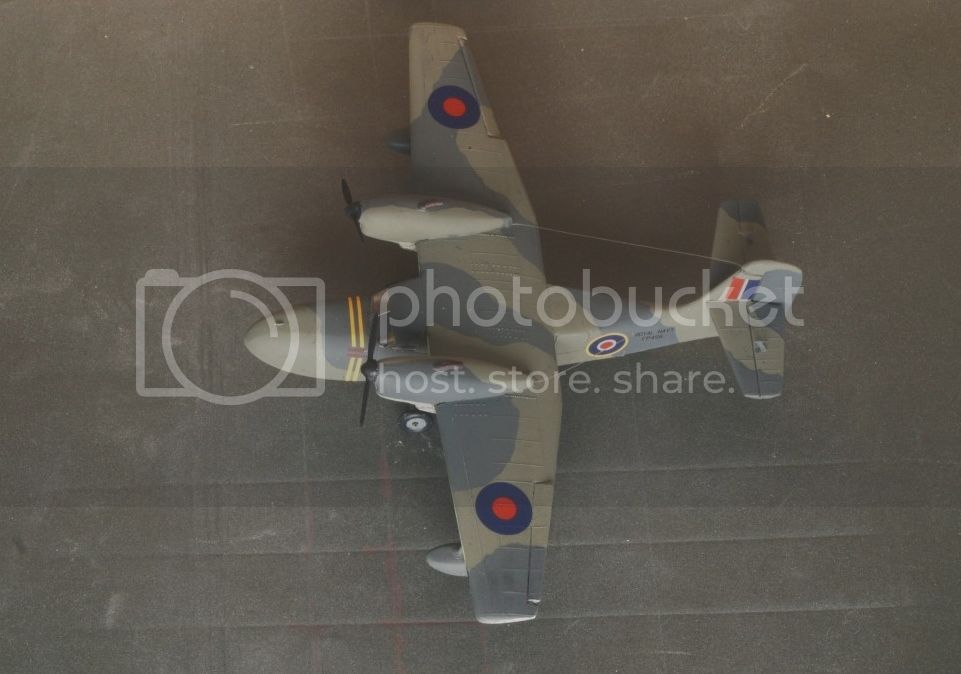
Decided to make a quick and rough (very rough) Dio with some tinfoil and black and grey Halfords spray primers. Once the primers were dry I put some white paint on a pad and just ran it across the "Wave" tops then added cotton wool spray.
For such a rough and ready dio I'm actually quite pleased with it and seas that colour are extremely common around Scotland.
"Going home":
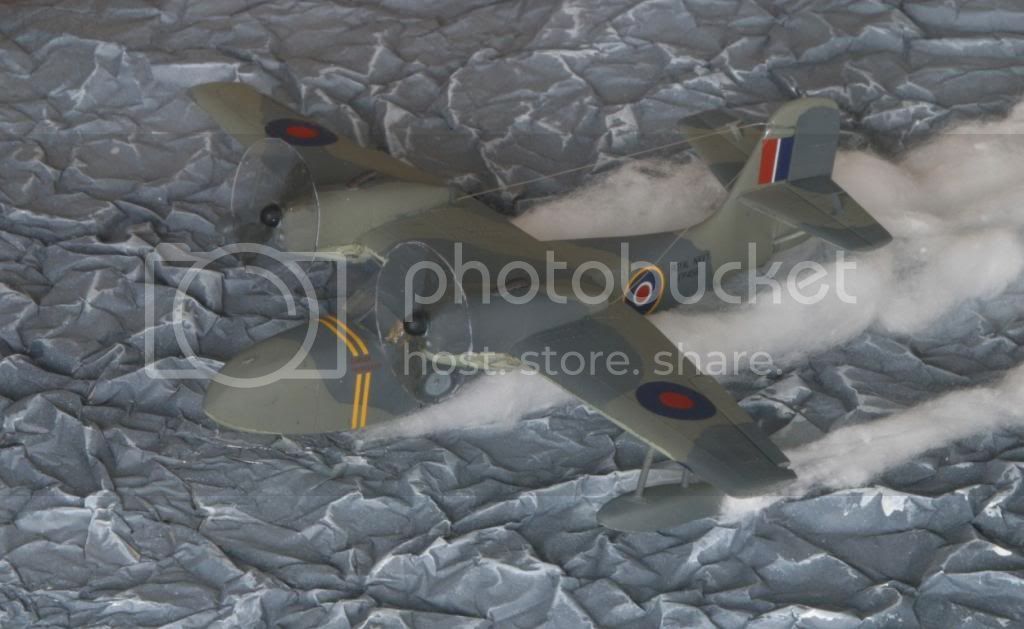
Hope you like it.
The pics:
Decided to make a quick and rough (very rough) Dio with some tinfoil and black and grey Halfords spray primers. Once the primers were dry I put some white paint on a pad and just ran it across the "Wave" tops then added cotton wool spray.
For such a rough and ready dio I'm actually quite pleased with it and seas that colour are extremely common around Scotland.
"Going home":
Hope you like it.

DaveCox

Member Since: January 11, 2003
entire network: 4,307 Posts
KitMaker Network: 788 Posts

Posted: Saturday, March 23, 2013 - 06:12 AM UTC
Looking very good there Murdo.
Steph, that Morris looks like it's going to be a little cracker as well!
Steph, that Morris looks like it's going to be a little cracker as well!

Murdo
Member Since: May 25, 2005
entire network: 2,218 Posts
KitMaker Network: 760 Posts
Posted: Saturday, March 23, 2013 - 07:32 AM UTC
Thanks Dave.
Actually... Just to show off, here's another ancient Airfix kit I finished in January.
This is the Airfix 1/72 Gazelle. A lovely wee kit but far from new and I first built one 30 or 40 years ago.
The cockpit has been tarted up a bit with scratchbuilt straps, pedals, rotor brake lever (red thing hanging down from the ceiling) dials and other bits 'n bobs.
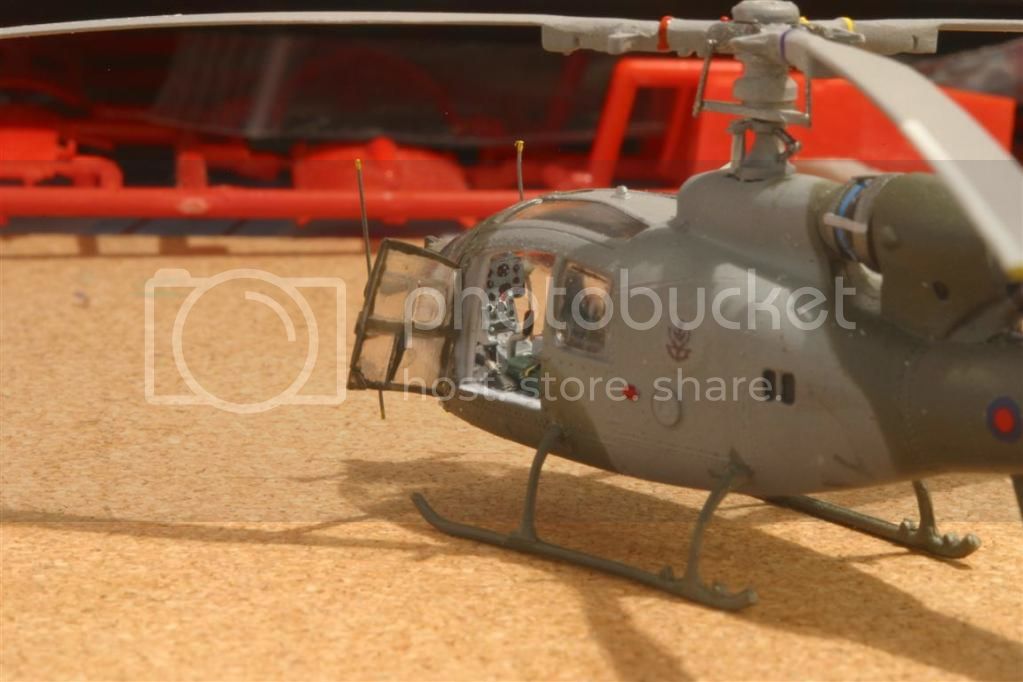
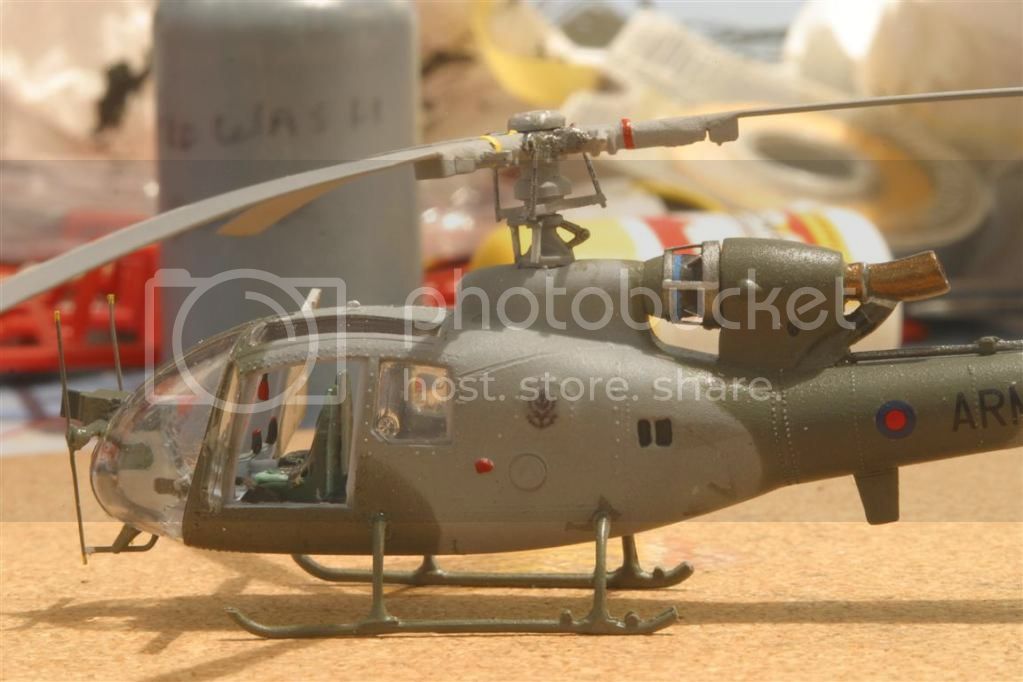
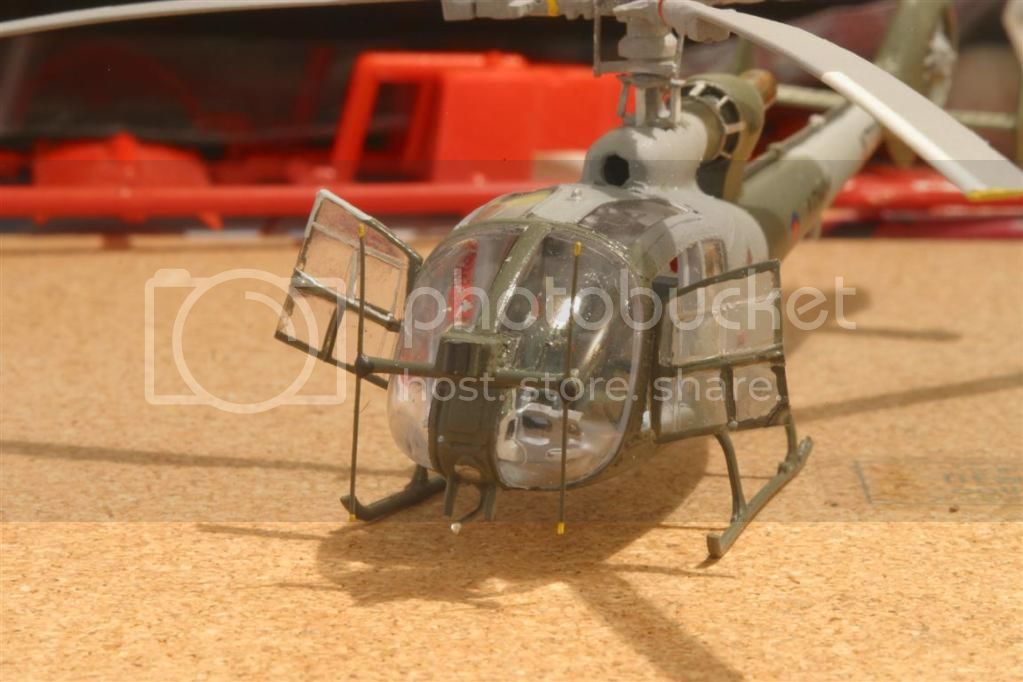
I also tarted up the engine, Pitot tube and front antennae which I added before painting and broke off about six times. Oh, and scratched the rotor mechanism.
The Regimental badge is a home-made decal - the heli has been "Tagged" by a certain Highland Infantry Regiment. Them Jocks are bad boys!
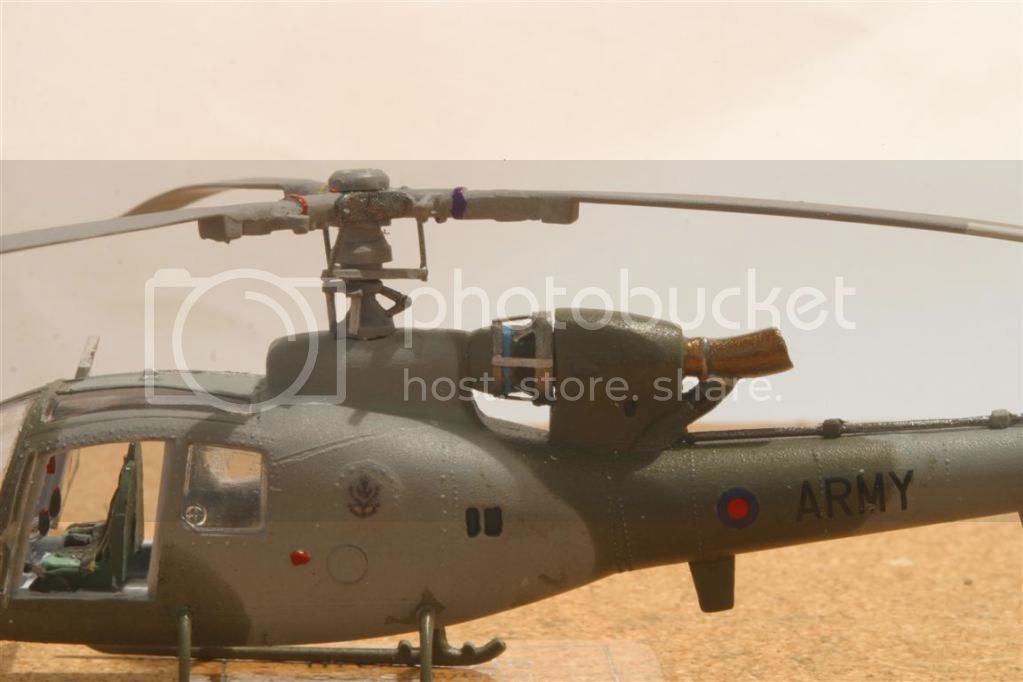
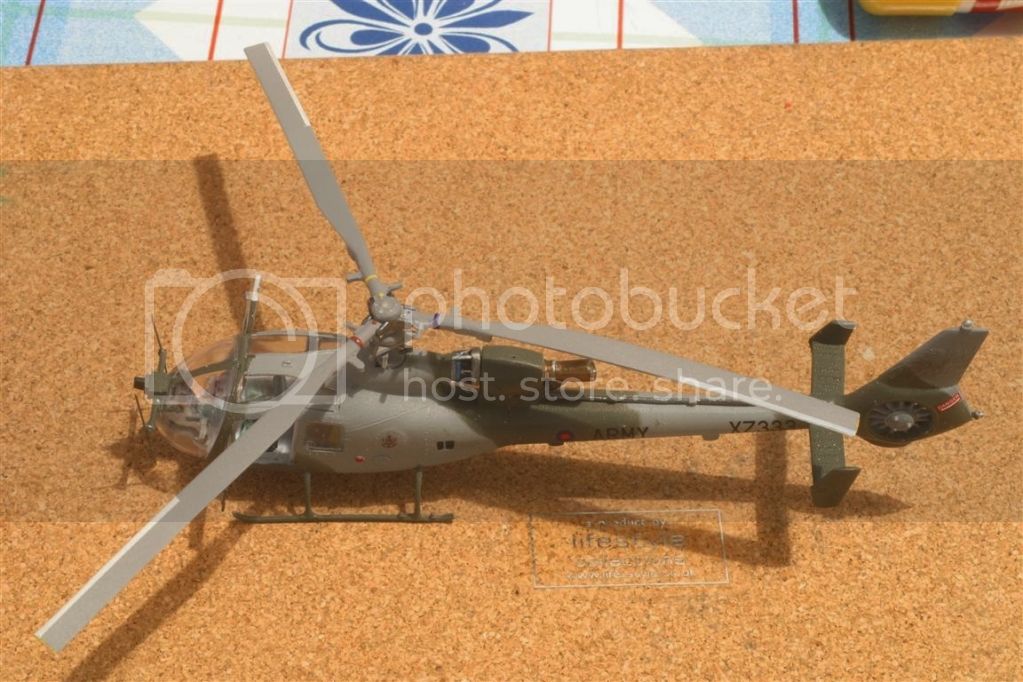
It's a very small model:
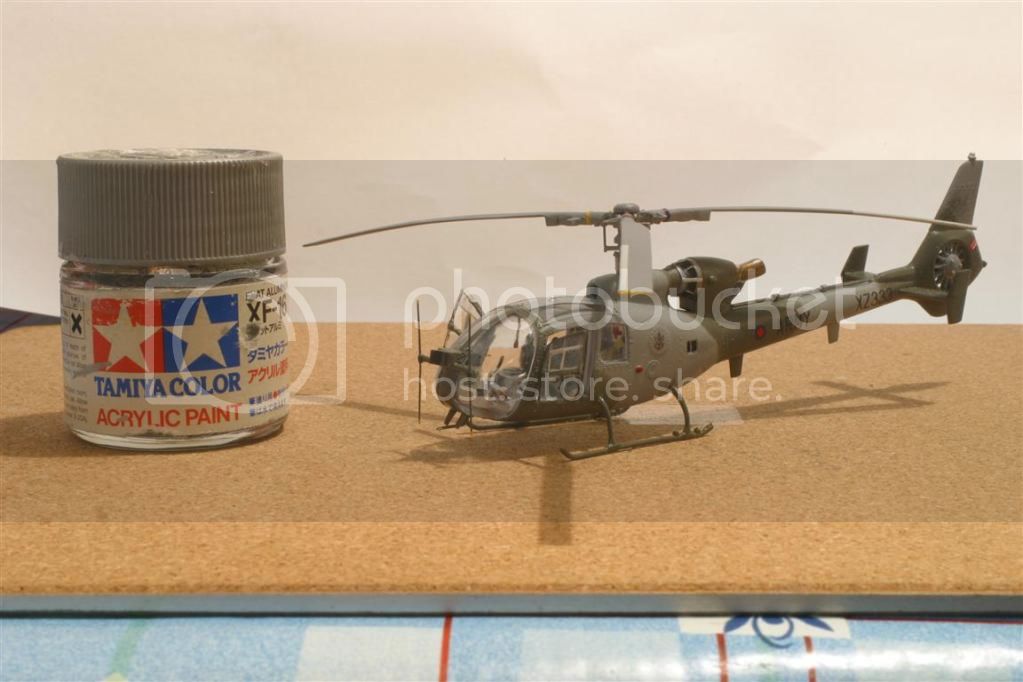
There's no AM stuff, all the extra bits 'n bobs are scratchbuilt.
Hope you like it.
Actually... Just to show off, here's another ancient Airfix kit I finished in January.
This is the Airfix 1/72 Gazelle. A lovely wee kit but far from new and I first built one 30 or 40 years ago.
The cockpit has been tarted up a bit with scratchbuilt straps, pedals, rotor brake lever (red thing hanging down from the ceiling) dials and other bits 'n bobs.
I also tarted up the engine, Pitot tube and front antennae which I added before painting and broke off about six times. Oh, and scratched the rotor mechanism.
The Regimental badge is a home-made decal - the heli has been "Tagged" by a certain Highland Infantry Regiment. Them Jocks are bad boys!
It's a very small model:
There's no AM stuff, all the extra bits 'n bobs are scratchbuilt.
Hope you like it.
 |

WEB HOSTING BY


Copyright ©2021 KitMaker Network and Kitmaker Network, a subsidiary of Silver Star Enterprises
All Rights Reserved. Please read our Conditions of Use and Privacy Policy.
All Rights Reserved. Please read our Conditions of Use and Privacy Policy.