Official EOD Campaign thread

#012
Wyoming, United States
Member Since: November 07, 2003
entire network: 3,098 Posts
KitMaker Network: 899 Posts
Posted: Thursday, September 30, 2010 - 02:42 AM UTC
Quoted Text
Lookin great Harv, some evil sidearms there, crossbow and crispifier !!
Thank you Damian, I appreciate your feedback.
Quoted Text
Harv, looks good. Real clean build so far. I like the propane burner. I guess it could pull double duty as a fish cooker as well.
Thank you, I appreciate it. I didn't have any idea that my scratchbuilt weed burner set up would be such a hit.
Quoted Text
It'd look great to have a suited up "officer" or two leaning against that sucker smoking a cigar or sharpening a knife or something.
I found what I thought were going to be some perfect figures to go along with my car at a local dollar store. So I bought two of them but when I got them home they were way too big to go along with the car. Oh well.
I should get my basic construction finished on the car this weekend. Then I will start denting it up and adding some blood and dirt.
Thanks again,
Harv

If any white man tries to destroy what is mine, or take what is mine, or take my lands, I will take my gun, get on my horse, and go punish him. Chief Low Dog - Oglala Sioux Chief
Florida, United States
Member Since: January 14, 2009
entire network: 2,798 Posts
KitMaker Network: 286 Posts
Posted: Monday, October 04, 2010 - 04:18 PM UTC
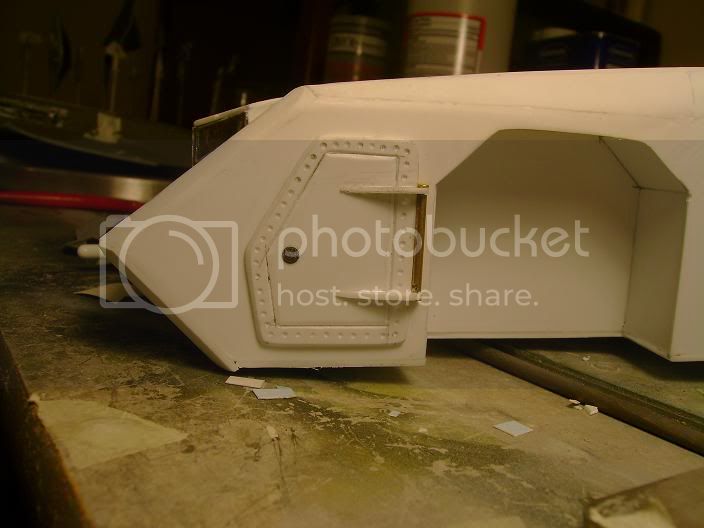
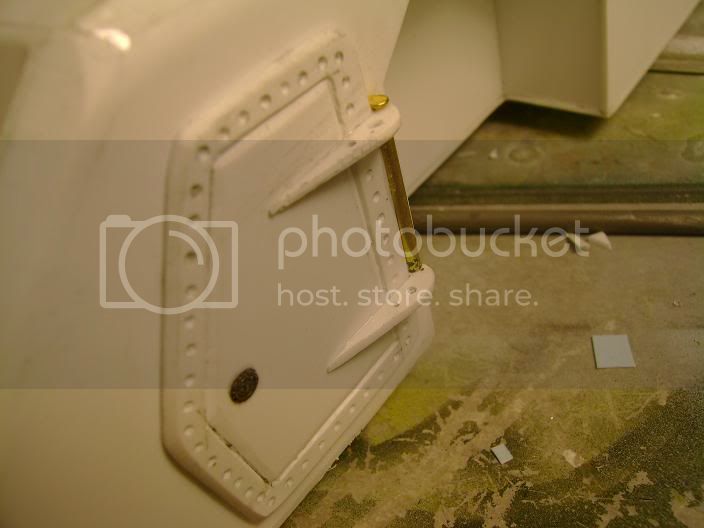
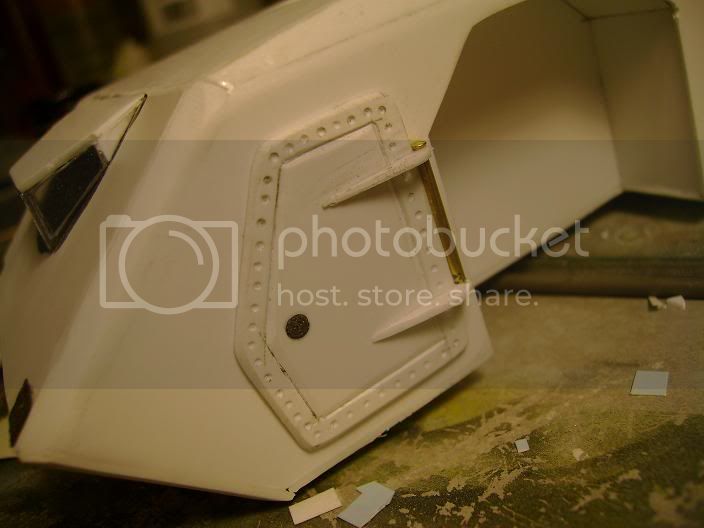
Just an update getting some doors done and playing with stretched sprue yes it's new to me so I've been trying to get it longer and longer

"From time to time, the tree of liberty must be watered with the blood of
tyrants and patriots."
- Thomas Jefferson
IPMS#47611
Texas, United States
Member Since: February 22, 2008
entire network: 5,026 Posts
KitMaker Network: 461 Posts
Posted: Monday, October 04, 2010 - 04:28 PM UTC
My Lindberg 1/24 Dodge Raminator arrived and my chassis problem has been solved for the 55 Ford and the MONSTER TIRES are awsome (photos later. I also played with my outrunner

RIP (Bob)
If it aint broke dont fix it.
#012
Wyoming, United States
Member Since: November 07, 2003
entire network: 3,098 Posts
KitMaker Network: 899 Posts
Posted: Tuesday, October 05, 2010 - 01:35 PM UTC
Here are a couple more in-progress photos of my project.
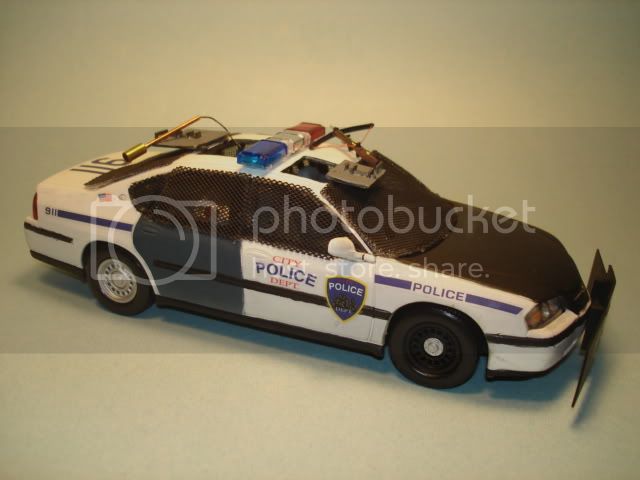
Not much progress other than I have everything assembled. The next step will be to start dirtying it up and adding some battle damage. I still need to paint the torch and then glue it and the crossbow in place.
I should have another in-progress photo to show soon.
Thanks for looking.
Harv
If any white man tries to destroy what is mine, or take what is mine, or take my lands, I will take my gun, get on my horse, and go punish him. Chief Low Dog - Oglala Sioux Chief
Texas, United States
Member Since: February 22, 2008
entire network: 5,026 Posts
KitMaker Network: 461 Posts
Posted: Tuesday, October 05, 2010 - 02:14 PM UTC
Randy, I am really impressed with your $1.75 garage kit was it

I need to get out more

to find the deals that you or is it your wife found? Anyway, what is the material that you used to cover the window I like it and the front plow/bumper looks functional

cant wait to see what else you have up your sleeve.
RIP (Bob)
If it aint broke dont fix it.
Florida, United States
Member Since: January 14, 2009
entire network: 2,798 Posts
KitMaker Network: 286 Posts
Posted: Tuesday, October 05, 2010 - 02:28 PM UTC
"From time to time, the tree of liberty must be watered with the blood of
tyrants and patriots."
- Thomas Jefferson
IPMS#47611
Texas, United States
Member Since: February 22, 2008
entire network: 5,026 Posts
KitMaker Network: 461 Posts
Posted: Tuesday, October 05, 2010 - 03:45 PM UTC
Nice doors and hinges there Justin. Do you work for a special effects company? Your build is looking more menacing with each photo
I may steal another of your ideas yet.

RIP (Bob)
If it aint broke dont fix it.
Alberta, Canada
Member Since: July 23, 2010
entire network: 786 Posts
KitMaker Network: 17 Posts
Posted: Wednesday, October 06, 2010 - 05:48 AM UTC
The Scavenger
finished the build on my truck. i call it The Scavenger and i used the Tamiya Quad Tractor as a base to start the scratchbuilding off of. here's some pics:


i have a running blog over at Armorama for my buddies over there for the diorama build part of this project. i have some
more pics over there if you want to check 'em out.
this campaign is showing some very creative work and it's going to be fun to see all the amazing finished pieces.
cheers, bd.
the opposite of courage in our society is not cowardice, it is conformity.
Florida, United States
Member Since: January 14, 2009
entire network: 2,798 Posts
KitMaker Network: 286 Posts
Posted: Wednesday, October 06, 2010 - 03:10 PM UTC
Very cool Sir like how you chopped the front end that makes it look mean
"From time to time, the tree of liberty must be watered with the blood of
tyrants and patriots."
- Thomas Jefferson
IPMS#47611
Texas, United States
Member Since: February 22, 2008
entire network: 5,026 Posts
KitMaker Network: 461 Posts
Posted: Wednesday, October 06, 2010 - 03:20 PM UTC
Bruce, that is impressive I like the squat look like a bulldog ready to give an account of itself.
RIP (Bob)
If it aint broke dont fix it.
Texas, United States
Member Since: February 22, 2008
entire network: 5,026 Posts
KitMaker Network: 461 Posts
Posted: Wednesday, October 06, 2010 - 04:03 PM UTC
Ok guy's feast your eyes on these photos:
1. Lindbergs 1/24 Dodge Raminator.

2. The lower part of the chrome moly tube frame and chassis that I will use on my command vehicle.

3. Bottom view:

4.Some MEAN TIRES!

5. A 1/35 Sherman on top of the chassis with the MEAN TIRES!!

6. Just a peek at what may be!

RIP (Bob)
If it aint broke dont fix it.
Florida, United States
Member Since: January 14, 2009
entire network: 2,798 Posts
KitMaker Network: 286 Posts
Posted: Wednesday, October 06, 2010 - 04:27 PM UTC
Now that's cool as hell I don't care who you are.have you named it yet?
"From time to time, the tree of liberty must be watered with the blood of
tyrants and patriots."
- Thomas Jefferson
IPMS#47611
Texas, United States
Member Since: February 22, 2008
entire network: 5,026 Posts
KitMaker Network: 461 Posts
Posted: Wednesday, October 06, 2010 - 04:38 PM UTC
I dont what to name it but I did work on my scout vehicle and will use those Justin wheels. I did a little more tinkering and made room for the engine giving the little guy a snout. I will post some photos soon.
RIP (Bob)
If it aint broke dont fix it.
South Carolina, United States
Member Since: December 03, 2009
entire network: 2,160 Posts
KitMaker Network: 123 Posts
Posted: Friday, October 08, 2010 - 07:06 AM UTC
Bruce, nice use of that Quad tractor. I actually thought about using that chassis but opted for the halftrack due to larger cargo space. Really neat looking profile.
Bigrip, The exposed frame really gives it a mean look. When in doubt over a vehicle name for my post apocalyptic vehicles I go for the catchy chauvinistic route. "Brown Sugar" is probably what I'm going with for my track. Have to keep it tasteful though...it is a company vehicle. Not sure about my scout Mutt.
Texas, United States
Member Since: February 22, 2008
entire network: 5,026 Posts
KitMaker Network: 461 Posts
Posted: Friday, October 08, 2010 - 07:19 AM UTC
Hey GAB, I like the name MUTT' but since you took it I will have to come up with two (2) others for the dear ones on my work table.
Bob
If it aint broke dont fix it.
#012
Wyoming, United States
Member Since: November 07, 2003
entire network: 3,098 Posts
KitMaker Network: 899 Posts
Posted: Friday, October 08, 2010 - 02:26 PM UTC
Quoted Text
Randy, I am really impressed with your $1.75 garage kit was it I need to get out more to find the deals that you or is it your wife found? Anyway, what is the material that you used to cover the window I like it and the front plow/bumper looks functional cant wait to see what else you have up your sleeve.
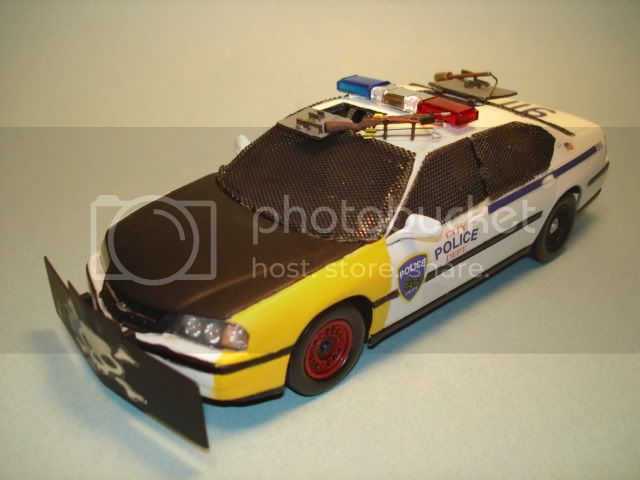
Thank you Bob, I appreciate the comments. Actually I ended up not using the kit pieces my wife found at a garage sale. I bought the police car from Squadron. I still might rob a few pieces from the garage sale stuff and add them to my car. The material over the windows is mesh from a frying pan cover that I bought at Wal-Mart. There were actually two of them in the set and I paid around $6.00 for them. I just cut the mesh from the cover and then cut it into the shapes I wanted. It worked out great and the mesh was easy to cut and to form.
Thank you Justin, I appreciate the comment.
Thanks again guys, Both of your projects are looking cool.
Harv
If any white man tries to destroy what is mine, or take what is mine, or take my lands, I will take my gun, get on my horse, and go punish him. Chief Low Dog - Oglala Sioux Chief
South Carolina, United States
Member Since: December 03, 2009
entire network: 2,160 Posts
KitMaker Network: 123 Posts
Posted: Friday, October 08, 2010 - 07:10 PM UTC
Bigrip, consider the name "Mutt" as up for grabs. My Mutt is a Ford M151a MUTT. I'm probably going to give it a woman's name or Skeeter or something to play off of Brown Sugar. I'll have to check the old decal collection.
Bob, I'm using the plastic mesh from a bag for russet potatoes to cover my windows. It's loose enough so you can see through it to see the interior. There is also stuff that scales right for 1/35 chainlink fence. Mine came in a gift basket so I don't have a source. You could also try a mesh screen repair kit....like for window or door screens.
Alberta, Canada
Member Since: July 23, 2010
entire network: 786 Posts
KitMaker Network: 17 Posts
Posted: Sunday, October 10, 2010 - 04:46 AM UTC
thanks guys, it sure is fun to get back into the hobby and have a crew of fellows who want to build crazy things from scratch.
i gave the Scavenger a disruptor/dazzle pattern camo and now it's being geared up for some major weathering:


cheers for now, bd
the opposite of courage in our society is not cowardice, it is conformity.
Texas, United States
Member Since: February 22, 2008
entire network: 5,026 Posts
KitMaker Network: 461 Posts
Posted: Sunday, October 10, 2010 - 05:45 AM UTC
Bruce, tha camo is impressive and has given me some nightmares. I have not thought that far ahead to visualize my builds color. Any way I like your vehicle it looks like fun to ride in.
Bob
If it aint broke dont fix it.
Alberta, Canada
Member Since: July 23, 2010
entire network: 786 Posts
KitMaker Network: 17 Posts
Posted: Sunday, October 10, 2010 - 07:58 AM UTC
i think it works out to 1 hour of masking for every 1 minute of airbrushing... i believe it was about 6 minutes of airbrushing total with about 6 hrs of masking/planning.
shame, because i think much will be covered during the weathering but it was a good exercise in digital camo pattern work for future projects.
cheers, bd.
the opposite of courage in our society is not cowardice, it is conformity.
Alberta, Canada
Member Since: March 08, 2009
entire network: 394 Posts
KitMaker Network: 21 Posts
Posted: Sunday, October 10, 2010 - 07:59 AM UTC
Bruce
I'm really liking the camo job on your project. Well done!!!
I've been thought-processing idea's for a camo job on my vehicle too. Mostly, I think it is just for aesthetic reasons, because I can't see a zombie understanding the difference between camo and pink polkadots. I might just go with a winter type scheme of whitewash.
Anyway, your vehicle looks brilliant. Are you putting guns on it?
Guy
Current Projects: 1/144 R5D-3 (MiniCraft)
1/48 Ford Flivver (Williams Bro.)
1/72 UC-64A Norseman (MatchBox)
MAAC No.51187
IPMS CANADA No. 3369
Texas, United States
Member Since: February 22, 2008
entire network: 5,026 Posts
KitMaker Network: 461 Posts
Posted: Sunday, October 10, 2010 - 09:51 AM UTC
After viewing Bruce's fantastic camo scheme I am jelous of his talent

but the thought of a nice and shiny pickup just did no appeal to me for my (2) builds so when I came across the ad in micromark tools for a product called "Rust and Dust" I just fell in love with it. My vehicles will be old rust buckets.

@ GAB & jUSTIN: I christened my scout/outrunner "TINKER BELL" and the command vehicle "CAPTAIN HOOK"
Bob
If it aint broke dont fix it.
Alberta, Canada
Member Since: July 23, 2010
entire network: 786 Posts
KitMaker Network: 17 Posts
Posted: Sunday, October 10, 2010 - 10:30 AM UTC
i was thinking of a huge gun mount but the idea i planned has two figures having some mean looking weapons for themselves so i thought a big gun on the truck might make their firearms look wussy.
thanks for the kind words on the camo, hope some will still show after the rust from acid rains is applied. and hello to my fellow Albertan, Guy. cheers, bd.
the opposite of courage in our society is not cowardice, it is conformity.
Florida, United States
Member Since: January 14, 2009
entire network: 2,798 Posts
KitMaker Network: 286 Posts
Posted: Sunday, October 10, 2010 - 01:19 PM UTC
when I am finished with the "hell wagon" I recived this yesterday as my second donar car for my "Widow Maker"
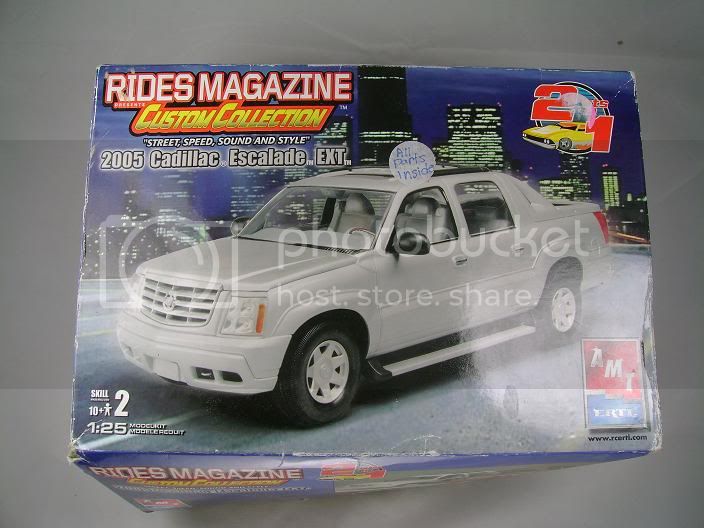

Killing Zombies in style
"From time to time, the tree of liberty must be watered with the blood of
tyrants and patriots."
- Thomas Jefferson
IPMS#47611
AussieReg
 Associate Editor
#007
Victoria, Australia
Member Since: June 09, 2009
entire network: 8,156 Posts
KitMaker Network: 593 Posts
Posted: Sunday, October 10, 2010 - 02:03 PM UTC
Well it's time I contributed something of substance to this Campaign, so here's a few pics of the start of stage 1 for me, a GAZ 66 which has become GAZOMBIE 666.


The fuel tanks have been relocated into the cargo area, and I will cut the side frames back to the first post and create a mesh cage to protect them.

This will be the fun part, these goodies are going to become a supercharged quad barrel flame thrower turret that will be mounted on a raised frame over the wheel arches in the cargo area. The barrels are Q-tip shafts, and the capacitors and diodes are from a burnt out PCB from a hydronic boiler. These will become napalm tanks and assorted valves and "gizmology" for the turret.
Any and all comments and suggestions gratefully received.
Cheers, D
ON the bench
Revell 1/24 '53 Corvette (building as '54)
Revell 1/24 BMW 507 Coupe and Cabrio
Italeri 1/48 Me262 B-1a/U1 Nightfighter
Monogram 1/24 '57 Chevy Nomad
Dragon 1/350 USS Frank Knox DD-742