

 I knew the pose I wanted - he's on patrol and has been alerted to a sound or something and is reacting/turning/raising weapons and worked from there ;0)
Scratchbuilders!
Built a model or part from your own materials lately?
Built a model or part from your own materials lately?
Hosted by Mike Kirchoff
Official EOD Campaign thread

DickyF

Member Since: February 01, 2010
entire network: 54 Posts
KitMaker Network: 29 Posts
Posted: Tuesday, October 25, 2011 - 10:43 AM UTC
Erm no Adam .... I don't do plans, just worked it as I went - just sort of comes to me I knew the pose I wanted - he's on patrol and has been alerted to a sound or something and is reacting/turning/raising weapons and worked from there ;0)
I knew the pose I wanted - he's on patrol and has been alerted to a sound or something and is reacting/turning/raising weapons and worked from there ;0)
adamsmasher

Member Since: June 27, 2009
entire network: 192 Posts
KitMaker Network: 135 Posts
Posted: Tuesday, October 25, 2011 - 11:04 AM UTC
That's the same way I work; just figure it out as I go.  I've actually got a bipedal walker I've been working on, but the level of detail is no where near what you have (although I did finally pick up some small rods so I can make rivets).
I've actually got a bipedal walker I've been working on, but the level of detail is no where near what you have (although I did finally pick up some small rods so I can make rivets).
phantom_phanatic309

#372

Member Since: March 10, 2010
entire network: 2,568 Posts
KitMaker Network: 126 Posts

Posted: Tuesday, October 25, 2011 - 11:39 AM UTC
Some fantastic builds going on here!
What's the deadline? I'm afraid that with starting a new job and my girlfriends insistance that I finish the airfix Valiant she bought (like I need a reason to build it anyway?) I've barely started my nuclear winter E-type Jag. Have to see what I can do the next week or so.
What's the deadline? I'm afraid that with starting a new job and my girlfriends insistance that I finish the airfix Valiant she bought (like I need a reason to build it anyway?) I've barely started my nuclear winter E-type Jag. Have to see what I can do the next week or so.

adamsmasher
Member Since: June 27, 2009
entire network: 192 Posts
KitMaker Network: 135 Posts
Posted: Tuesday, October 25, 2011 - 12:18 PM UTC
@stephen The deadline was extended to Dec 31st so you might yet still have time.
phantom_phanatic309
#372
Member Since: March 10, 2010
entire network: 2,568 Posts
KitMaker Network: 126 Posts
Posted: Tuesday, October 25, 2011 - 11:25 PM UTC
Cool. Its avery old and simple kit so I might be able to do something with it in time.
DickyF
Member Since: February 01, 2010
entire network: 54 Posts
KitMaker Network: 29 Posts
Posted: Wednesday, October 26, 2011 - 05:45 AM UTC
Looking forward to seeing more great campaign builds here
Robot progress.....
Left arm had to be a flamethrower eh? Started with the business end shroud.

Made up the body including underslung igniter and fitted the shroud:

Then it was the left upper arm and 'thrower bracket:

Left shoulder joint - was going for a tubular steel frame with internal hosing and wiring:

Here's a mock-up with the completed torso fitted to the legs - I temporarily fitted discs for the feet until I was ready to attcah it to the base:

The completed left arm with fuel tanks and mounts:

That's all for now..as ever all comments and Q's welcomed
Dicky
DickyF
Member Since: February 01, 2010
entire network: 54 Posts
KitMaker Network: 29 Posts
Posted: Thursday, October 27, 2011 - 06:06 AM UTC
Last stretch.......
Attached the fuel tanks to the left arm and plumbed it in to the 'thrower:

Left arm in postion:

Made up the head unit and shoulder mounted smoke dischargers:

and plumbed it in (viewed from above):

So, build completeI applied some Mr Surfacer 500 to the plate sections and I set the sub assemblies aside to dry.....

Next, the base and paint........
DickyF
Member Since: February 01, 2010
entire network: 54 Posts
KitMaker Network: 29 Posts
Posted: Monday, October 31, 2011 - 06:09 AM UTC
Made up a base from 2 sheets of 2.0mm sheet laminated together - top sheet was cut into 'slabs' and detailed with styrene and scrap from the bits box:

Then primed everything:


And here's the final piece; Coloured, washed, minor chipping added and some random spare decals:


Hope you like it
ATVB
Dick

Then primed everything:


And here's the final piece; Coloured, washed, minor chipping added and some random spare decals:


Hope you like it
ATVB
Dick

17741907

Member Since: December 05, 2007
entire network: 953 Posts
KitMaker Network: 50 Posts

Posted: Monday, October 31, 2011 - 11:55 AM UTC
Looking awesome Richard...Great work...Well done...

DickyF
Member Since: February 01, 2010
entire network: 54 Posts
KitMaker Network: 29 Posts
Posted: Tuesday, November 01, 2011 - 04:56 AM UTC
Hi Hakan - thanks very much glad you liked it - it was a fun project between 'serious' builds and I'm just glad I found this great campaign thread in which to post it.
As you can no doubt appreciate it's nice to build something now and again without refs and plans and more importantly.......... use theose offcuts that us scratchbuilders always keep!!!!
All the best
Dicky
As you can no doubt appreciate it's nice to build something now and again without refs and plans and more importantly.......... use theose offcuts that us scratchbuilders always keep!!!!
All the best
Dicky

Bluestab
Member Since: December 03, 2009
entire network: 2,160 Posts
KitMaker Network: 123 Posts
Posted: Wednesday, November 23, 2011 - 08:14 AM UTC
With the deadline extended it looks like I'll have my scout Mutt and recovery track both finished. I'm glad I'll be able to put my original concept vehicles up as well as their replacement...the Pibber boat. I should have the wrecker done in the next few days. I have been taking photos of the progress and should have some of them up soon. I know...I'm horrible about the picture thing.
@Richard, very nice. Wonderful detail throughout. And I love the paint scheme. .
@Richard, very nice. Wonderful detail throughout. And I love the paint scheme. .

Keeperofsouls2099
Member Since: January 14, 2009
entire network: 2,798 Posts
KitMaker Network: 286 Posts
Posted: Wednesday, November 23, 2011 - 10:45 AM UTC
Good job sir great work


AussieReg

#007

Member Since: June 09, 2009
entire network: 8,156 Posts
KitMaker Network: 593 Posts
Posted: Saturday, December 24, 2011 - 10:28 PM UTC
Merry Christmas all you mad zombie slayers !
Ok, I hate the fact that this magnificent Campaign has gone off the rails in the absence of our illustrious leader, so here's my idea.
I'm offering to take over the reins as Campaign Leader (yes, I know I will never live up to the standards set by VonCuda, but I will do my bestest), and I am suggesting that we extend this madness by another 6 months. I will get really busy with promoting the Campaign every few days, and try to get it back to the activity levels it had in the beginning.
Please let me know what you all think.
Cheers, D

adamsmasher
Member Since: June 27, 2009
entire network: 192 Posts
KitMaker Network: 135 Posts
Posted: Sunday, December 25, 2011 - 04:02 AM UTC
Quoted Text
Merry Christmas all you mad zombie slayers !
Ok, I hate the fact that this magnificent Campaign has gone off the rails in the absence of our illustrious leader, so here's my idea.
I'm offering to take over the reins as Campaign Leader (yes, I know I will never live up to the standards set by VonCuda, but I will do my bestest), and I am suggesting that we extend this madness by another 6 months. I will get really busy with promoting the Campaign every few days, and try to get it back to the activity levels it had in the beginning.
Please let me know what you all think.
Cheers, D
This all fine with me! I think if and when Hermon returns he would be glad that you took over. Lead away grandmaster D.
Merry Xmas, everyone!

Bluestab
Member Since: December 03, 2009
entire network: 2,160 Posts
KitMaker Network: 123 Posts
Posted: Monday, December 26, 2011 - 07:15 AM UTC
I'm fine with whatever you want to do.
With the end date fast-approaching I was getting worried. I have my pics for all of mine done and ready to post. I have my boat, my halftrack wrecker, and my scout Mutt all done. Added time doesn't do much for me, but I'm sure some of the MIA enlistees might want it. About the only thing I could do is to try to take some better pictures of the models for the campaign gallery.
I used the last extension to do the halftrack and scout vehicles. Those were part of my original idea before I shifted to the boat...which I still am not thrilled about. The boat will actually be getting an overhaul later on down the road.
Howabout another extension of the existing campaign to make sure everyone has their projects in and uploaded to the gallery. Not six months, but maybe a month or two give those that joined time to wrap things up and get their stuff uploaded.
Maybe in a few months we can start an EOD 2. I know I have a head full of ideas for more futuristic death and destruction...some of which from the non-human perspective. That said, whatever you decide is fine with me though.
Bluestab
Member Since: December 03, 2009
entire network: 2,160 Posts
KitMaker Network: 123 Posts
Posted: Tuesday, December 27, 2011 - 10:30 AM UTC
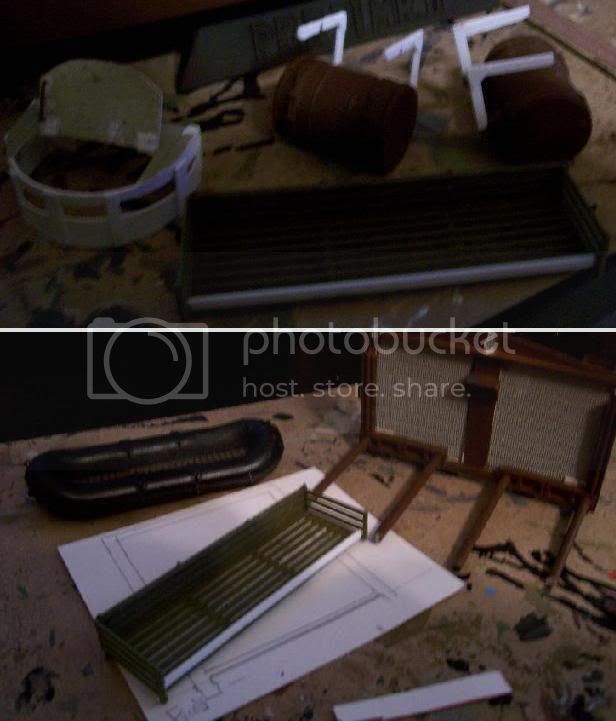
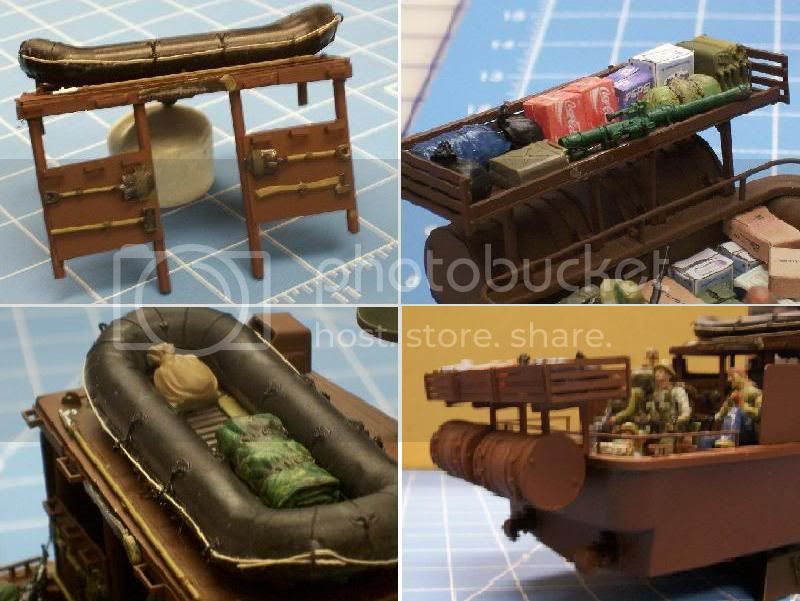
First up is the boat. I'll start with the last under construction pictures I have. I lost a good chunk of my build pictures. The two below are the build pictures of the rear stowage rack, auxillery fuel tank brackets, and an infatable boat taken from the Dragon German kit. I figured you need added stowage space, added range, and helptransferring some items from ship to shore (and vice versa). Besides, no one likes zombie hunting in soggy trousers. There's also the turret addition and an early view of the new cabin.
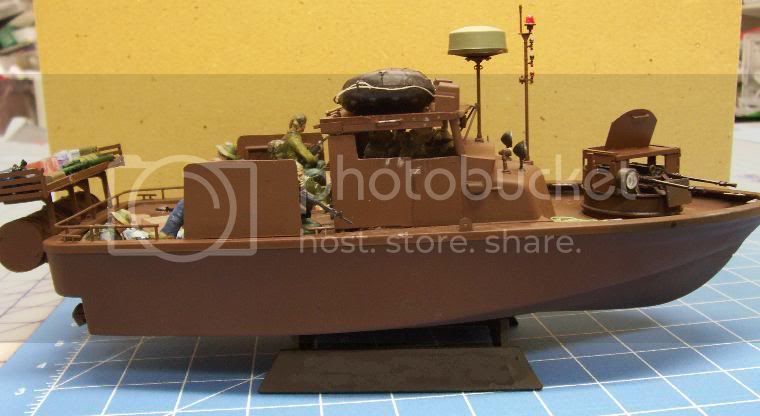
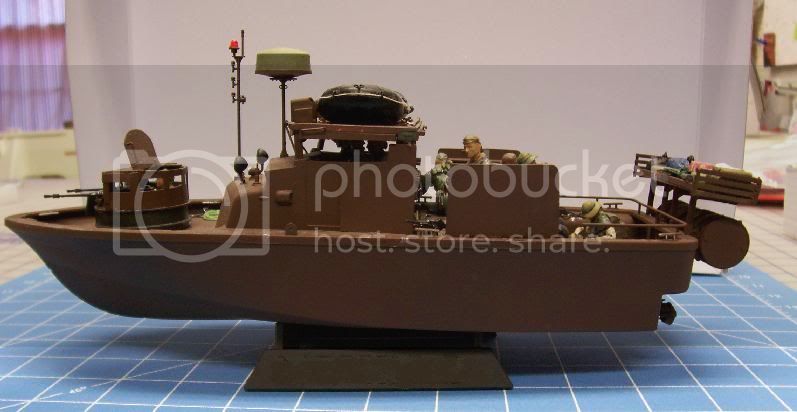
Next, we have both side views.
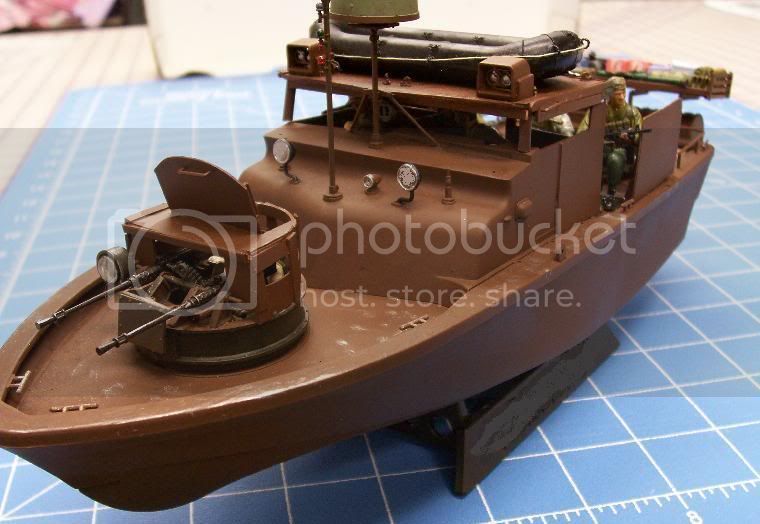
Front angle. You'll notice the kit front turret was reworked to provide the gunner with added protection.
Next, we have both side views.
Front angle. You'll notice the kit front turret was reworked to provide the gunner with added protection.
AussieReg
#007
Member Since: June 09, 2009
entire network: 8,156 Posts
KitMaker Network: 593 Posts
Posted: Tuesday, December 27, 2011 - 10:43 AM UTC
Very nice work on the boat Gab, some really neat additions with the inlatable, stowage and tanks. I'm looking forward to seeing your other builds as well.
I agree about the prospect of EOD2, I'm sure EOD1 has stirred up some ideas and interest that will need to put into action down the track.
Phase 1 is complete, I am now officially Campaign Leader, and I have asked for an extension on the finish date, so we will see how that goes.
As for my build, my GAZ just needs some paint and detailing/weathering, so I will get some pics up soon.
Who else is with us now ? Any in-progress builds to share ? WIll anybody dive in if we get an extension? Let's get this back up and running and give Hermon something to be proud of when he returns.
Cheers, D
Bluestab
Member Since: December 03, 2009
entire network: 2,160 Posts
KitMaker Network: 123 Posts
Posted: Tuesday, December 27, 2011 - 10:50 AM UTC
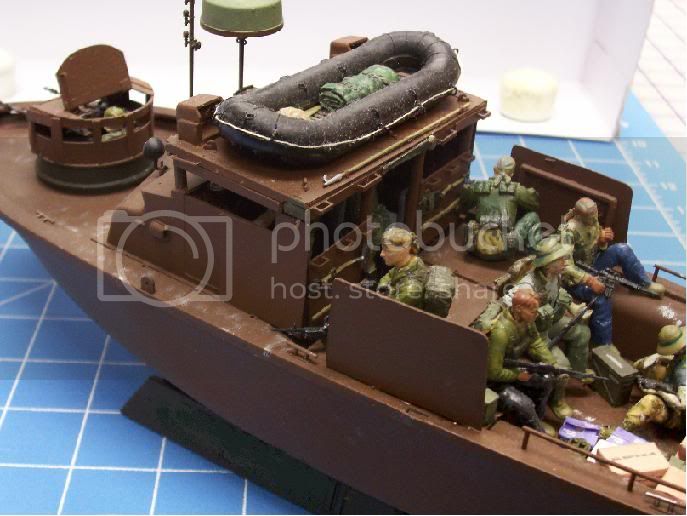
Now a couple of rear-ish views.
I went with the open rear for height reasons. Plus, it looked really top heavy. When I redo the design later, I'll go with a more enclosed look like a dreadnaught. This one is more for speed, scouting, and insertions. I figured they wouldn't need a lot of protection against land-bound zombies and the occassional brigand so I opted for side shields to protect the crew.
The hardened cabin has the rubber boat on top as well as some pioneering tools fixed to the rear. The cabin was made of plastic stock on a spure tube frame. I was going to put mesh style window flaps but decided against it.
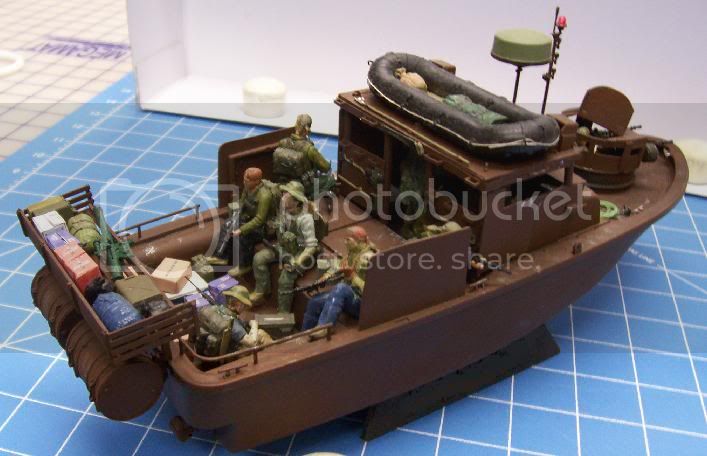
Time to go topless. You can see some added detail as well as the vessel's capatin, first mate, and the "away-team" leader.
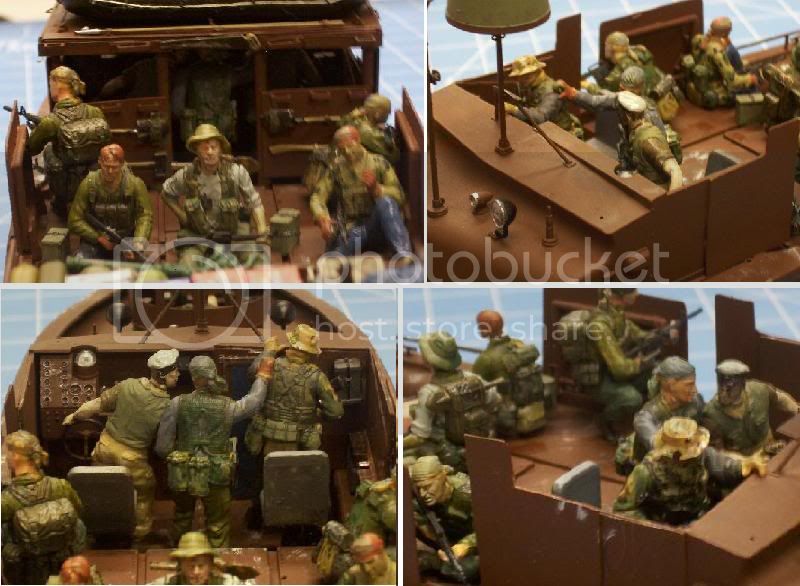
More close-ups on various sections of the vessel.
Okay that's all for the boat. Not my best work. It was a fun build though once I settled on a design. I appologize about the missing build pictures. That last two build pictures were actually taken on my phone, otherwise there wouldn't have been any newer ones.
I'll put the halftrack and Mutt pics up later tonight or tomorrow.
I went with the open rear for height reasons. Plus, it looked really top heavy. When I redo the design later, I'll go with a more enclosed look like a dreadnaught. This one is more for speed, scouting, and insertions. I figured they wouldn't need a lot of protection against land-bound zombies and the occassional brigand so I opted for side shields to protect the crew.
The hardened cabin has the rubber boat on top as well as some pioneering tools fixed to the rear. The cabin was made of plastic stock on a spure tube frame. I was going to put mesh style window flaps but decided against it.
Time to go topless. You can see some added detail as well as the vessel's capatin, first mate, and the "away-team" leader.
More close-ups on various sections of the vessel.
Okay that's all for the boat. Not my best work. It was a fun build though once I settled on a design. I appologize about the missing build pictures. That last two build pictures were actually taken on my phone, otherwise there wouldn't have been any newer ones.
I'll put the halftrack and Mutt pics up later tonight or tomorrow.
17741907
Member Since: December 05, 2007
entire network: 953 Posts
KitMaker Network: 50 Posts
Posted: Tuesday, December 27, 2011 - 12:18 PM UTC
Looking awesome GAB....I like it very much.... 
Bluestab
Member Since: December 03, 2009
entire network: 2,160 Posts
KitMaker Network: 123 Posts
Posted: Wednesday, December 28, 2011 - 09:45 AM UTC
@Damian, Has anyone heard from Hermon?
@Hakan, Thank you.
@Hakan, Thank you.
Bluestab
Member Since: December 03, 2009
entire network: 2,160 Posts
KitMaker Network: 123 Posts
Posted: Wednesday, December 28, 2011 - 10:22 AM UTC
Okay the second stage of this is a scout vehicle based on the Tamiya Mutt and a Halftrack hauler based on the Tamiya M3 Halftrack. I didn't do any figures for either vehicle. The figures shown in the posted pictures are mainly to demonstrate scale or were used to check stuff like head clearance. We'll do the Mutt first.
It's a simple hard cab design. The cab is designed to be removal to allow access to the interior later on. The construction was pretty straightforward. I used card stock to work out my templates. I left the rear open mainly to avoid looking too much like the existing Academy hart top Mutt. The driver is the kit figure and he was used to check the height of the cab. I added a radio and made a reciever and coiled cord out of wire.
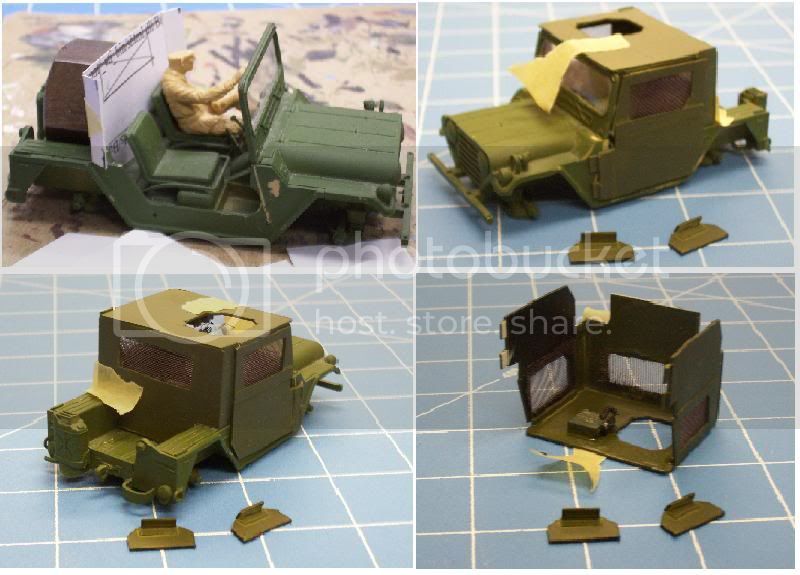
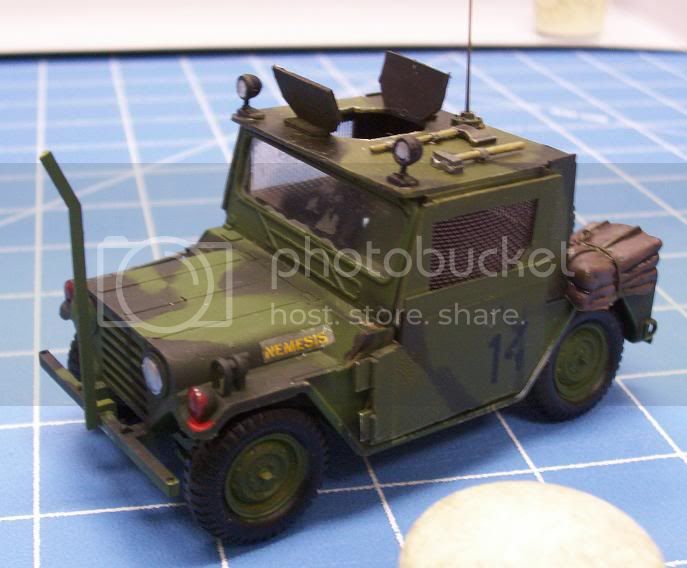
Two finished shots. Note the mesh side and rear windows, stowage in the rear, and tools strapped to the top. I really don't remember what color paint I used and I am colorblind. I masked and oversprayed with standard black for the camoflage. Decals came from the spares.
In general, I liked how the scout vehicle came out.

A break from the Mutt for now. Next up the build for the halftrack. The begining shots of the halftrack can be found at the beginning of this thread.
Originally, the track was going to be a trade and salvage vehicle. I changed it to a salvage and wrecker vehicle. I stretched the kit frame and doubled the M3 running gear. I decided to use a flatbed with a small area set aside for a the crew to store their tools and work. Originally the work compartments was going to be enclosed but that left a vehicle with a high profile. I cut down the kit bed and kept the bottom to mount the flatbed on. Can anyone identify where I sourced the gray styrene?
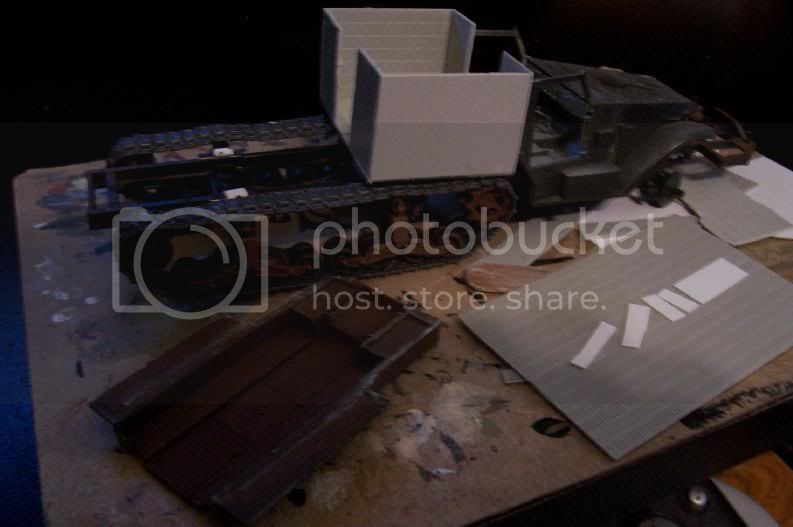
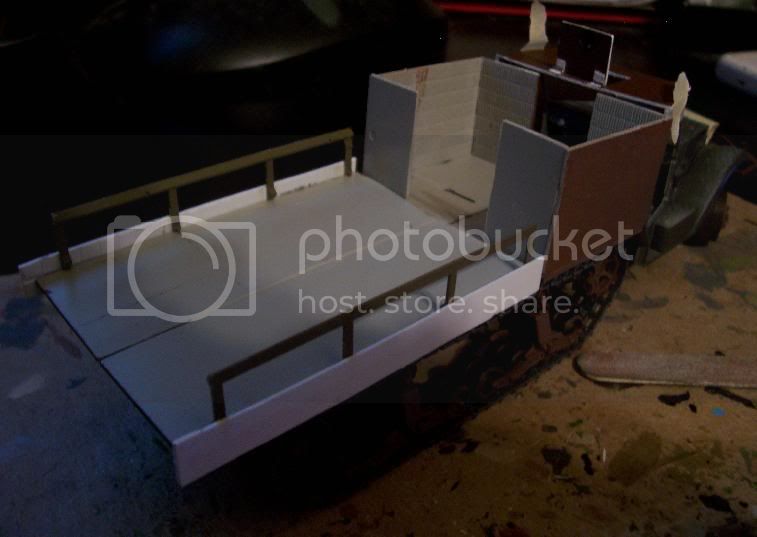
Here's a rough mock up of the vehicle with the bed and work compartment. The bed rails were seat supports for the Tamiya GMC Truck. The work compartment is designed to be removable so I can have access to the cab interior.
Here's the front angle view. The original plan was to completely redo the cab...instead I decided to modify it. The cab has a raised ceiling to be flush with the lip of the work compartment. I added a hatch for a weapon. I cut the fenders and made the front straight instead of slanted. I added a styrene grill. I also added some details to the sides. In general, I think it greatly alters the overall look of the vehicle. Sorry for the poor picture quality.
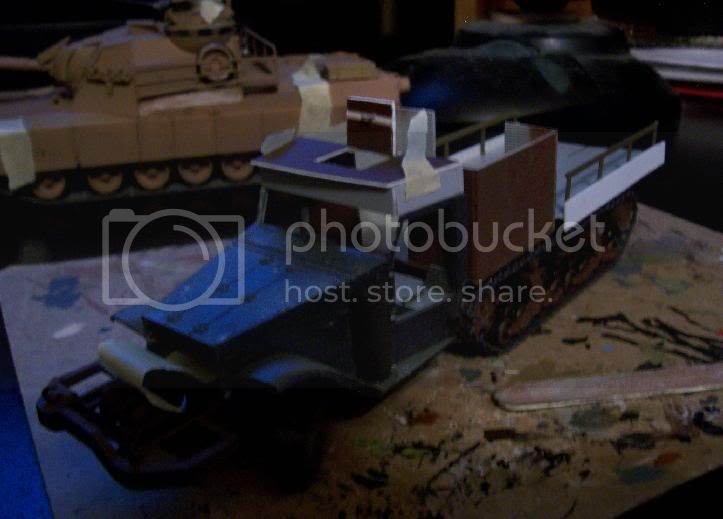
As an aside, in the background you can see my entry for the What If Campaign.
It's a simple hard cab design. The cab is designed to be removal to allow access to the interior later on. The construction was pretty straightforward. I used card stock to work out my templates. I left the rear open mainly to avoid looking too much like the existing Academy hart top Mutt. The driver is the kit figure and he was used to check the height of the cab. I added a radio and made a reciever and coiled cord out of wire.
Two finished shots. Note the mesh side and rear windows, stowage in the rear, and tools strapped to the top. I really don't remember what color paint I used and I am colorblind. I masked and oversprayed with standard black for the camoflage. Decals came from the spares.
In general, I liked how the scout vehicle came out.
A break from the Mutt for now. Next up the build for the halftrack. The begining shots of the halftrack can be found at the beginning of this thread.
Originally, the track was going to be a trade and salvage vehicle. I changed it to a salvage and wrecker vehicle. I stretched the kit frame and doubled the M3 running gear. I decided to use a flatbed with a small area set aside for a the crew to store their tools and work. Originally the work compartments was going to be enclosed but that left a vehicle with a high profile. I cut down the kit bed and kept the bottom to mount the flatbed on. Can anyone identify where I sourced the gray styrene?
Here's a rough mock up of the vehicle with the bed and work compartment. The bed rails were seat supports for the Tamiya GMC Truck. The work compartment is designed to be removable so I can have access to the cab interior.
Here's the front angle view. The original plan was to completely redo the cab...instead I decided to modify it. The cab has a raised ceiling to be flush with the lip of the work compartment. I added a hatch for a weapon. I cut the fenders and made the front straight instead of slanted. I added a styrene grill. I also added some details to the sides. In general, I think it greatly alters the overall look of the vehicle. Sorry for the poor picture quality.
As an aside, in the background you can see my entry for the What If Campaign.
Bluestab
Member Since: December 03, 2009
entire network: 2,160 Posts
KitMaker Network: 123 Posts
Posted: Wednesday, December 28, 2011 - 10:46 AM UTC
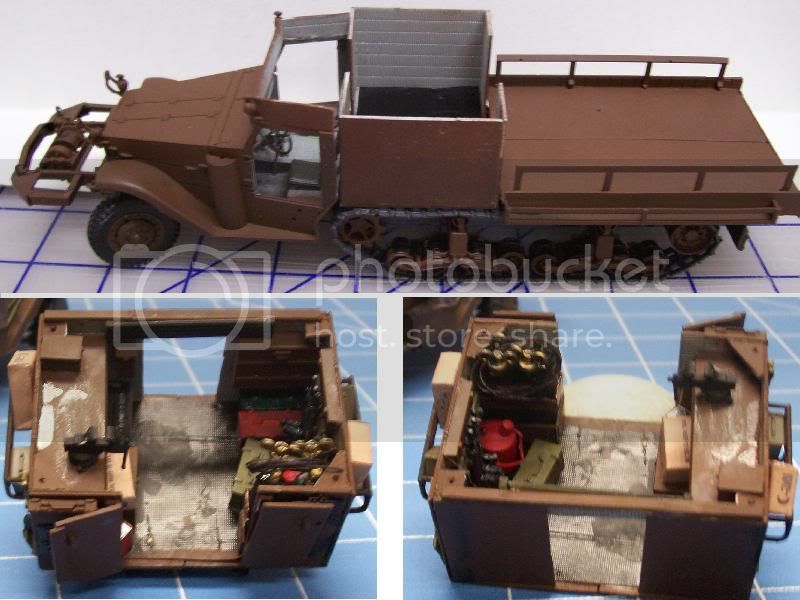
Now we have a painted and basic assembled picture of the vehicle. I used a red-brown spray can for the base. It's the same color I used for the boat. Also, you see two views of the interior of the work compartment. I gave it a work table. Most of the tools and such came from the Italeri Field Shop set.
I cut down the welding tanks. At their regular height, they made too good a target for some bandito with a rifle.
It doesn't show well in the picture but the work compartment floor is the textured liner of a pack of cigarettes. Once painted, they look like rubber mats. I've used them before for other vehicles.
At the front of the work compartment are mounted four poles. It's actually a modified barrel cleaning rod for a Sherman. These served as support poles for a canopy that could be raised over the work area. The mounting points can be seen in each corner.
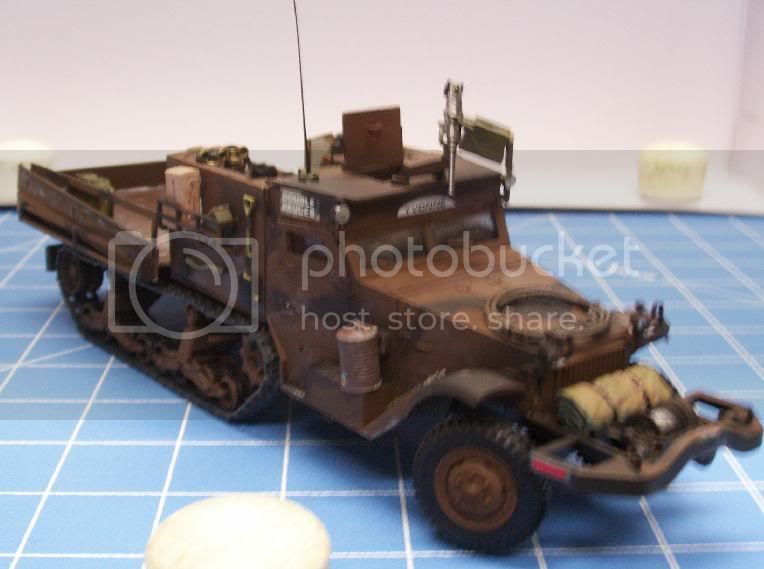
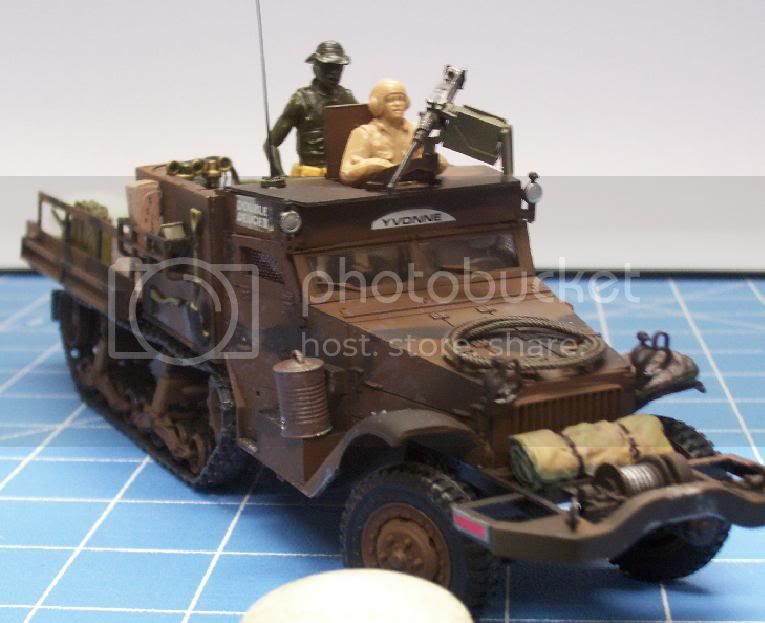
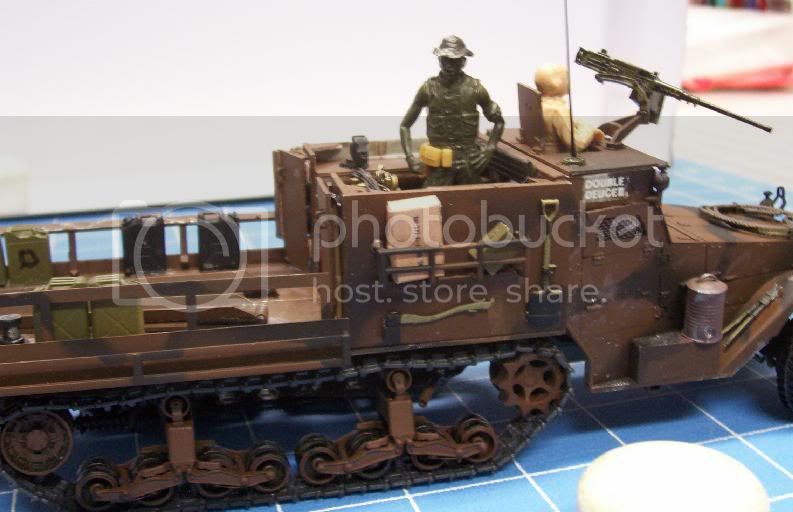
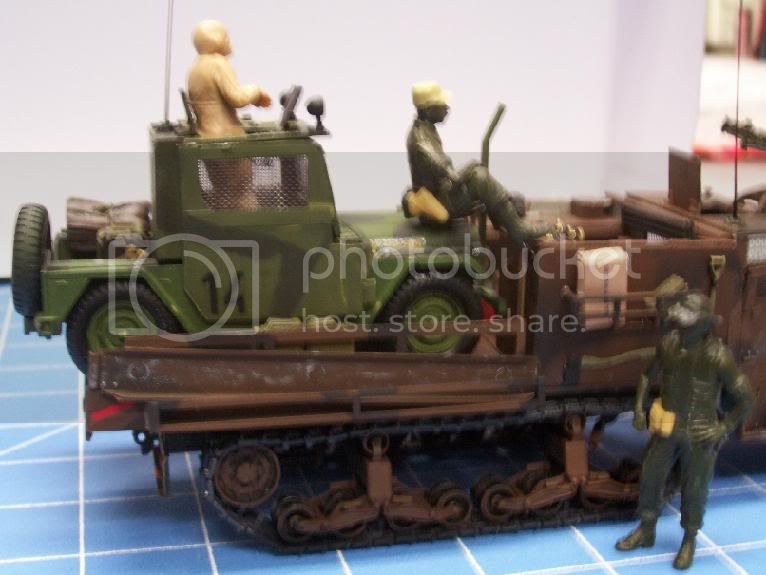
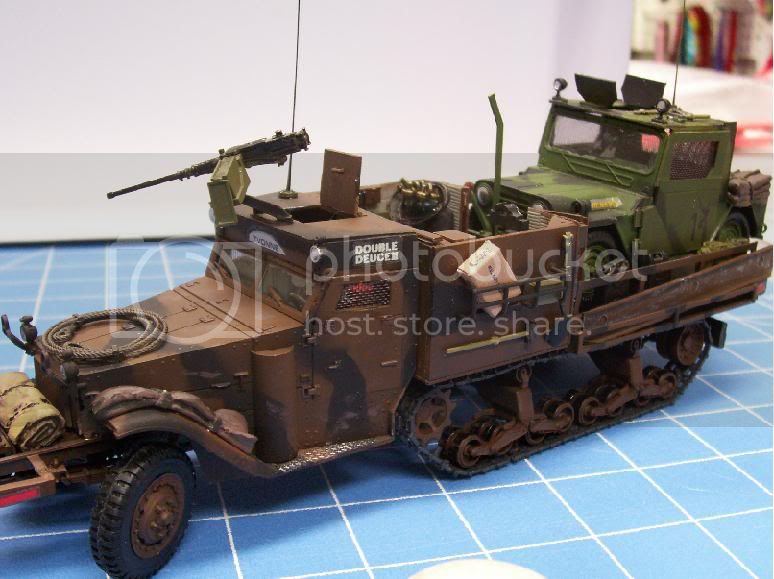
So let me mask off a few areas and give it a quick spray of black. Here's a variety of shots of the finished halftrack. For some shots I added some figures to demonstrate size. Once I decide on how I'll display the vehicles I'll probably work up some crew figures and do some serious weathering. Decals came from the spares. Double Deuce II for the vehicle name and Yvonne maybe in tribute to a lost loved one. You can see some of the added details.
I cut down the welding tanks. At their regular height, they made too good a target for some bandito with a rifle.
It doesn't show well in the picture but the work compartment floor is the textured liner of a pack of cigarettes. Once painted, they look like rubber mats. I've used them before for other vehicles.
At the front of the work compartment are mounted four poles. It's actually a modified barrel cleaning rod for a Sherman. These served as support poles for a canopy that could be raised over the work area. The mounting points can be seen in each corner.
So let me mask off a few areas and give it a quick spray of black. Here's a variety of shots of the finished halftrack. For some shots I added some figures to demonstrate size. Once I decide on how I'll display the vehicles I'll probably work up some crew figures and do some serious weathering. Decals came from the spares. Double Deuce II for the vehicle name and Yvonne maybe in tribute to a lost loved one. You can see some of the added details.
Bluestab
Member Since: December 03, 2009
entire network: 2,160 Posts
KitMaker Network: 123 Posts
Posted: Wednesday, December 28, 2011 - 10:59 AM UTC
Oh snap! The Mutt won't start. But it's okay....and the Double D accepts all major credit cards.
The ramps are stowed in racks on the side of the bed and the rear tailgate is removable.
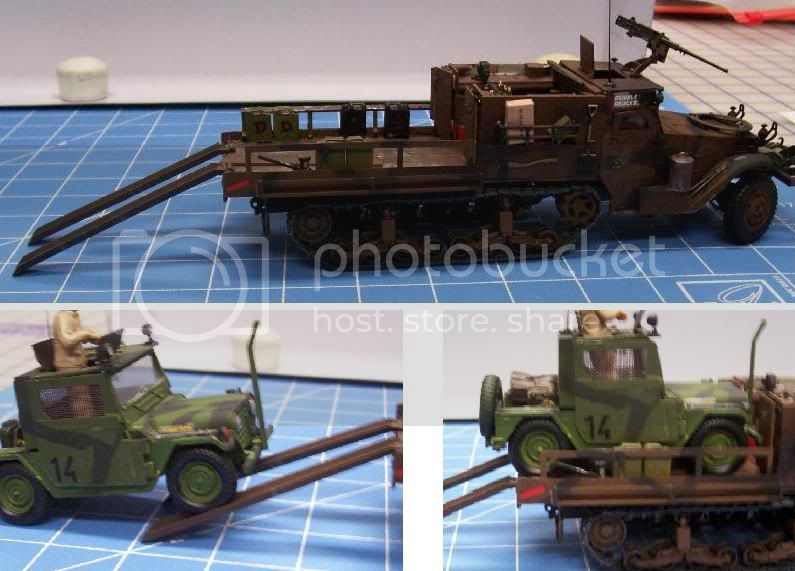
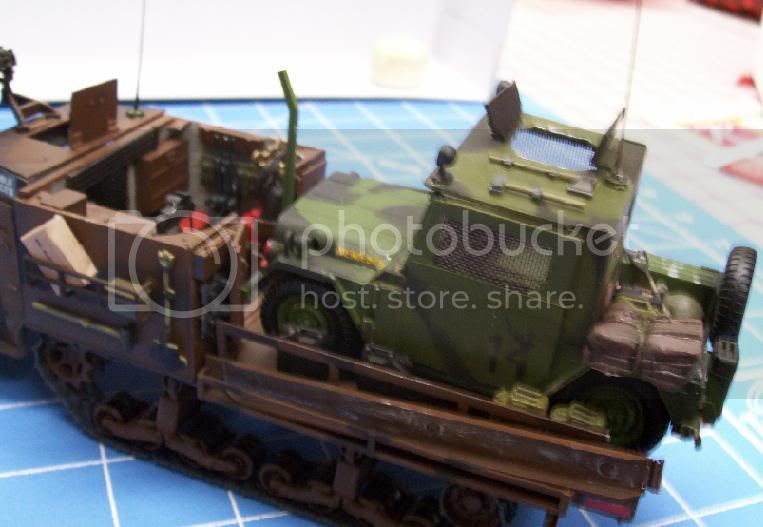
That's about it. I had a lot of fun doing these.
I'll upload a few to the Campaign Gallery later. Since we got an extension, right, I may try to take some better pictures.
The ramps are stowed in racks on the side of the bed and the rear tailgate is removable.
That's about it. I had a lot of fun doing these.
I'll upload a few to the Campaign Gallery later. Since we got an extension, right, I may try to take some better pictures.
Keeperofsouls2099
Member Since: January 14, 2009
entire network: 2,798 Posts
KitMaker Network: 286 Posts
Posted: Wednesday, December 28, 2011 - 12:31 PM UTC
Good job stab!i wish hermon could see the end of his campaign 
 |

WEB HOSTING BY


Copyright ©2021 KitMaker Network and Kitmaker Network, a subsidiary of Silver Star Enterprises
All Rights Reserved. Please read our Conditions of Use and Privacy Policy.
All Rights Reserved. Please read our Conditions of Use and Privacy Policy.