Build-a-Tool 3 Campaign Thread
matt
 Campaigns Administrator
New York, United States
Member Since: February 28, 2002
entire network: 5,957 Posts
KitMaker Network: 2,626 Posts
Posted: Thursday, January 01, 2015 - 04:03 PM UTC
Chopper done...........
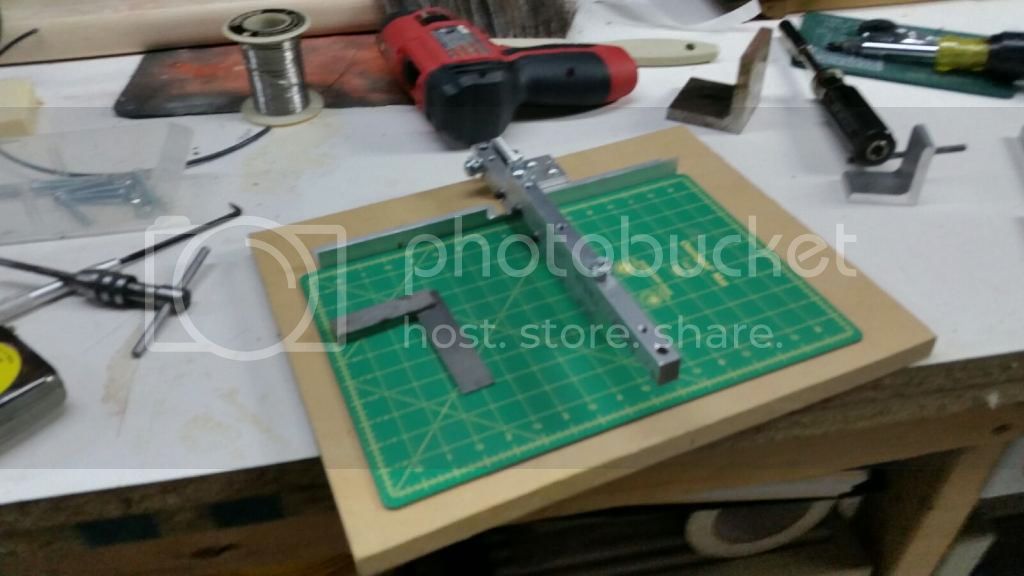
I need to make a few small tweaks as the blade wants to bend cutting thicker stock... but it works great on smaller stuff.
I'm having issues with the hot wire cutter... it's not going to make the deadline...
Tools & Supplies Forum Moderator
Napoli, Italy
Member Since: April 17, 2014
entire network: 652 Posts
KitMaker Network: 18 Posts
Posted: Friday, January 02, 2015 - 03:38 AM UTC
Hi Matt,
Thanks for the extension. Now I can try to finish my tool.
Anyway, a lot of very nice and cool ideas so far.
Cheers
Giovanni
Namabiiru
Associate Editor 
#399
Rhode Island, United States
Member Since: March 05, 2014
entire network: 2,888 Posts
KitMaker Network: 489 Posts
Posted: Sunday, January 04, 2015 - 03:58 AM UTC
Matt,
Any design details you can share? Been wanting to create my own chopper, but there are a few engineering challenges I can foresee that maybe you've already solved.

matt
Campaigns Administrator New York, United States
Member Since: February 28, 2002
entire network: 5,957 Posts
KitMaker Network: 2,626 Posts
Posted: Sunday, January 04, 2015 - 04:25 PM UTC
I'll try to take a few more detailed shots of it tonight.
The biggest thing you'll need is a drill press, or a milling machine. (To be sure the holes are all square, I also milled a relief for the reinforcement on the blade)
My handle is 2 pieces, because I had picked up some scrap from the shop at work that happened to work.
Tools & Supplies Forum Moderator
matt
Campaigns Administrator New York, United States
Member Since: February 28, 2002
entire network: 5,957 Posts
KitMaker Network: 2,626 Posts
Posted: Monday, January 05, 2015 - 04:22 PM UTC
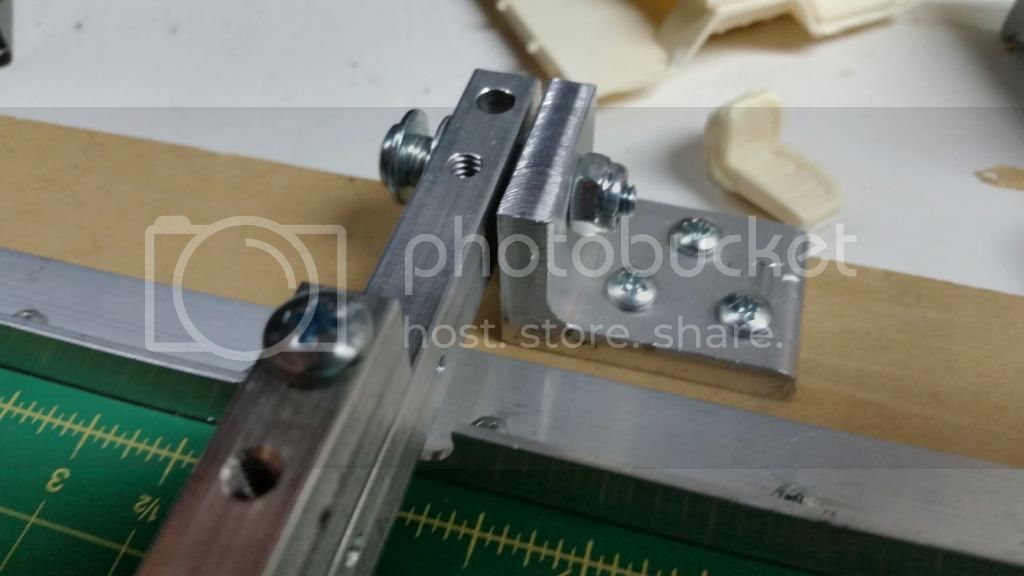
There's a little play because of the plastic washer between the arm and the base... but it's not much at all.
Tools & Supplies Forum Moderator
Michigan, United States
Member Since: June 10, 2008
entire network: 230 Posts
KitMaker Network: 59 Posts
Posted: Monday, January 05, 2015 - 11:36 PM UTC
Is that a tension spring at the pivot point?
Looks good. I want to make one as well, but I think I'll design the blade holder to accept utility knife blades as they are much sturdier. Maybe I can do two sets of holes and have the ability to change to both styles of blade?
Gave me some great ideas. Thanks for posting.
EJ
Fair Winds and Following Seas
EJ
matt
Campaigns Administrator New York, United States
Member Since: February 28, 2002
entire network: 5,957 Posts
KitMaker Network: 2,626 Posts
Posted: Tuesday, January 06, 2015 - 02:35 AM UTC
That's not a bad idea on the blades!!! I could easily add a couple more holes.
it's a compression spring to keep pressure on the plastic washer between the base & arm. Like I mentioned, a but of wobble but not much.
Tools & Supplies Forum Moderator
Namabiiru
Associate Editor #399
Rhode Island, United States
Member Since: March 05, 2014
entire network: 2,888 Posts
KitMaker Network: 489 Posts
Posted: Tuesday, January 06, 2015 - 03:19 AM UTC
I'm keeping my eyes out for a single-ground blade (as opposed to a double-ground razor blade) in order to get a nice square cut when I eventually build my chopper.
Also considering for my next BAT entry mounting a flourescent light UNDER my bench since I seem to spend so much time down on the floor with a flashlight looking for parts....
Michigan, United States
Member Since: June 10, 2008
entire network: 230 Posts
KitMaker Network: 59 Posts
Posted: Tuesday, January 06, 2015 - 04:55 AM UTC
Quoted Text
Also considering for my next BAT entry mounting a flourescent light UNDER my bench since I seem to spend so much time down on the floor with a flashlight looking for parts....
GOOD ONE! I'm with ya there. Knee pads help as well.
EJ
Fair Winds and Following Seas
EJ
South Carolina, United States
Member Since: December 14, 2006
entire network: 1,355 Posts
KitMaker Network: 336 Posts
Posted: Tuesday, January 06, 2015 - 09:29 PM UTC
Here's another tool I use. I took an old pair of plastic glasses frames and added 16.5X Jeweler's Clip-On Eye Loupe, one clipped to each side of the frames. I got the Loupes from Harbor Freight Tools for $3.99 each.
 http://www.harborfreight.com/165x-jewelers-clip-on-eye-loupe-94364.html
I got two loupes because I can use the 3.5X and sometimes the 5X loupes with both eyes (depth perception), but the 16X is too close and I can only use I eye at a time.
I use them quite a bit. HTH
ESSAYONS!
"Man does not live until he looks to the future, and that is his salvation in the worst of times.".... (Author Unknown)
AMPS #2102
South Carolina, United States
Member Since: December 14, 2006
entire network: 1,355 Posts
KitMaker Network: 336 Posts
Posted: Wednesday, January 07, 2015 - 09:02 AM UTC
And here is the picture of my magnifiers:
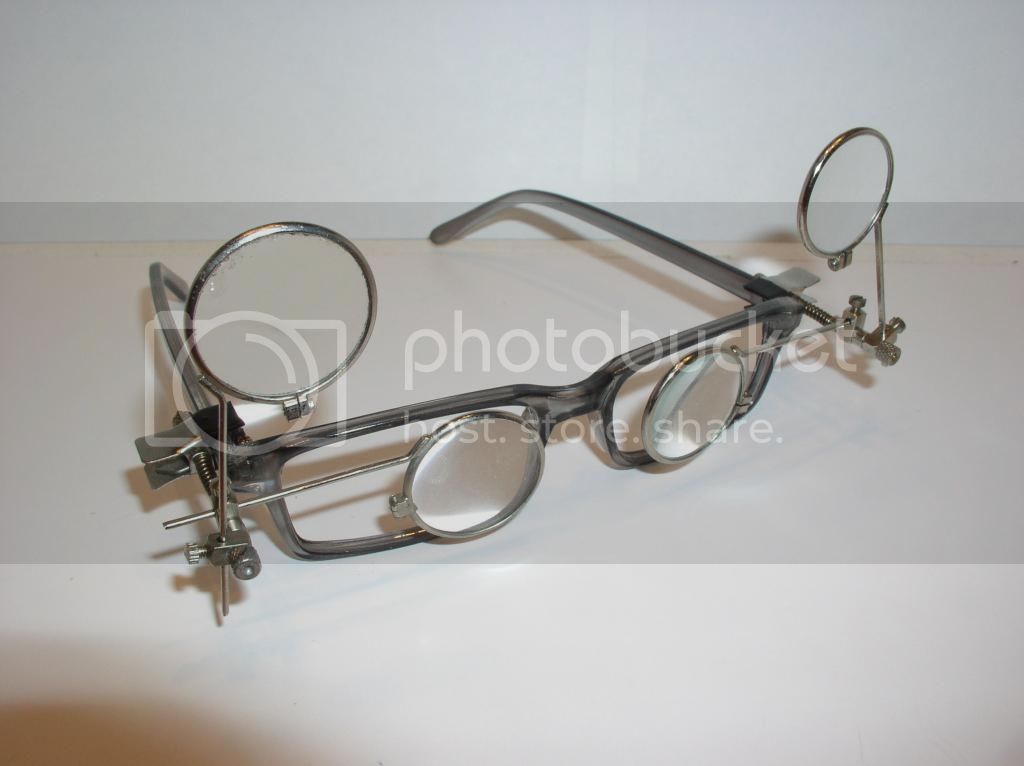
Do I need to post this picture in a campaign album?
ESSAYONS!
"Man does not live until he looks to the future, and that is his salvation in the worst of times.".... (Author Unknown)
AMPS #2102
Namabiiru
Associate Editor #399
Rhode Island, United States
Member Since: March 05, 2014
entire network: 2,888 Posts
KitMaker Network: 489 Posts
Posted: Wednesday, January 07, 2015 - 09:06 AM UTC
I just ordered a couple loupes myself based on your previous post. I'm far-sighted and have a devil of a time working up close. Tried a lot of different options with limited success, but this looks like it has a lot of potential...and the price was right.
Myanmar
Member Since: March 05, 2004
entire network: 4,011 Posts
KitMaker Network: 879 Posts
Posted: Wednesday, January 07, 2015 - 10:26 AM UTC
Matt - nice fabrication. A very useful tool.
Namabiiru - LOL "...flourescent light UNDER my bench
"
majjanelson - whoa, those look cool, sort of Steam meets Ichabod Crane

i watched a scale plastic figure crawl along the edge . . . of an exacto blade . . . that's my dream , it's my nightmare . . . . . . . crawling , slithering . . . . . along the edge . . . . . . of an exacto . . . . . blade . . . . and surviving
matt
Campaigns Administrator New York, United States
Member Since: February 28, 2002
entire network: 5,957 Posts
KitMaker Network: 2,626 Posts
Posted: Thursday, January 08, 2015 - 04:44 PM UTC
Quoted Text
Do I need to post this picture in a campaign album?
The thread is good enough for me!
I alomst swung by a Harbor Freight yesterday to get some.... the weather was just too crappy for another stop (near white out conditions)
Tools & Supplies Forum Moderator
Napoli, Italy
Member Since: April 17, 2014
entire network: 652 Posts
KitMaker Network: 18 Posts
Posted: Thursday, January 08, 2015 - 05:13 PM UTC
Hi friends,
Ok, nothing that can compared to Matt's chopper, very elegant and clean

The matter is: many small pieces being painted and necessary to be held by clips. Then, you have many of these and you don't have the right place to keep...
So, I've modified a certain number of curtains clips in order to have a suitable support:

A simple rail is arranged in the ''paint workshop'':

Once the piece is painted, I can hang up it at the rail to keep everything in order. I can manage up to 15 pieces in one painting round:

Well, it is not beautiful and I don't expect to win the Nobel Prize, but it useful for me and I'm using it...
Cheers
Giovanni

Michigan, United States
Member Since: June 10, 2008
entire network: 230 Posts
KitMaker Network: 59 Posts
Posted: Thursday, January 08, 2015 - 07:46 PM UTC
Very nice. Now I just gotta find some of those clips.
Thanks for posting.
All these great ideas are gonna keep me busy for a bit.
EJ
Fair Winds and Following Seas
EJ
Napoli, Italy
Member Since: April 17, 2014
entire network: 652 Posts
KitMaker Network: 18 Posts
Posted: Thursday, January 08, 2015 - 11:37 PM UTC
Quoted Text
Very nice. Now I just gotta find some of those clips.
Thanks for posting.
All these great ideas are gonna keep me busy for a bit.
EJ
Hi Eugene,
Just you: I'm building the Yamato 1:350, quite different in size compared with my usual 1:35 armor things, and I've built a indoor spray box for the ship's hull following your post.
Not so elegant like your, wooden instead of metallic, but it works... Thanks for posting.
Cheers
Giovanni
Michigan, United States
Member Since: June 10, 2008
entire network: 230 Posts
KitMaker Network: 59 Posts
Posted: Thursday, January 08, 2015 - 11:50 PM UTC
Quoted Text
Hi Eugene,
Just you: I'm building the Yamato 1:350, quite different in size compared with my usual 1:35 armor things, and I've built a indoor spray box for the ship's hull following your post.
Not so elegant like your, wooden instead of metallic, but it works... Thanks for posting.
Cheers
Giovanni
Your welcome. I know I love my booth a lot. It has made things much more convenient in my model room.
Good modeling.
EJ
Fair Winds and Following Seas
EJ
Namabiiru
Associate Editor #399
Rhode Island, United States
Member Since: March 05, 2014
entire network: 2,888 Posts
KitMaker Network: 489 Posts
Posted: Saturday, January 10, 2015 - 07:39 AM UTC
I loved Randy's clothespins so much I went out and made a bunch of my own--now I just need to find a use for them!

So, when does BAT4 start? I'm ready!
matt
Campaigns Administrator New York, United States
Member Since: February 28, 2002
entire network: 5,957 Posts
KitMaker Network: 2,626 Posts
Posted: Saturday, January 10, 2015 - 04:57 PM UTC
I've done a quick round of awards....... I'll run thru one more time tomorrow morning.
Let's plan on the actual campaign for BAT-4 running July thru December. But anything you build this year is OK for it.
Tools & Supplies Forum Moderator
Namabiiru
Associate Editor #399
Rhode Island, United States
Member Since: March 05, 2014
entire network: 2,888 Posts
KitMaker Network: 489 Posts
Posted: Sunday, January 11, 2015 - 03:18 AM UTC
Sweet! I've started a blog on the paint booth I'm building, but I have some other tool ideas rattling around in the space between my ears.
Namabiiru
Associate Editor #399
Rhode Island, United States
Member Since: March 05, 2014
entire network: 2,888 Posts
KitMaker Network: 489 Posts
Posted: Sunday, January 11, 2015 - 06:04 AM UTC
Matt,
I'm wondering if it isn't too late to edit the badge a little bit. When it shows up on my profile it's huge!
Alberta, Canada
Member Since: April 07, 2010
entire network: 1,028 Posts
KitMaker Network: 41 Posts
Posted: Sunday, January 11, 2015 - 10:10 AM UTC
Thank-you for the purdy ribbon, Matt. Like Mark says, though, the dimensions might be a little off.

To prevent being called an 'expert', screw something up good every now and again.
British Columbia, Canada
Member Since: March 16, 2010
entire network: 473 Posts
KitMaker Network: 58 Posts
Posted: Sunday, January 11, 2015 - 10:50 AM UTC
Tried to sign up , hopefully posting will qualify me.
For my 1/16 WW1 figure piece : 'Ypres 1915'
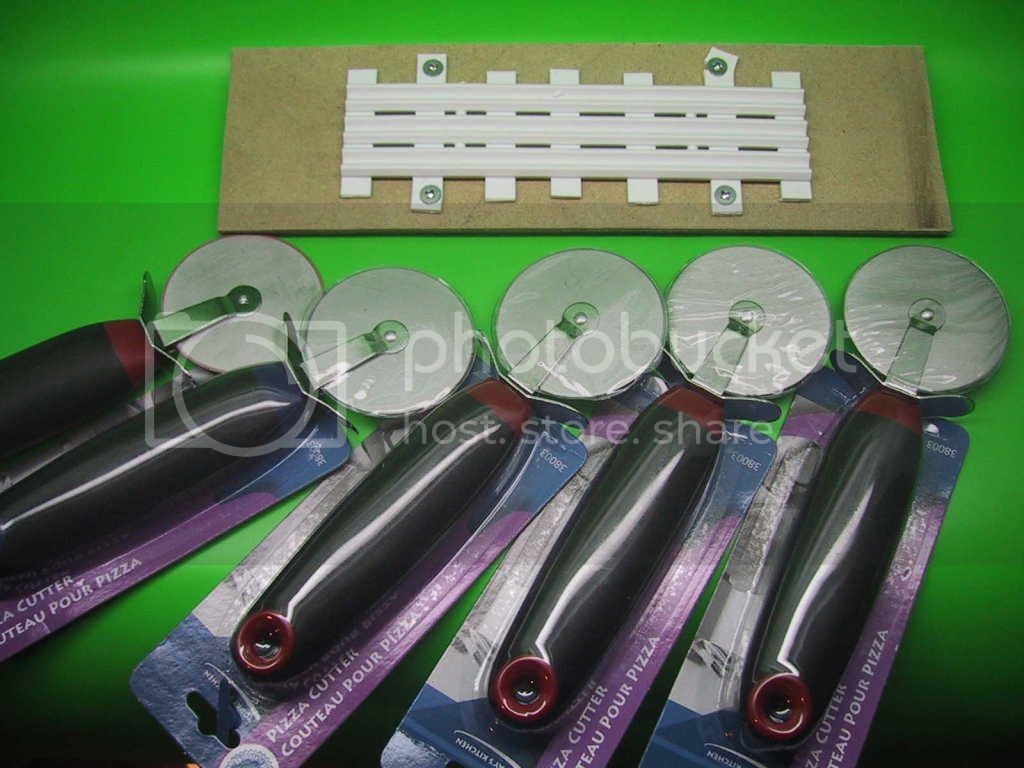
I needed the corrugated metal so intrinsic to the WW1 dio builder. I could not find any , and with a manufacturing background , decided to attempt a tool for this. I know about metal forming so had an idea where to start.
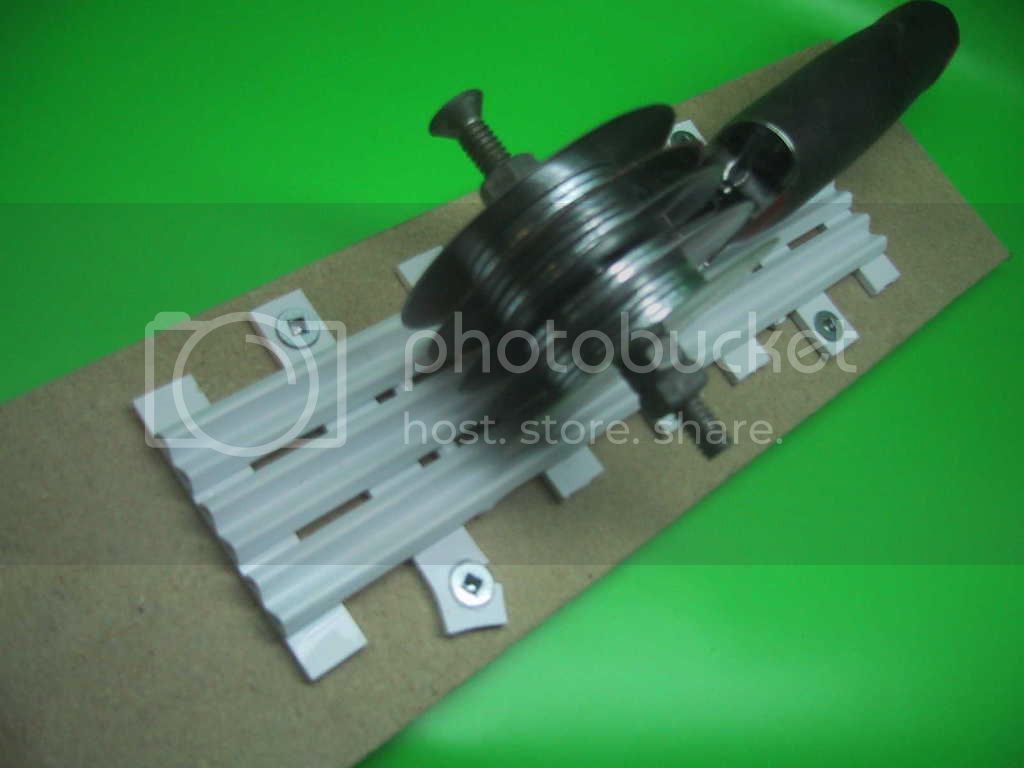
Seeing the rail in this kit:

I made a mount for it:
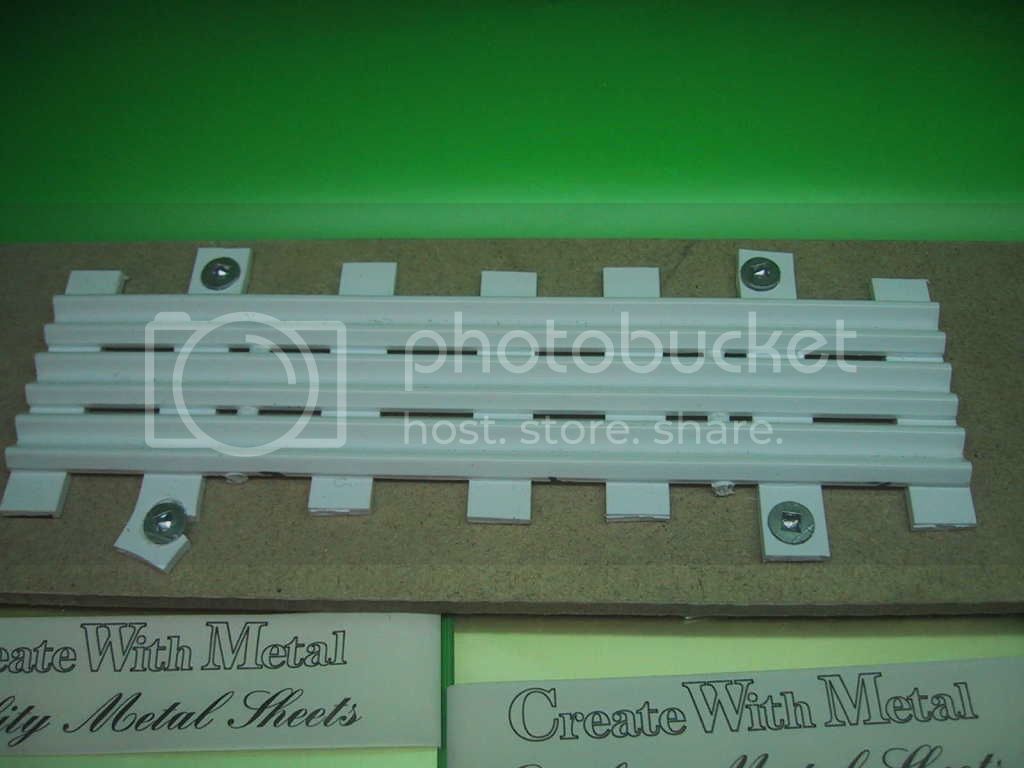
Then I procured 6 pizza cutter's from the baking section of Wal-Mart. I disassembled the wheel part of the cutters and took all the wheels , spaced the cutting discs according to the rail and many pics of the corrugated metal and assembled one tool:

I masked off the metal sheet and started making my dio components:
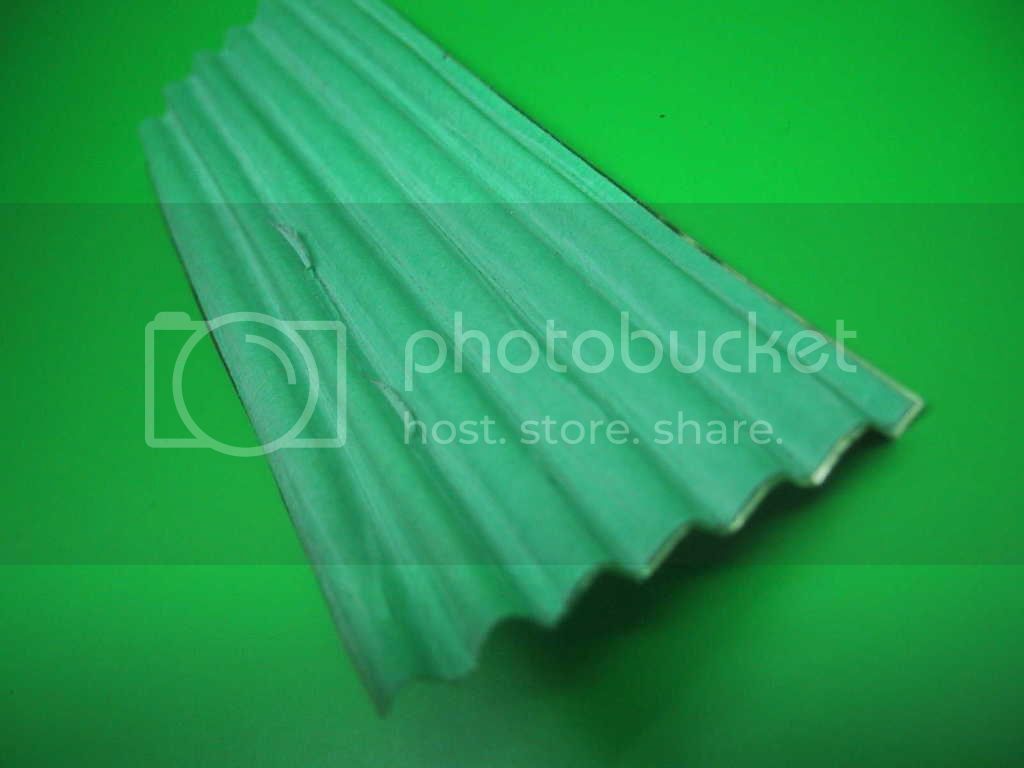
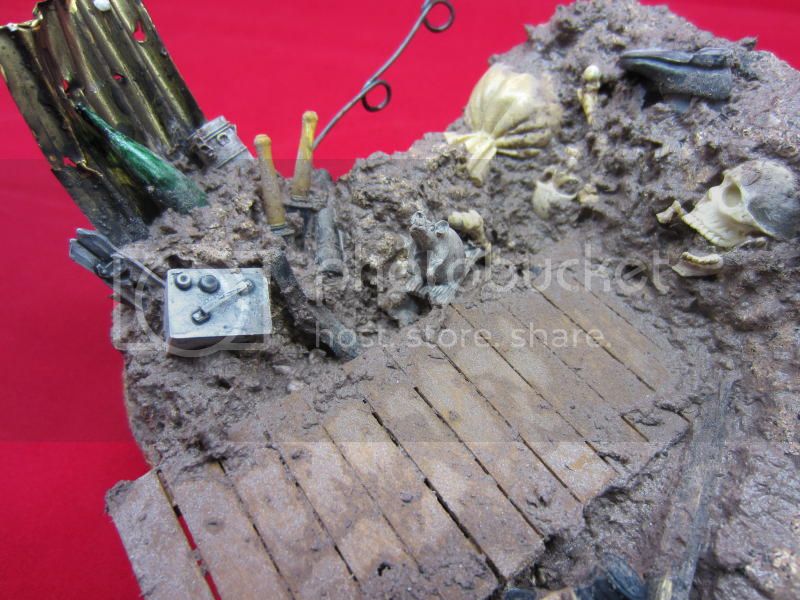
The spacers can be changed to re-create different scales of corrugated sheet. The finished item is a very good replication of the corrugated sheet so needed to pull off a WW1 dio:


fbook : Custom Motorcycle Modeler Page
Thank you , Steve
Namabiiru
Associate Editor #399
Rhode Island, United States
Member Since: March 05, 2014
entire network: 2,888 Posts
KitMaker Network: 489 Posts
Posted: Sunday, January 11, 2015 - 11:04 AM UTC
And the award for first to complete BAT4 goes to James!

That's a really cool set-up, James!


