

Tools & Supplies
Discussions on the latest and greatest tools, glues, and gadgets.
Discussions on the latest and greatest tools, glues, and gadgets.
Hosted by Matt Leese
Build-a-Tool 3 Campaign Thread

matt

Member Since: February 28, 2002
entire network: 5,957 Posts
KitMaker Network: 2,626 Posts
Posted: Sunday, September 14, 2014 - 10:29 PM UTC
Both are pretty cool ideas!!!

ejhammer
Member Since: June 10, 2008
entire network: 230 Posts
KitMaker Network: 59 Posts

Posted: Monday, September 15, 2014 - 02:08 AM UTC
Nice scraper. Should work well on 1/700 ship parts too.
EJ
EJ

Mcleod

Member Since: April 07, 2010
entire network: 1,028 Posts
KitMaker Network: 41 Posts
Posted: Friday, September 26, 2014 - 04:38 PM UTC
My third weird, but, workable idea for a tool in the campaign.


 Ben
Ben
Benejhammer
Member Since: June 10, 2008
entire network: 230 Posts
KitMaker Network: 59 Posts
Posted: Sunday, September 28, 2014 - 06:41 AM UTC
Havn't replied since March when I started this spray booth. Might give you some ideas.
Sheet metal construction, downdraft, filters below the pegboard, plenum in the back, vented to the outdoors.
Made specially to fit 1/350 aircraft carriers so is 36" wide, 23 1/2" high and 24" deep including the plenum so it would fit on a 24" counter, but is 21 1/2" deep inside.
Sure will be nice this winter in Michigan so I don't have to heat up my whole separate workshop to spray for 20 minits.


Has lights behind the front top edges, switched seperatly from the exhaust blower. Filters changed by lifting out the pegboard floor. takes standard furnace filters.
Mcleod
Member Since: April 07, 2010
entire network: 1,028 Posts
KitMaker Network: 41 Posts
Posted: Sunday, September 28, 2014 - 11:42 AM UTC
Really cool, Eugene.
I like the down draft design and its size; I prefer large painting areas over the small commercially sold shoe-box designs. Well done
I like the down draft design and its size; I prefer large painting areas over the small commercially sold shoe-box designs. Well done

DeskJockey
Member Since: July 17, 2006
entire network: 1,558 Posts
KitMaker Network: 376 Posts
Posted: Sunday, September 28, 2014 - 11:55 AM UTC
Very nice, Eugene! I wish I had the skills and tools to build a custom one for myself.
ejhammer
Member Since: June 10, 2008
entire network: 230 Posts
KitMaker Network: 59 Posts
Posted: Sunday, September 28, 2014 - 12:12 PM UTC
Thanks. I used stuff laying around my shop. Am a retired builder. The only thing I had to buy was the duct, elbow and damper for the exhaust, and the filters. About $60.00.
I've been thinking about moving the blower motor outdoors, away from the window, as it is kinda noisy. I've never heard one of the commercially made ones running, so I don't know how noisy they are. Maybe mine's not so bad.
EJ
I've been thinking about moving the blower motor outdoors, away from the window, as it is kinda noisy. I've never heard one of the commercially made ones running, so I don't know how noisy they are. Maybe mine's not so bad.
EJ
DeskJockey
Member Since: July 17, 2006
entire network: 1,558 Posts
KitMaker Network: 376 Posts
Posted: Sunday, September 28, 2014 - 12:28 PM UTC
I have a commercial one and it is somewhat noisy, but quieter than my compressor, which is rated at 61 Db. When I close the door, it's not noticeable in the rest of the house. That said, it doesn't move as much air as I would like--it's decent, but not great.
ejhammer
Member Since: June 10, 2008
entire network: 230 Posts
KitMaker Network: 59 Posts
Posted: Sunday, September 28, 2014 - 12:50 PM UTC
Thanks for the info.
Well, my booth blower is about as noisy as the compressor too, so I guess it's not that bad. I might move the compressor into the laundry room to remove some of the noise. Just need a longer hose. I might try wrapping the blower and duct with insulating wrap too. Easier than moving the blower.
The blower really sucks air - about 600 cubic feet per minit I calculate. I sometimes throttle it back by laying a towel over the pegboard. I'm thinking of adding a variable speed switch to it for a little more control. It was a spark-proof blower motor assembly salvaged from a commercial lab vent system, worth about $300.00 if I had to buy it, so I'll live with it no matter what.
EJ

2002hummer

#257
Member Since: October 11, 2011
entire network: 812 Posts
KitMaker Network: 105 Posts

Posted: Thursday, November 06, 2014 - 03:28 PM UTC
Here is my contribution to the campaign. It is a painting jig. Made from coat hanger wire and a section of pine board. The inner pieces of wire slide back and forth to adjust to different size parts.


All the entries look great.
All the entries look great.
matt
Member Since: February 28, 2002
entire network: 5,957 Posts
KitMaker Network: 2,626 Posts
Posted: Monday, November 17, 2014 - 05:34 PM UTC
Getting down to the last month... I know I have stuff to get finished... UGH 

Namabiiru
#399
Member Since: March 05, 2014
entire network: 2,888 Posts
KitMaker Network: 489 Posts

Posted: Friday, December 05, 2014 - 04:13 PM UTC
Matt,
I'm trying to figure out what's going on with this campaign. I remember a forum thread where I posted photos of my track jig back around the end of March, someone had photos of a spray booth in progress, and someone else had a device for holding tank turrets and hulls, but I don't see any of those posts any more. I had kind of forgotten about this campaign, having not seen any activity on that thread for so long, but now I see there is a whole new thread going. Do I need to repost my jig photos in this thread in order to get credit for the campaign?
I'm trying to figure out what's going on with this campaign. I remember a forum thread where I posted photos of my track jig back around the end of March, someone had photos of a spray booth in progress, and someone else had a device for holding tank turrets and hulls, but I don't see any of those posts any more. I had kind of forgotten about this campaign, having not seen any activity on that thread for so long, but now I see there is a whole new thread going. Do I need to repost my jig photos in this thread in order to get credit for the campaign?
Namabiiru
#399
Member Since: March 05, 2014
entire network: 2,888 Posts
KitMaker Network: 489 Posts
Posted: Friday, December 05, 2014 - 04:15 PM UTC
Just in case I otherwise forget (which I am prone to do), here are the photos of my track-laying jig again:


hofpig

Member Since: March 04, 2007
entire network: 1,330 Posts
KitMaker Network: 56 Posts

Posted: Friday, December 05, 2014 - 05:03 PM UTC
I thought I'd have a go at something to sort out a small problem I have had recently. I use liquid poly cement in this type of bottle with it's own applicator.
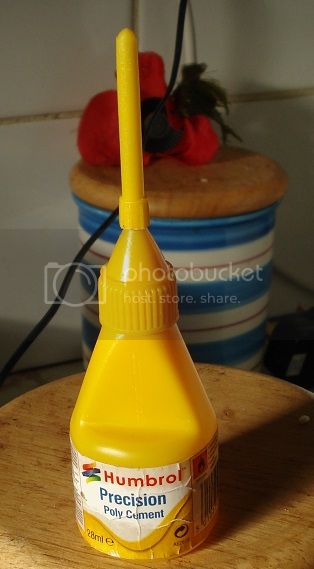
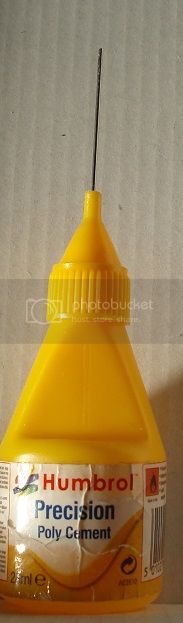
However the issue is the needle applicator becomes easily clogged thus blocking the flow of the glue. Luckily I discovered I had some suitable sized wire in my stock so I came up with this.
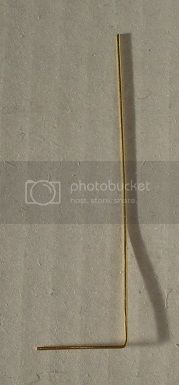
You just push into the needle, twist it around a few times and bingo the blockage is gone! I have tried it a few times and it works a treat. I will be using this one for years!
Paul
However the issue is the needle applicator becomes easily clogged thus blocking the flow of the glue. Luckily I discovered I had some suitable sized wire in my stock so I came up with this.
You just push into the needle, twist it around a few times and bingo the blockage is gone! I have tried it a few times and it works a treat. I will be using this one for years!
Paul


KoSprueOne

Member Since: March 05, 2004
entire network: 4,011 Posts
KitMaker Network: 879 Posts
Posted: Sunday, December 07, 2014 - 08:36 AM UTC
Some very useful ideas here 
My contribution will be a paint mask for HO scale wheels and axles. A very similar setup as EHAM0624's, underwing ordnance paint mask.

My contribution will be a paint mask for HO scale wheels and axles. A very similar setup as EHAM0624's, underwing ordnance paint mask.
matt
Member Since: February 28, 2002
entire network: 5,957 Posts
KitMaker Network: 2,626 Posts
Posted: Sunday, December 07, 2014 - 03:45 PM UTC
I need to reclaim my workbench from the fiberglass repairs I've been having to to on our Vehicles running board. Maybe I can get one oh the entries I started done.
Namabiiru
#399
Member Since: March 05, 2014
entire network: 2,888 Posts
KitMaker Network: 489 Posts
Posted: Sunday, December 07, 2014 - 05:17 PM UTC
Matt,
Please see my post above. Any idea what happened to the thread that was active late March through June? I distinctly remember several other projects, my own included, being posted, of which there is no evidence in the current thread. Or is my mind starting to go?
Please see my post above. Any idea what happened to the thread that was active late March through June? I distinctly remember several other projects, my own included, being posted, of which there is no evidence in the current thread. Or is my mind starting to go?
matt
Member Since: February 28, 2002
entire network: 5,957 Posts
KitMaker Network: 2,626 Posts
Posted: Sunday, December 07, 2014 - 05:25 PM UTC
AH HA!!! I found them!!! a bunch of us posted into the proposal thread (myself included)
https://archive.kitmaker.net/forums/192848#1853347
https://archive.kitmaker.net/forums/192848#1853347
Namabiiru
#399
Member Since: March 05, 2014
entire network: 2,888 Posts
KitMaker Network: 489 Posts
Posted: Monday, December 08, 2014 - 03:32 AM UTC
Quoted Text
AH HA!!! I found them!!! a bunch of us posted into the proposal thread (myself included)
https://archive.kitmaker.net/forums/192848#1853347
I didn't think I was losing my mind (at least not for this particular reason). I wonder why it didn't turn up when I searched for "build tool"

Anyway, Hopefully all those get credit too...
Looking forward to BAT IV since I already have some new ideas....
KoSprueOne
Member Since: March 05, 2004
entire network: 4,011 Posts
KitMaker Network: 879 Posts
Posted: Monday, December 08, 2014 - 07:42 AM UTC
Wheel Mask blog https://archive.kitmaker.net/forums/229248&page=1
I attempted a budget Wheel Mask for HO scale wheels a few years ago (2011) but was not successful. In fact a total FAIL
So, I've since figured out a solution and will contribute this solution build to this, Build-a-tool 3, campaign.
Before I do this I want to show you the ill fated journey to failsville, or as some put it, the agony of defeat
A warning, the following is not for the RC or Lego stomaches:
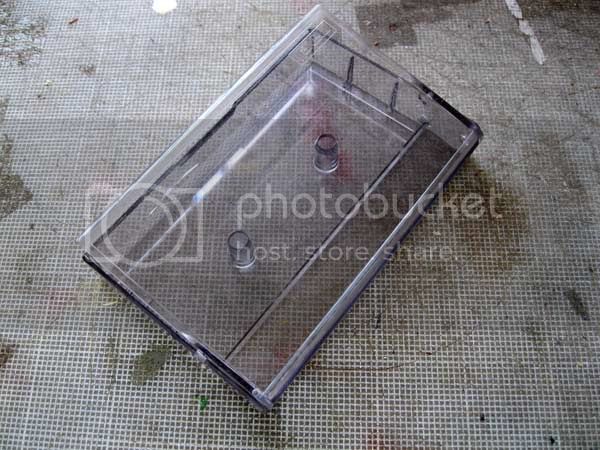
here you see a standard Maxell case on the bench
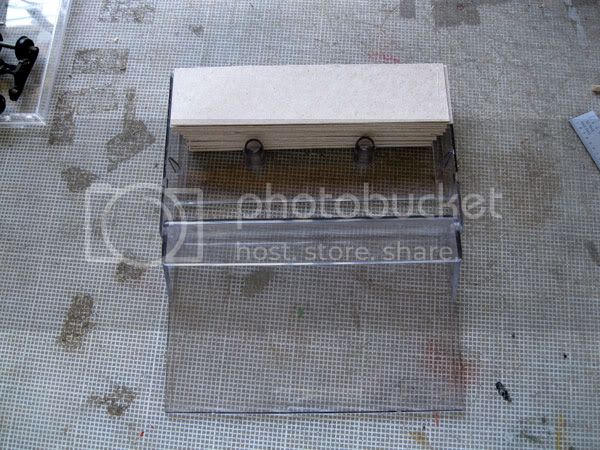
filler material is cut and stuffed into the case.
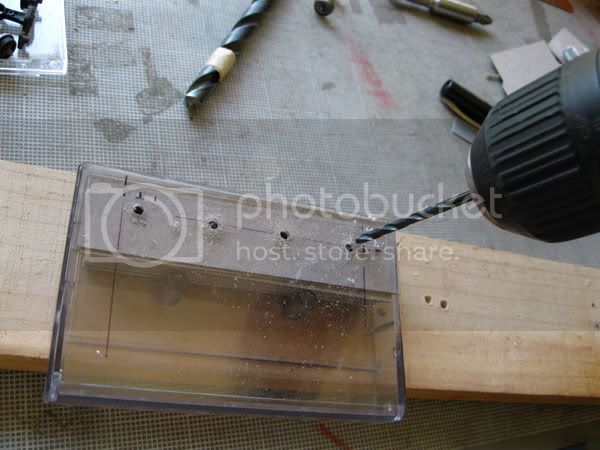
equal spots are measured out and marked onto the case. Then pilot holes are drilled into those spots with a 1/8" drill bit
again The following may not be suitable for die-cast collectors. If you cannot handle cold hard reality in model building, please turn away from the next picture
Major FAIL . . .
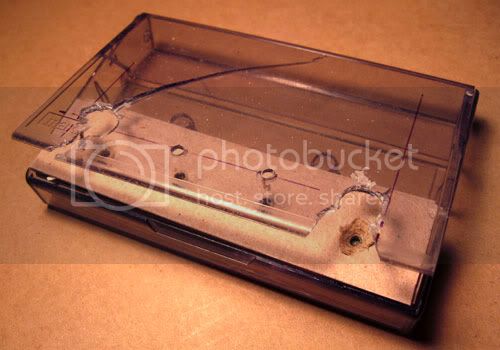
I see what I did wrong and will include this solution in Phase Two of this wheel mask build . . .
thanks for looking
I attempted a budget Wheel Mask for HO scale wheels a few years ago (2011) but was not successful. In fact a total FAIL
So, I've since figured out a solution and will contribute this solution build to this, Build-a-tool 3, campaign.
Before I do this I want to show you the ill fated journey to failsville, or as some put it, the agony of defeat
A warning, the following is not for the RC or Lego stomaches:
here you see a standard Maxell case on the bench
filler material is cut and stuffed into the case.
equal spots are measured out and marked onto the case. Then pilot holes are drilled into those spots with a 1/8" drill bit
again The following may not be suitable for die-cast collectors. If you cannot handle cold hard reality in model building, please turn away from the next picture
Major FAIL . . .
I see what I did wrong and will include this solution in Phase Two of this wheel mask build . . .
thanks for looking
Namabiiru
#399
Member Since: March 05, 2014
entire network: 2,888 Posts
KitMaker Network: 489 Posts
Posted: Monday, December 08, 2014 - 08:00 AM UTC
Looks like you used a twist bit to drill your larger holes. You're probably going to want to use a brad-point bit for that since it cuts from the outside-in, rather than inside-out. Maybe also consider a smaller pilot hole so the larger bit is more stable when you drill.
KoSprueOne
Member Since: March 05, 2004
entire network: 4,011 Posts
KitMaker Network: 879 Posts
Posted: Monday, December 08, 2014 - 08:28 AM UTC
whoa, you def know what you're talking about  I love the track-laying jig you made, BTW
Thanks for the tips
I love the track-laying jig you made, BTWThanks for the tips
Namabiiru
#399
Member Since: March 05, 2014
entire network: 2,888 Posts
KitMaker Network: 489 Posts
Posted: Monday, December 08, 2014 - 08:31 AM UTC
Thanks!
hofpig
Member Since: March 04, 2007
entire network: 1,330 Posts
KitMaker Network: 56 Posts
Posted: Monday, December 08, 2014 - 12:45 PM UTC
Ko, I'd also using a softer plastic. If I remember correctly those old cassette boxes are Acrylic which has a tendency to shatter rather than cut!
Paul
Paul
KoSprueOne
Member Since: March 05, 2004
entire network: 4,011 Posts
KitMaker Network: 879 Posts
Posted: Tuesday, December 09, 2014 - 08:35 AM UTC
Yes, they are brittle but I've learned how to work with it
 |

WEB HOSTING BY


Copyright ©2021 KitMaker Network and Kitmaker Network, a subsidiary of Silver Star Enterprises
All Rights Reserved. Please read our Conditions of Use and Privacy Policy.
All Rights Reserved. Please read our Conditions of Use and Privacy Policy.