Tools & Supplies
Discussions on the latest and greatest tools, glues, and gadgets.
Hosted by Matt Leese
Build-a-Tool 3 Campaign Thread
KoSprueOne
Visit this Community
Myanmar
Member Since: March 05, 2004
entire network: 4,011 Posts
KitMaker Network: 879 Posts
Posted: Tuesday, December 09, 2014 - 08:46 AM UTC
PHASE TWO - The Solution
https://archive.kitmaker.net/forums/229248

This is where solving the previous error 3 years ago begins. I gathered some scrap wood from pallets behind my job site. Two for the outside and one cut and shaped to fit snugly inside.


These parts were sandwiched together and held together flush on one side. A 1/8" pilot bit and a 25/64" bit were set aside and ready.


KoSprueOne
Visit this Community
Myanmar
Member Since: March 05, 2004
entire network: 4,011 Posts
KitMaker Network: 879 Posts
Posted: Wednesday, December 10, 2014 - 07:54 AM UTC
complete wheel mask blog here: https://archive.kitmaker.net/forums/229248&page=1#1931883

This time I'm drilling through a TDK case.


pilot holes


final 25/64" holes


I still need to open up the end of the case a little to enable sprayed paint to reach the axles and inner surfaces of the wheels


roteck
Visit this Community
Quebec, Canada
Member Since: January 12, 2004
entire network: 274 Posts
KitMaker Network: 6 Posts
Posted: Sunday, December 21, 2014 - 07:16 AM UTC
Hey guys,

There's some pretty nice things here! Here is my 2 contributions to the campaign. The first one is a jig I use to weather HO scale cars. The idea is not from me but from another well know modeller.

Fairly simple, a piece of 2x4 lumber about 18" long, 2 pieces of coat hanger formed into some kind of support and some styrene tubes.

 photo BuildatoolCampaign-001_zps1a0f79b6.jpg
 photo BuildatoolCampaign-002_zps24966ad4.jpg
 photo BuildatoolCampaign-004_zps098eeefc.jpg
 photo BuildatoolCampaign-003_zpsb3162b2a.jpg

The second one is my workbench. I was sick and tired of not having a proper place to partake in my hobbies, so one day, I just decided to build this!

Aside from the 2 wall unit from Ikea (Billy), the center piece is all handmade.

 photo BuildatoolCampaign-005_zpsd779cbba.jpg
 photo BuildatoolCampaign-006_zpsee5981ab.jpg
 photo BuildatoolCampaign-007_zps545e99b6.jpg

Cheers!

Christian
KoSprueOne
Visit this Community
Myanmar
Member Since: March 05, 2004
entire network: 4,011 Posts
KitMaker Network: 879 Posts
Posted: Sunday, December 21, 2014 - 10:16 AM UTC
Hey Christian, that HO rolling stock holder looks handy dandy
Thanks for sharing the idea

I cut out the outer side of the cassette case to enable painting of the axles and inner wheel surfaces
http://railroadmodeling.kitmaker.net/forums/229248&page=1#1935128


Namabiiru
Staff MemberAssociate Editor
MODEL SHIPWRIGHTS
#399
Visit this Community
Rhode Island, United States
Member Since: March 05, 2014
entire network: 2,888 Posts
KitMaker Network: 489 Posts
Posted: Sunday, December 21, 2014 - 02:28 PM UTC
Christian,
I love what you've done with your workbench. Here's a photo of some shelves I built for my bench a little while ago.


Specifically, this is a photo of my tool-holder: I drilled a row of holes in a strip of wood, then epoxied rare earth magnets into each hole. Now my tools stay off the bench (mostly), but are always in easy reach.

You also see I keep my beer in easy reach--same as your bench!

Giovanni1508
Visit this Community
Napoli, Italy
Member Since: April 17, 2014
entire network: 652 Posts
KitMaker Network: 18 Posts
Posted: Sunday, December 21, 2014 - 04:24 PM UTC

Hi gents,

This is a very interesting campaign. I've just discovered this tread and I see many nice tools. During next weekend I'll try to post something from my workshop.

Cheers

Giovanni
Giovanni1508
Visit this Community
Napoli, Italy
Member Since: April 17, 2014
entire network: 652 Posts
KitMaker Network: 18 Posts
Posted: Sunday, December 21, 2014 - 04:36 PM UTC

Hi gents,

Just now proudly enlisted !

@ Jan Janssen: your tool for building belt buckles is simply fantastic !

Cheers
Giovanni
HARV
#012
Visit this Community
Wyoming, United States
Member Since: November 07, 2003
entire network: 3,098 Posts
KitMaker Network: 899 Posts
Posted: Sunday, December 21, 2014 - 06:51 PM UTC
Well......I am the person that kept pushing for Build-A-Tool III and I have yet to do anything with the campaign. Oh well, there are still 9 days left to go before it wraps up. I was actually able to work on a couple of my entries yesterday. I have one more to work on and I should be able to get some pictures posted. Nothing like waiting till the last minute to get something done. It has just been a rough year and I haven't had much time for any modeling. Hopefully that will be changing. So anyway I should have a few pictures to post in the next couple of days.

Thanks,
Randy
roteck
Visit this Community
Quebec, Canada
Member Since: January 12, 2004
entire network: 274 Posts
KitMaker Network: 6 Posts
Posted: Sunday, December 21, 2014 - 10:25 PM UTC
Thanks guys for the comments!

@KoSprueOne: I like your paint jig! Too bad I already bought the "super expensive" acrylic one!

@Mark C: The beer holder (aka "the work surface") hasn't much room now that I'm back into modelling, but I still manage to find a spot for it! :-)
EHAM0624
Visit this Community
Noord-Holland, Netherlands
Member Since: January 27, 2014
entire network: 200 Posts
KitMaker Network: 12 Posts
Posted: Monday, December 22, 2014 - 04:15 AM UTC

Quoted Text


Hi gents,

Just now proudly enlisted !

@ Jan Janssen: your tool for building belt buckles is simply fantastic !

Cheers
Giovanni


Hi Giovanni,
Glad to be off assistance
KoSprueOne
Visit this Community
Myanmar
Member Since: March 05, 2004
entire network: 4,011 Posts
KitMaker Network: 879 Posts
Posted: Monday, December 22, 2014 - 10:37 AM UTC

Quoted Text

Thanks guys for the comments!

@KoSprueOne: I like your paint jig! Too bad I already bought the "super expensive" acrylic one!

@Mark C: The beer holder (aka "the work surface") hasn't much room now that I'm back into modelling, but I still manage to find a spot for it! :-)


Thanks, I saw the "super expensive" acrylic ones and then wanted to make one with something that I already had around the house. This way I wouldn't have to buy anything.


retiredyank
Visit this Community
Arkansas, United States
Member Since: June 29, 2009
entire network: 11,610 Posts
KitMaker Network: 3,657 Posts
Posted: Wednesday, December 24, 2014 - 04:12 AM UTC
Wheel mask. I have made others for a Panther and Panzer III, as well.
majjanelson
Visit this Community
South Carolina, United States
Member Since: December 14, 2006
entire network: 1,355 Posts
KitMaker Network: 336 Posts
Posted: Wednesday, December 24, 2014 - 05:08 AM UTC
Since I haven't actually gotten much modeling work done in the last 6 months, I haven't had a chance to contribute to this thread.

I have a couple "tools" for helping with installing PE parts, small plastic parts, or other tiny items. I don't have pictures, but the two items are pretty simple.

1. I dip approximately 1/4" of the tips of my tweezers into melted candle wax and then let it cool. When I pick up small PE or plastic parts, the wax has a slight tackiness that helps to keep the part from slipping out of the tweezers and I don't have to hold them so tight, which also helps prevent the parts from suddenly flying away. Once the wax starts wearing off, I just clean it off and re-dip them into the wax again.

2. I do the same with the tips of tooth picks, plastic rod or even wire to make simple "pick up" tools for placing a PE part onto a bit of glue. I touch the wax tip to the part and it sticks just enough to pick up small items. Once the glue sets enough, I just pull the "tool" away.

Not much for now, but I hope this helps.
KoSprueOne
Visit this Community
Myanmar
Member Since: March 05, 2004
entire network: 4,011 Posts
KitMaker Network: 879 Posts
Posted: Thursday, December 25, 2014 - 05:42 AM UTC
Good ideas, majjanelson


Quoted Text

CALLSIGN:retiredyank

Wheel mask. I have made others for a Panther and Panzer III, as well.


Very functional and affordable


KoSprueOne
Visit this Community
Myanmar
Member Since: March 05, 2004
entire network: 4,011 Posts
KitMaker Network: 879 Posts
Posted: Thursday, December 25, 2014 - 05:49 AM UTC
HO scale wheel mask, Tool finished : http://railroadmodeling.kitmaker.net/forums/229248&page=1#1936346

The thickness of the TDK cassette case was thinner than I thought so I layered on masking tape for thickness. 3 layers thick brought the thickness to the face of the wheels.

The tape was then cut out of the round openings to accept the wheel faces.


This requires rotation of the axles to paint the other side.
This paint mask will be a useful tool on my bench for many times to come. I hope the info can be useful to you too


?? where is the campaign finish gallery ??


Giovanni1508
Visit this Community
Napoli, Italy
Member Since: April 17, 2014
entire network: 652 Posts
KitMaker Network: 18 Posts
Posted: Sunday, December 28, 2014 - 10:42 PM UTC

Quoted Text


?? where is the campaign finish gallery ??


I think we don't have any campaign finish gallery, right ?

BigSmitty
Visit this Community
Minnesota, United States
Member Since: October 01, 2008
entire network: 597 Posts
KitMaker Network: 140 Posts
Posted: Monday, December 29, 2014 - 08:26 AM UTC
A bit late to this campaign, but I have a couple of tools I designed to help with certain areas of modeling.

First up is the paint rack. I paint almost exclusively with Vallejo (Panzer Aces, Model Air, Model Color) and the 17ml eye dropper is becoming more widely used. I took a 48" x 24" piece of 1/8" plywood as my backdrop, then built up the shelves. I left two shelves at the bottom for smaller size bottles such as the Tamiya "minis" and the Model Master glass jars. It is secured to the desk by countersunk 2" wood screws, and additional support from the cinder block walls in my half of the basement.


My second offering is a bit more specialized, and I wish I could take credit for it, but a member of my club built one similar and showed it to me last month.

It is designed as a figure holder, and can hold seven figures (75mm or smaller) on each "peg". I used a 1 3/4" cork cylinder for the base, then drilled out a 3/16" hole for the 2" wooden dowel. Think of each "peg" as a popsicle if you will. You can remove them from the base ($2.49 at a local craft store) and you have enough room to hold the figure if you need to get underneath for whatever reason. Then you simply plug the "peg" into the base to let it dry, etc. Again, the dowel was $1.19, the cork was $1.99 for the bag of 10, and the base was $2.49. That's a complete set of seven figure holders for under $7.00 (I think).

This is assuming you insert little brass (0.01" diameter) rod into your figures for painting, etc.


matt
Staff MemberCampaigns Administrator
Visit this Community
New York, United States
Member Since: February 28, 2002
entire network: 5,957 Posts
KitMaker Network: 2,626 Posts
Posted: Monday, December 29, 2014 - 11:01 PM UTC
All,

I'm extending this until Jan 11th 2015,due to the Honey do list that has taken over my time away from work for the holidays.

Matt
Namabiiru
Staff MemberAssociate Editor
MODEL SHIPWRIGHTS
#399
Visit this Community
Rhode Island, United States
Member Since: March 05, 2014
entire network: 2,888 Posts
KitMaker Network: 489 Posts
Posted: Tuesday, December 30, 2014 - 03:04 AM UTC
Never thought I'd hear myself saying this to a guy, but nice rack, Smitty!

HARV
#012
Visit this Community
Wyoming, United States
Member Since: November 07, 2003
entire network: 3,098 Posts
KitMaker Network: 899 Posts
Posted: Tuesday, December 30, 2014 - 06:05 AM UTC
Thank you for the extension Matt. I make add a couple of more entries for now here are these two.

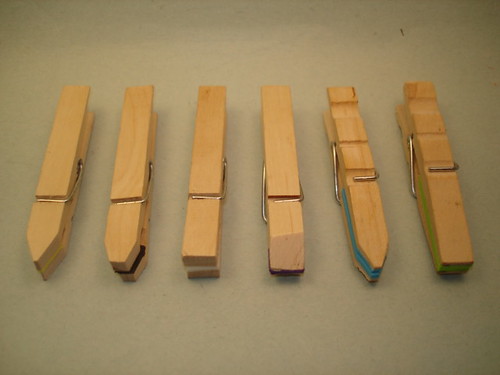
Nothing too fancy here. Just more clothes pin clamps. I cut the ends off square and then cut them into different shapes for different projects. I then glued some craft foam onto them to help protect any surfaces that might already be painted.

Build-A-Tool III  (1)

Build-A-Tool III  (2)

Build-A-Tool III  (3)

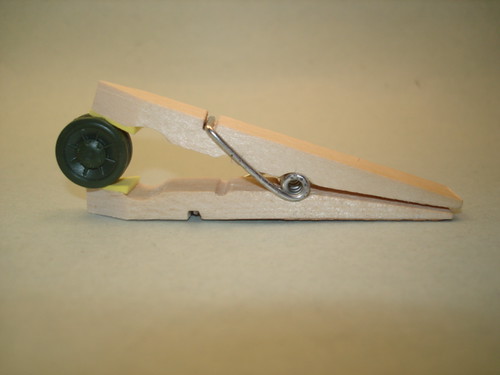
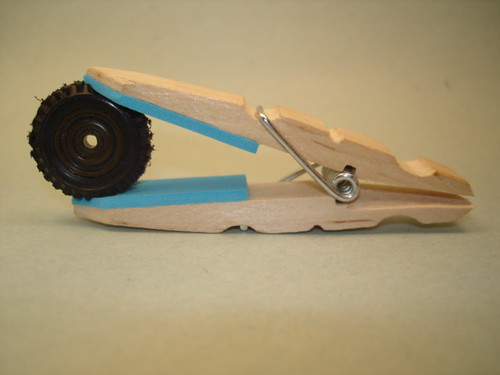
On these two clamps I took the clothes pins apart and basically reversed the spring. That way there is a longer area with which to clamp with. I also cut one of them to a different shape for different projects and applied craft foam to them as well. I also trimmed the former business end of the pins to allow them to be opened wider.

Build-A-Tool III  (4)

Build-A-Tool III  (5)

There is no reason for the different colors of craft foam other than I wanted to make each one different.

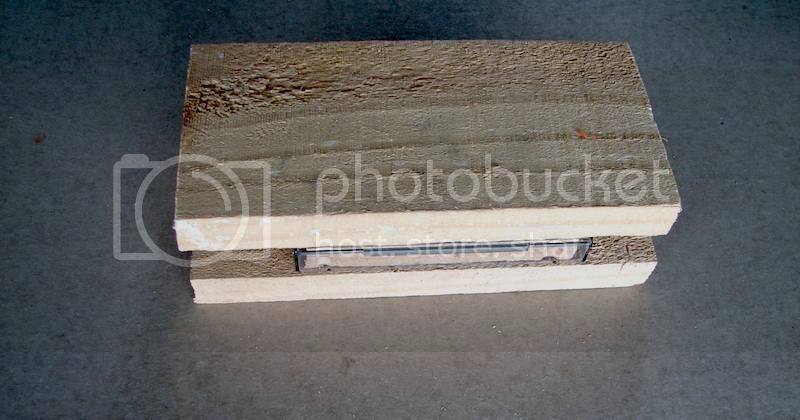
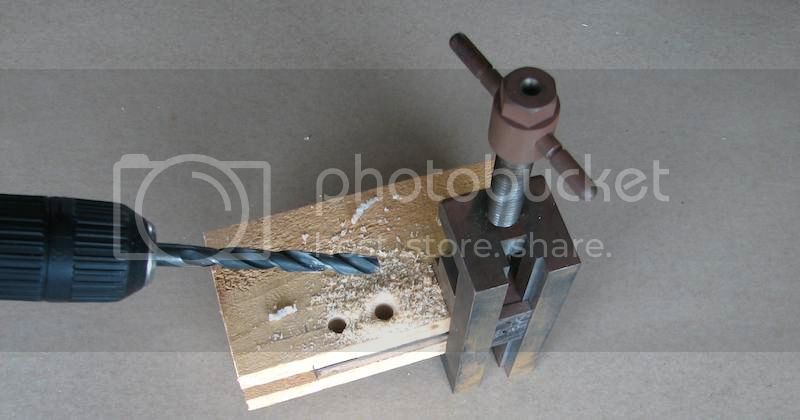
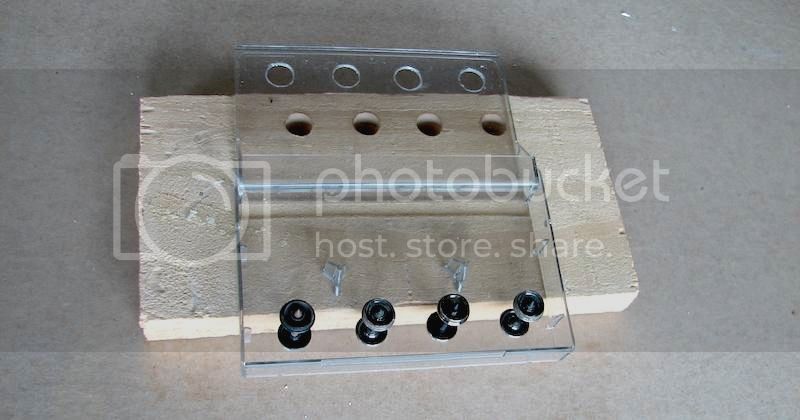
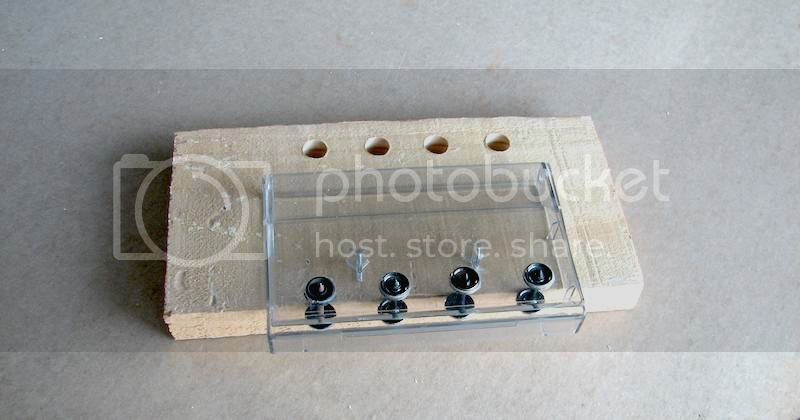
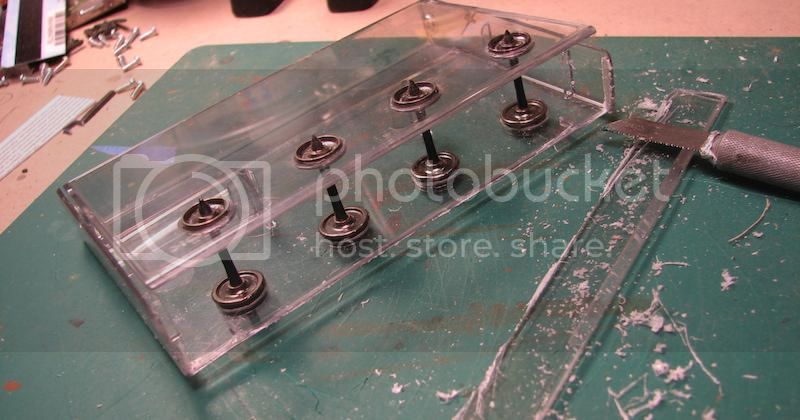
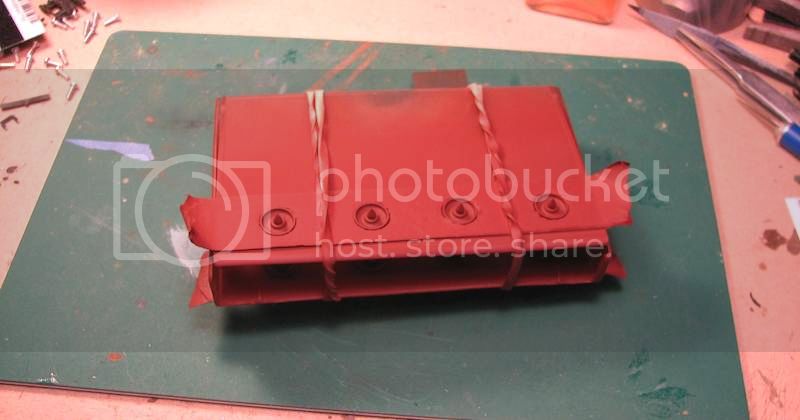
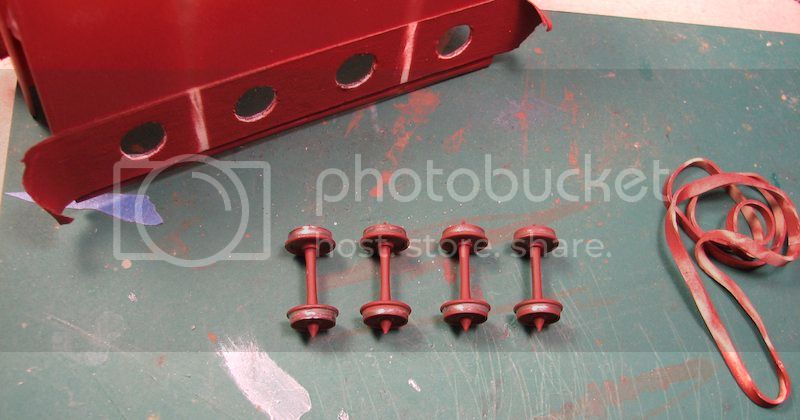
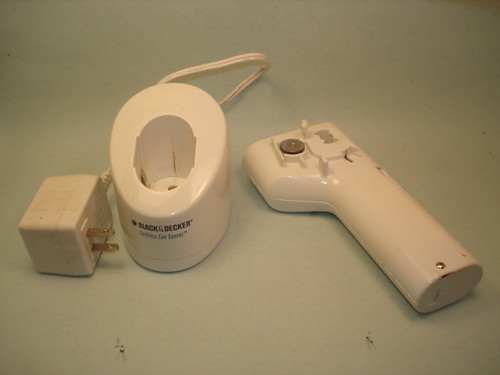
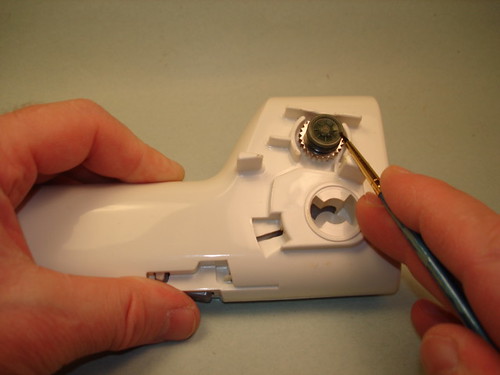
My other project is a very simple one to make. All I did was take an old rechargeable can opener and removed the cutting arm. Then all I did was add some double sided tape to the wheel. Now all I have to do is place my road wheel, or any other type of wheel, to the double sided tape, hold the paint brush in place and active the button. The can opener does all of the work for you.

Build-A-Tool III  (6)

Build-A-Tool III  (7)

Going to try adding a short video. Never tried this before.


Well the video works, sorry that it isn't very clear.

So that is all I have for now. I might add a couple more entries before the new end date.

Thank you for Build-A-Tool III Matt.

Randy
Delbert
#073
Visit this Community
Pennsylvania, United States
Member Since: October 05, 2002
entire network: 2,659 Posts
KitMaker Network: 865 Posts
Posted: Tuesday, December 30, 2014 - 06:06 AM UTC
Howdy

Here are my entries.

First up is my Model car body airbrush holder tool


It is made from a bit of aluminum I found at work. Aluminum is fairly flexible so it has some spring to it and can be bent some for different sized work pieces.


In order to get the curved end I bent my piece over the back of a chair.


You can see how I hold it in my left hand while I would use my right hand to airbrush.


Next up is my paint chip organizer.


What you need is a Index card flip book with the spiral ring. A paper shape cutter you can get at a craft store, I used a oval one for mine. I cut my ovals out of thin styrene I buy at the hobby store... which you see is attached to a craft stick for airbrushing.


I attach mine into the binder with bit of super glue. and write any information I want into their area. I like to make paint chips when I am starting to airbrush my model that way I can go back and see what exactly I used when and where..

thanks
Delbert
ejhammer
Visit this Community
Michigan, United States
Member Since: June 10, 2008
entire network: 230 Posts
KitMaker Network: 59 Posts
Posted: Tuesday, December 30, 2014 - 06:18 AM UTC
[Next up is my paint chip organizer. ]

Great idea. Thanks for posting.

EJ
KoSprueOne
Visit this Community
Myanmar
Member Since: March 05, 2004
entire network: 4,011 Posts
KitMaker Network: 879 Posts
Posted: Tuesday, December 30, 2014 - 08:33 AM UTC
Ok, cool Matt

wow, figure painter, paint chip organizer, cloths pins clamps…. Good and useful ideas


Delbert
#073
Visit this Community
Pennsylvania, United States
Member Since: October 05, 2002
entire network: 2,659 Posts
KitMaker Network: 865 Posts
Posted: Wednesday, December 31, 2014 - 03:21 AM UTC
Howdy again.. Since this was Build-a-Tool 3, I thought I'd add a third tool I made..

This one is my Adjustable Scale Model Auto Body Drying Rack.


As you can see its a small block of wood with a bunch of holes drilled into it for the dowels, sized so the dowels are fairly snug. the dowels are from those long cotton swabs you can buy and I just cut the ends off.

Delbert
ejhammer
Visit this Community
Michigan, United States
Member Since: June 10, 2008
entire network: 230 Posts
KitMaker Network: 59 Posts
Posted: Wednesday, December 31, 2014 - 07:05 AM UTC

Quoted Text

[Next up is my paint chip organizer. ]

Great idea. Thanks for posting.

EJ


Got an oval punch thingy today. Was on sale at Hobby Lobby for 40% off even.

EJ