Official: Helicopter Crossover Campaign
Wisconsin, United States
Member Since: September 11, 2009
entire network: 1,917 Posts
KitMaker Network: 133 Posts
Posted: Monday, January 27, 2014 - 07:47 AM UTC
Sounds excellent for inspiration! Steam punk submersible helicopter-- I don't think anyone else in the group build is making one of those.

Finishing my Great Build-Off Vampire now, but itching to get started here next. Did I mention that some of those spare parts have been waiting over 30 years for this campaign to come along?
-Sean H.


Current: model railroad layout
Stalled a while ago:
. 1950's Chrome, WW II Twins
Last completed: Police Car
Buenos Aires, Argentina
Member Since: May 21, 2012
entire network: 765 Posts
KitMaker Network: 10 Posts
Posted: Sunday, February 02, 2014 - 09:58 AM UTC
Well this is mine...
And very old UH-1H from Esci/Italeri and I will use some details from the sets from Eduard and CMK for the UH-1B
Those Radial Fighters Campaign: 1/72 FW 190 A5
Delta 2 Campaign: 1/48 Hobby Boss Mirage IIIC
Navy Boys on those Postage Stamps 1/72 Airfix Sea Harrier FA2
Working: Trumpeter A-5 Vigilante
Waiting: Phantom 60 Campaign
South Carolina, United States
Member Since: December 03, 2009
entire network: 2,160 Posts
KitMaker Network: 123 Posts
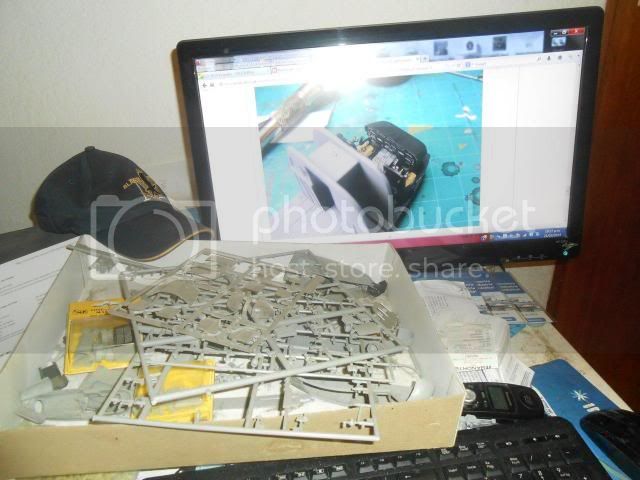
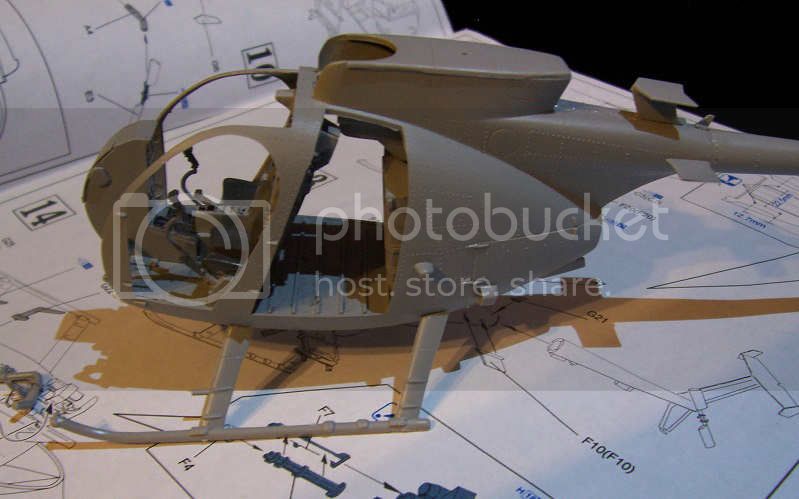
Posted: Tuesday, February 04, 2014 - 06:33 AM UTC
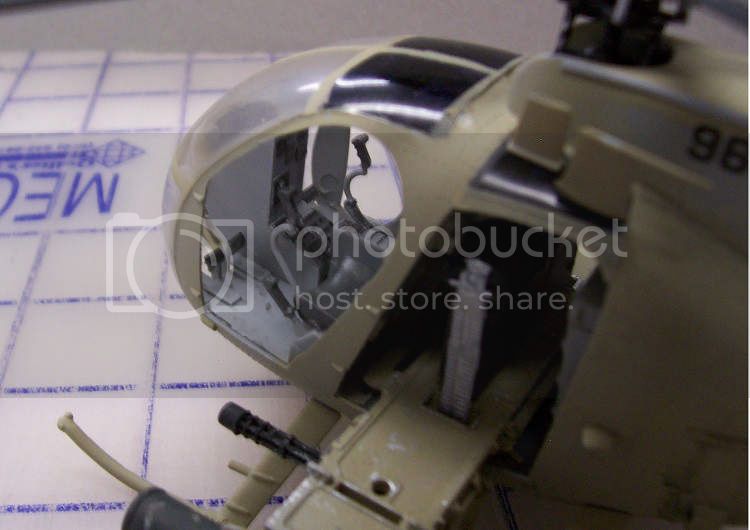
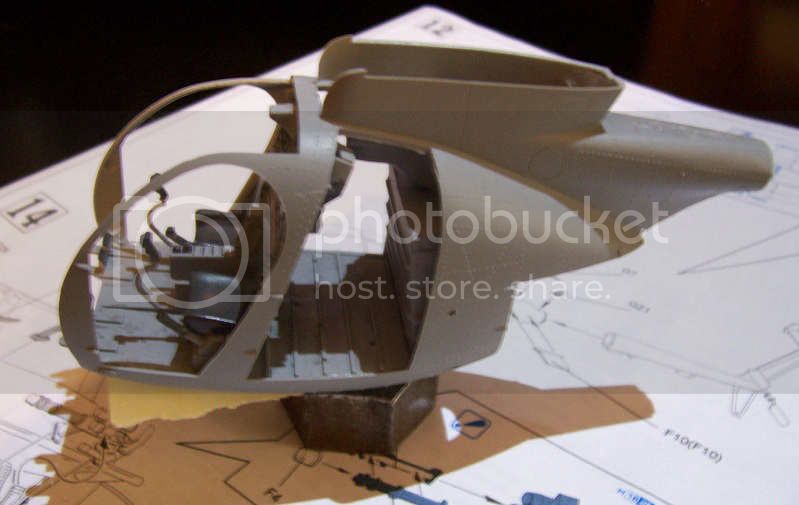
A quick update.
Time to work on the interior. I don't have the hands anymore for the fine painting for instruments, so I did what I could. I added a dark wash to bring out the interior details. I'm glad I broke from the kit's overall black scheme because so much detail would be lost.
Weapons mount and rear bulkhead. A dark wash was added to bring out detail.
Interior and fuselage halves come together. The cockpit placement was a bit vague and it was made more complicated by the ill-fit and a bit of warp-age with the fuselage.
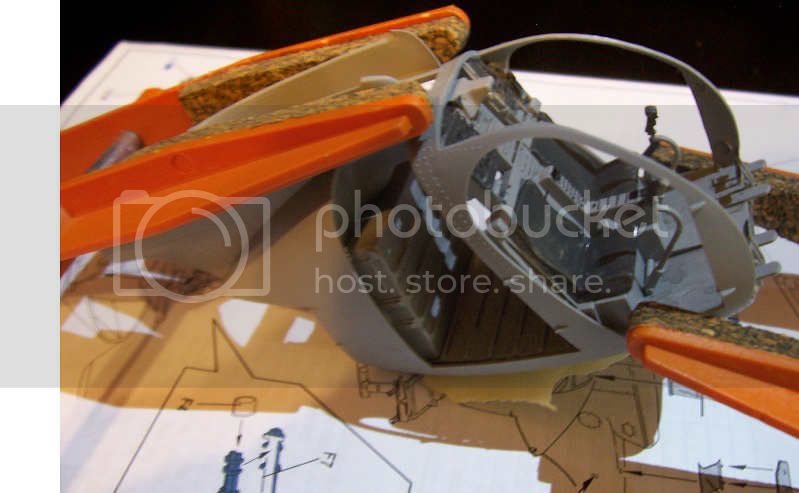
And without the clamps. There's still some alignment issues, but I can fix them as panels are added.
That's it for now. I'm playing around with some paint scheme ideas. I'm thinking of going with an aircraft in service with law enforcement, sort of a reference of the militarization of the US police departments.
England - South East, United Kingdom
Member Since: August 15, 2012
entire network: 408 Posts
KitMaker Network: 39 Posts
Posted: Friday, February 07, 2014 - 04:02 AM UTC
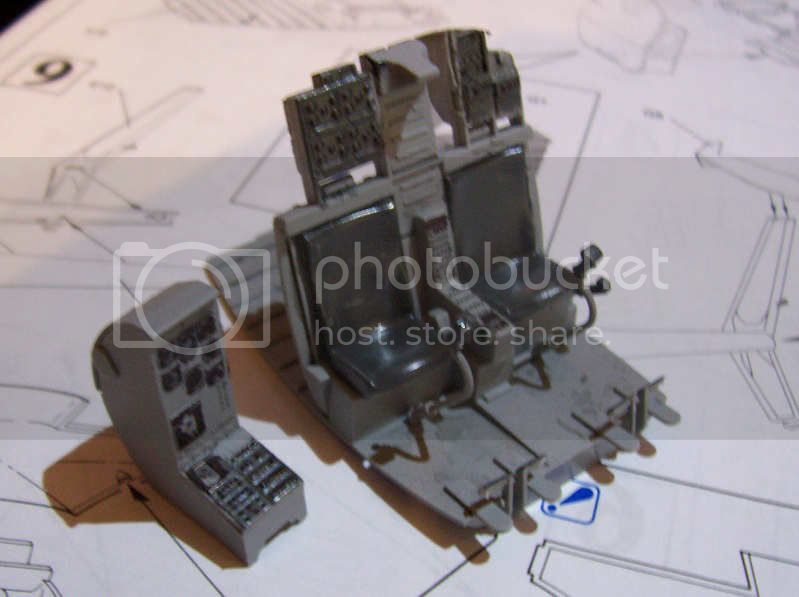
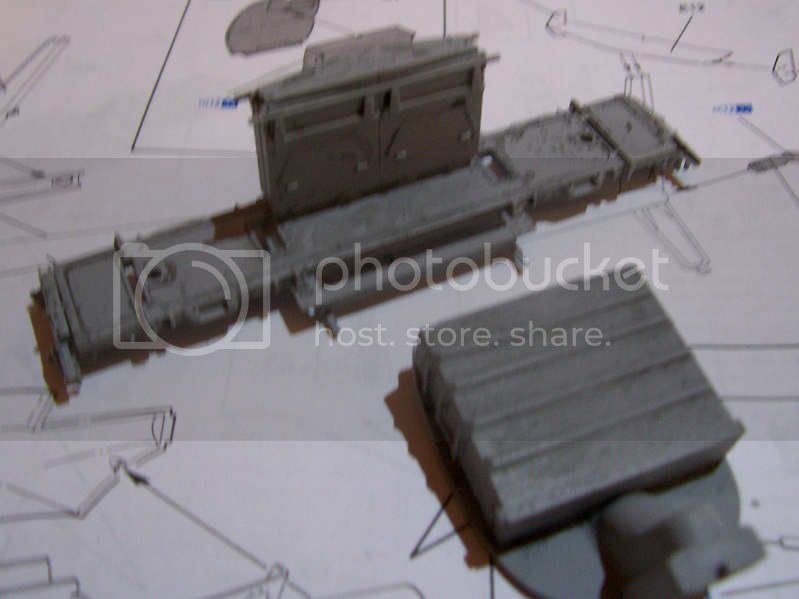
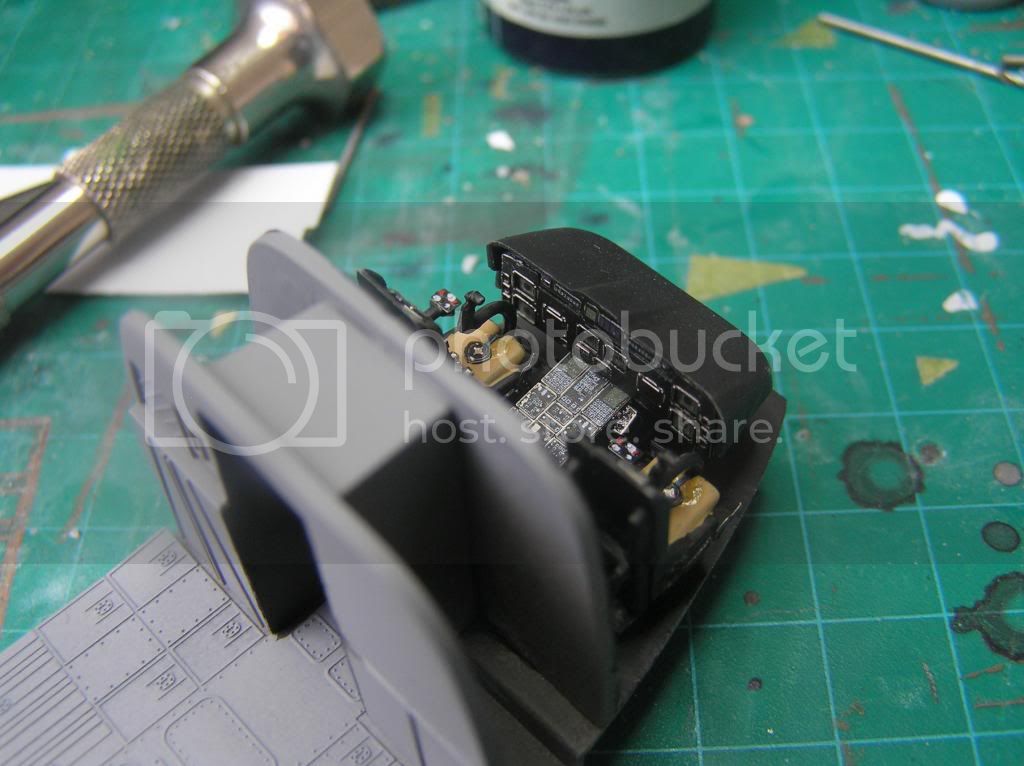
I've finally got around to starting the Merlin!

Not a lot to show you right now, as this will be a very slow and steady paced build. I got the kit off Evil Bay for a pretty cheap price, and I was suprised when I opened the box, and there was £30 worth of Eduard photoetch sets!

Since the campaign started, I have acquired an additional resin upgrade set from Heritage Aviation Models Ltd.

This set includes parts for the RAF HC.3 and the Danish Army version.
On the workbench
National Pride - 1/72 BAe Nimrod MR2.P
Tiger Meet! - 1/72 Panavia Tornado ECR (Luftwaffe)
Airfix III - 1/72 Hawker Hunter FGA.9
Hairy Brush - 1/72 P-51D Mustang
Mustang 75 - 1/72 P-51D "Ferocious Frankie"
England - South East, United Kingdom
Member Since: August 15, 2012
entire network: 408 Posts
KitMaker Network: 39 Posts
Posted: Saturday, February 15, 2014 - 03:53 AM UTC
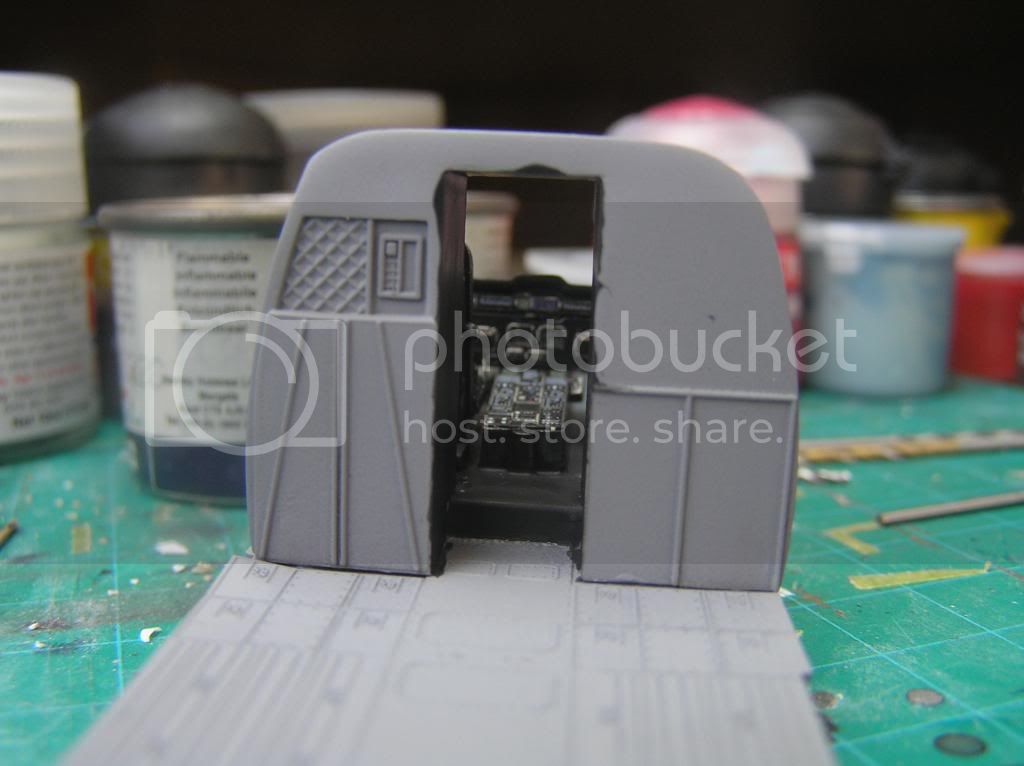
Some progress on the cockpit:
On the workbench
National Pride - 1/72 BAe Nimrod MR2.P
Tiger Meet! - 1/72 Panavia Tornado ECR (Luftwaffe)
Airfix III - 1/72 Hawker Hunter FGA.9
Hairy Brush - 1/72 P-51D Mustang
Mustang 75 - 1/72 P-51D "Ferocious Frankie"
Buenos Aires, Argentina
Member Since: May 21, 2012
entire network: 765 Posts
KitMaker Network: 10 Posts
Posted: Saturday, February 22, 2014 - 07:15 AM UTC
Well I founded in the stash and old kit of the DML 1/35 Huey wich I glue two pieces........, if Jessie give me the OK I changed the model...
Those Radial Fighters Campaign: 1/72 FW 190 A5
Delta 2 Campaign: 1/48 Hobby Boss Mirage IIIC
Navy Boys on those Postage Stamps 1/72 Airfix Sea Harrier FA2
Working: Trumpeter A-5 Vigilante
Waiting: Phantom 60 Campaign
British Columbia, Canada
Member Since: September 03, 2009
entire network: 6,965 Posts
KitMaker Network: 609 Posts
Posted: Saturday, February 22, 2014 - 09:03 AM UTC
There's always room for a Huey

When once you have tasted flight you will walk the Earth with your eyes turned skyward.
For there you have been, and there you will always long to return.
-Leonardo Da Vinci
Buenos Aires, Argentina
Member Since: May 21, 2012
entire network: 765 Posts
KitMaker Network: 10 Posts
Posted: Sunday, February 23, 2014 - 12:37 AM UTC
@Jessica,
Thanks Jessica, I will start today!!!
Those Radial Fighters Campaign: 1/72 FW 190 A5
Delta 2 Campaign: 1/48 Hobby Boss Mirage IIIC
Navy Boys on those Postage Stamps 1/72 Airfix Sea Harrier FA2
Working: Trumpeter A-5 Vigilante
Waiting: Phantom 60 Campaign
South Carolina, United States
Member Since: December 03, 2009
entire network: 2,160 Posts
KitMaker Network: 123 Posts
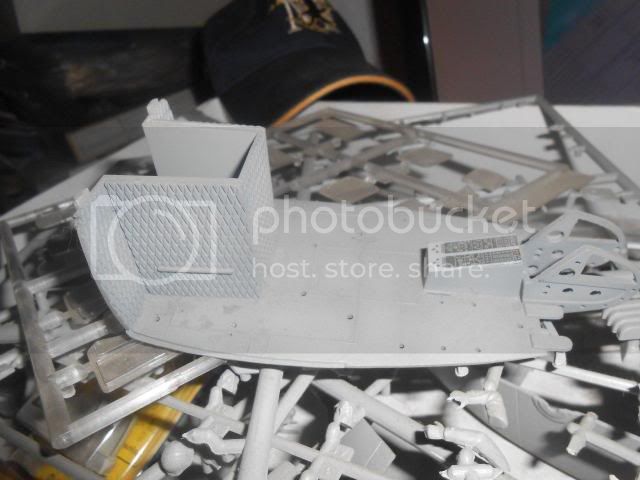
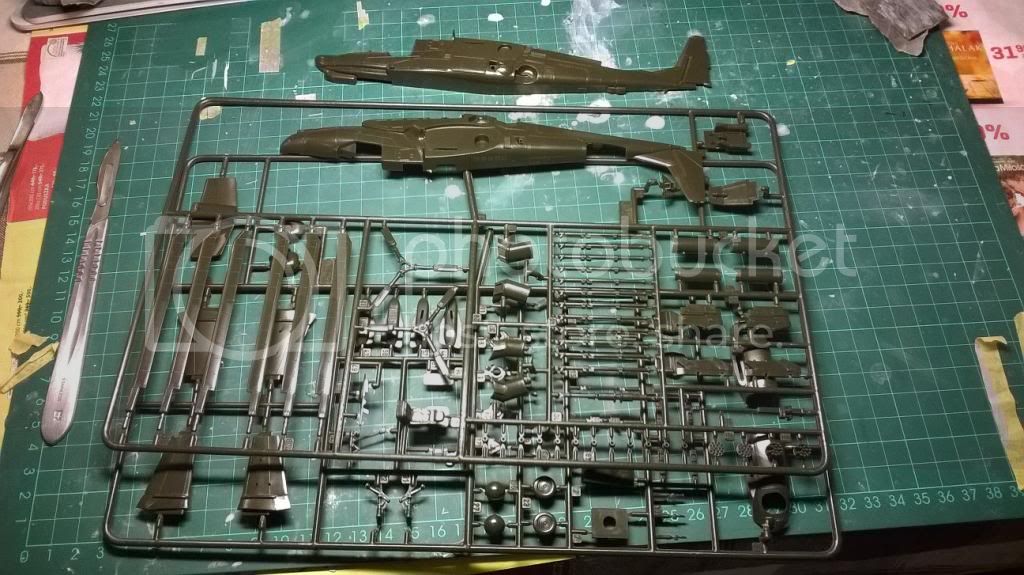
Posted: Wednesday, February 26, 2014 - 08:09 AM UTC
Update.
Added miscellaneous fins and aeros...at least the ones that I was least likely to knock off during assembly and paint. A lot of the locator holes for these require being drilled out. Dragon didn't even flash over many of them so you'll need to get the metric ruler out and work out their placements. And, it's easy to overlook some of these.

Jumped ahead and assembled the rotor assembly.

Added the landing skids and the engine cowling.
I took advantage of the nice weather and got some painting done. I decided to go with a tan color for the exterior. Masked the canopy and covered the open doors.
Canopy mounted. Now to start on the weapons spar. I had waited until later in assembly to do this to make painting easier.
Now I have to get the miniguns and rocket pods ready. I'm dreading the ammo chutes the most. They are molded straight and flat and each will require some bending to get them to work. I have to try to get that done without breaking them. This would be a great application for DS. I'll try to get that done by the weekend or next week.
Buenos Aires, Argentina
Member Since: May 21, 2012
entire network: 765 Posts
KitMaker Network: 10 Posts
Posted: Wednesday, February 26, 2014 - 10:34 AM UTC
@Alex: Nice....
I start with my Iroquis...

Those Radial Fighters Campaign: 1/72 FW 190 A5
Delta 2 Campaign: 1/48 Hobby Boss Mirage IIIC
Navy Boys on those Postage Stamps 1/72 Airfix Sea Harrier FA2
Working: Trumpeter A-5 Vigilante
Waiting: Phantom 60 Campaign
Województwo Gdanskie, Poland
Member Since: August 05, 2010
entire network: 37 Posts
KitMaker Network: 4 Posts
Posted: Tuesday, March 04, 2014 - 06:55 AM UTC
Hi,
From my side I will participate with Italeri 1:72 Ka-50 kit.
For a good begginig small in-box (actually I bought it without a box, but nevermind
)
European Union
Member Since: September 28, 2004
entire network: 2,186 Posts
KitMaker Network: 263 Posts
Posted: Monday, March 10, 2014 - 01:07 AM UTC
Woeps...
I just concluded that I have been buidling like a maniac for two weeks and not posted any progress picture.
This unacceptable shortcoming needs rectification soon

By the way, nice builds here, i particularly love that Loach
The mission: Beat the stash.
Almost conquered: MIG-29, Blackhawk, Skyray, Skyraider, fouga
Main battle:Demon, Skyhawk, F-14, CH-53
Stash reserve:Blackhawk, CH-46, 47 en 53; SU-7, Eurofighter, mohawk, hellcat, F-16D, 6x Fouga Magister, Voodoo
South Carolina, United States
Member Since: December 03, 2009
entire network: 2,160 Posts
KitMaker Network: 123 Posts
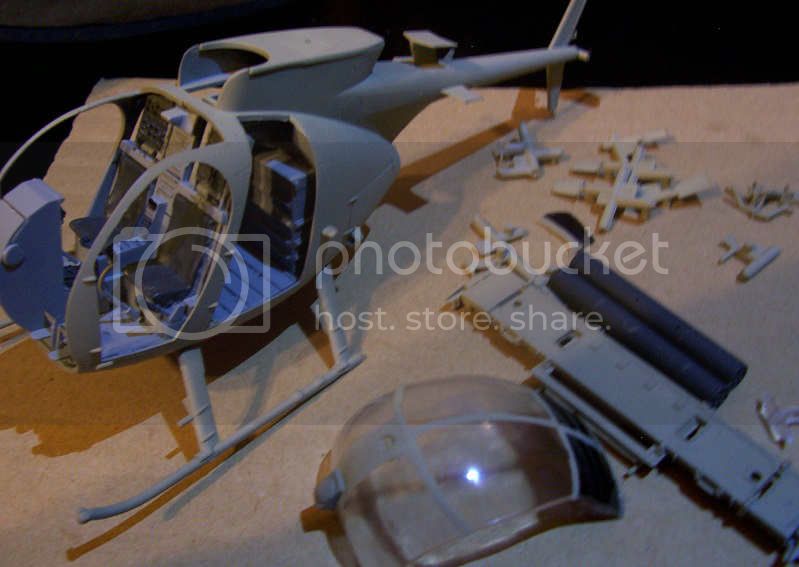
Posted: Thursday, March 13, 2014 - 06:33 AM UTC
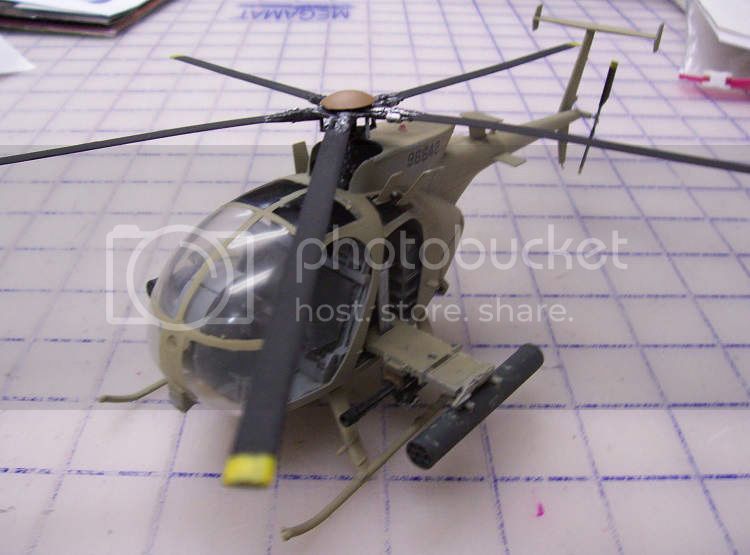
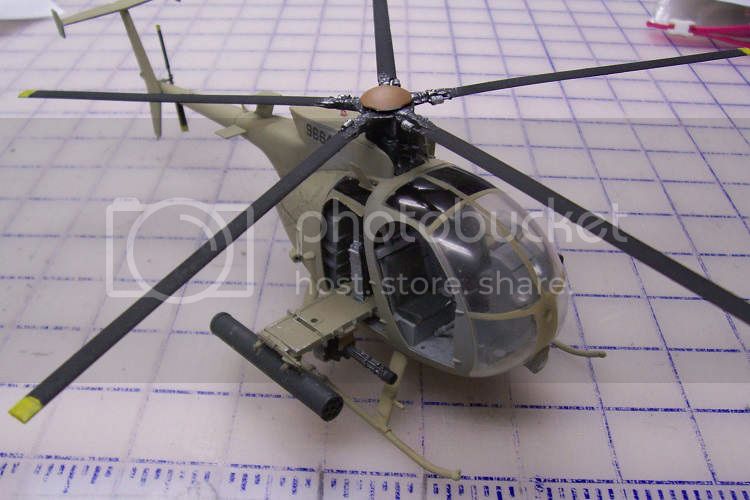
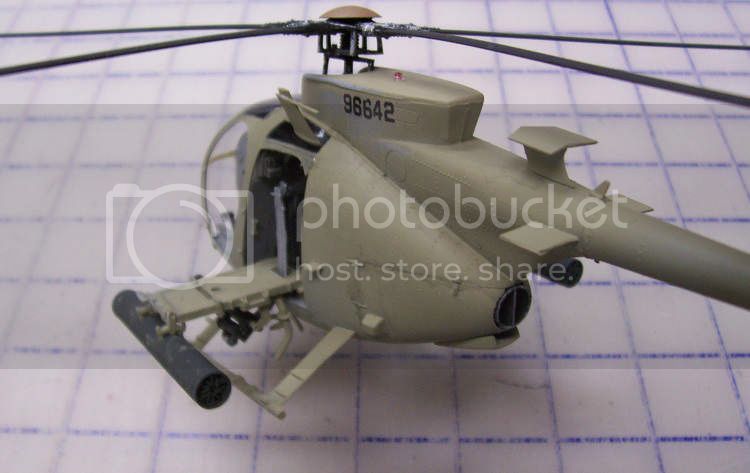
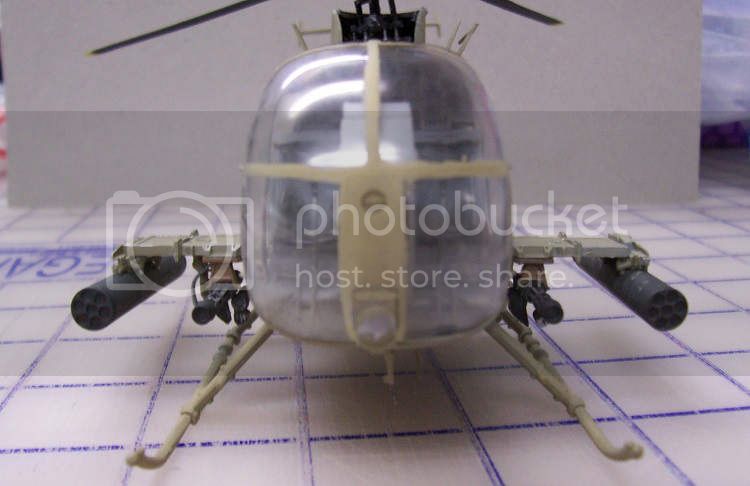
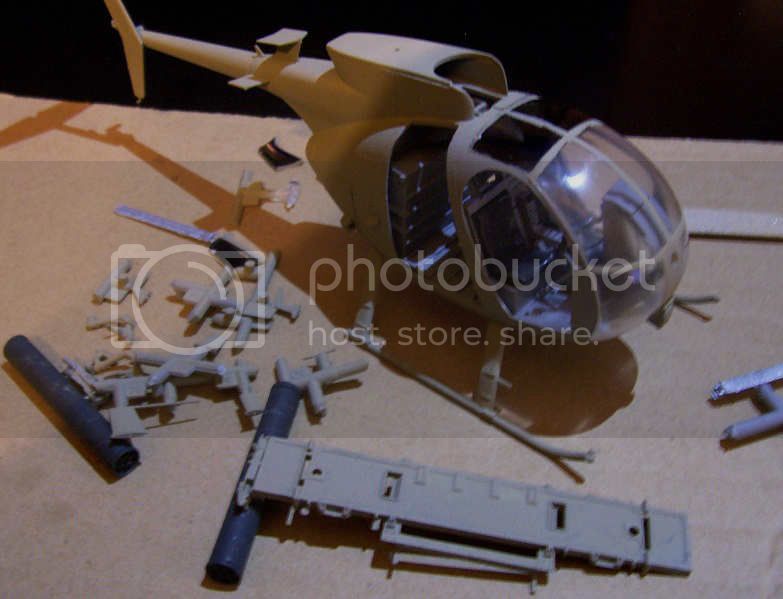
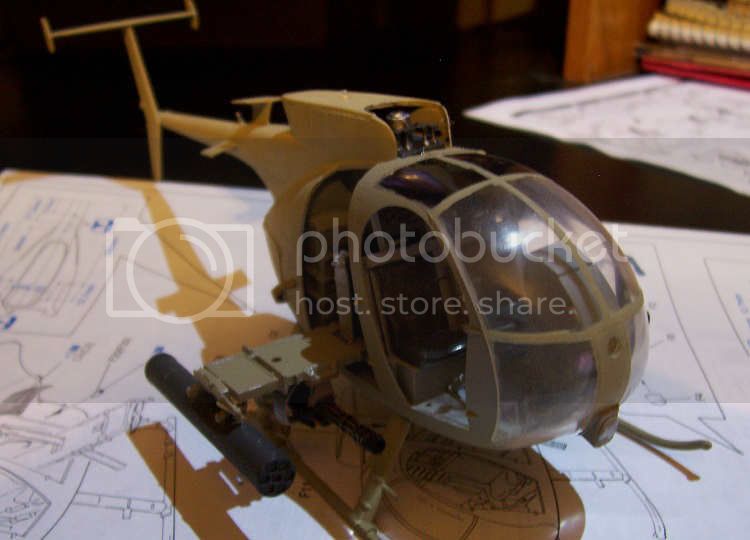
Update on my tan Little Bird.
The instructions would have you set the weapons spar before the fuselage is done, but I had to be Mr. Contrarian. I wrestled the ammo chutes into place and added the ammo box. I then added the rocket pod and minigun to one side of the spar. I slid it through and added the second set of weapons to the other side. And yes, it was a pain and much profanity was spewed. The ammo belts are undersized in terms of thickness and are a real pain to form the needed curves and bends to feed them through to the guns. A candidate for DS replacement versions.

Whalla!
Added rotors...yes I painted the yellow safety tips. Added the remaining aero-fins and panels.
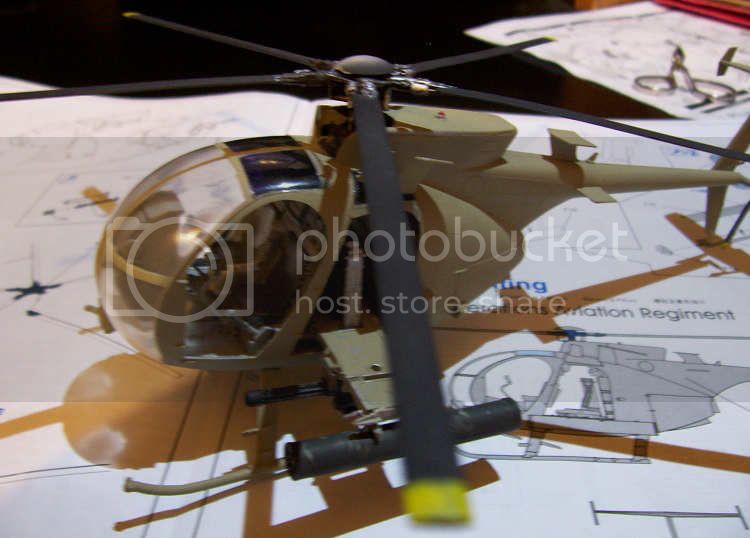
Added decals from the spares...kit doesn't come with any markings. Added a touch of tan to the rotor center cover cap. And here she basically is.
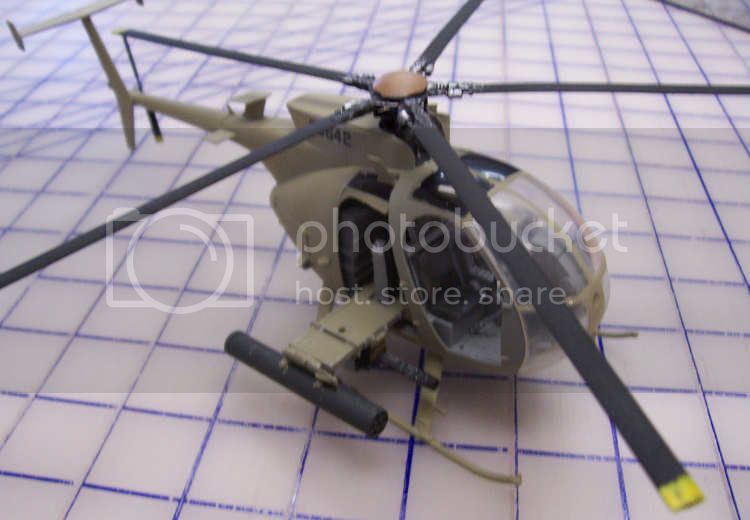
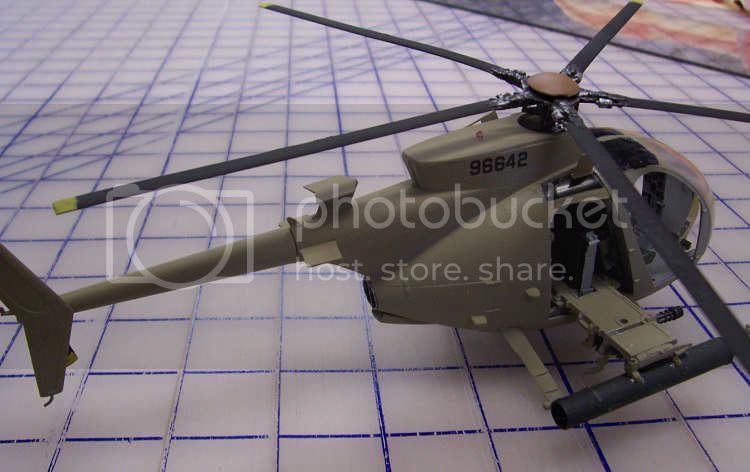
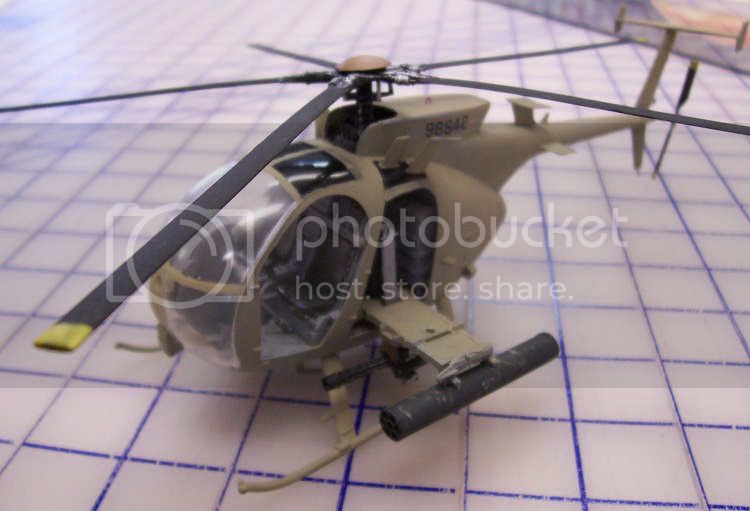
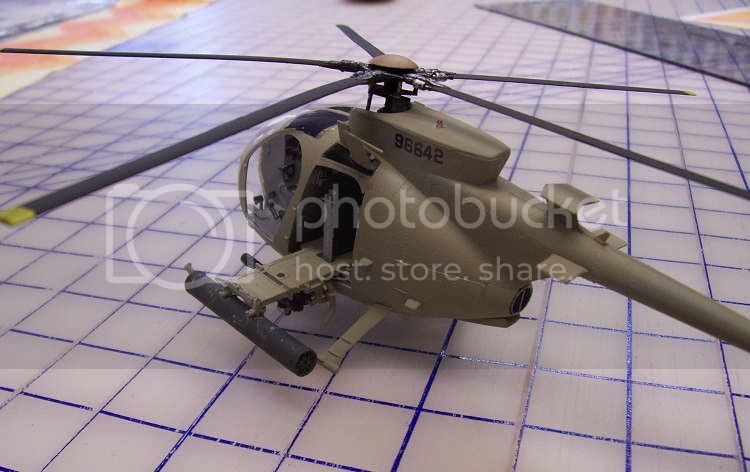
She still has a few details that need to be addressed but I think she's just about done. If I can find some Police decals I like she might become a police vehicle...they take a hardline approach to traffic patrol. I might add a light wash and drybrushing to bring out some of the detail. I don't want a lot of weathering because there really shouldn't be a lot on this vehicle...it's not like it's WW2 Jeep.
The kit had its moments but looks quite nice. Whether it's a Loach or a Little Bird, it really is a great looking, sporty chopper. It'll look nice on my whirly-bird shelf next to my Hueys and Cobras. Still have room for a Kiowa and Blackhawk.
South Carolina, United States
Member Since: December 03, 2009
entire network: 2,160 Posts
KitMaker Network: 123 Posts
Posted: Saturday, March 15, 2014 - 02:29 PM UTC
Buenos Aires, Argentina
Member Since: May 21, 2012
entire network: 765 Posts
KitMaker Network: 10 Posts
Posted: Tuesday, March 18, 2014 - 10:03 AM UTC
@Alex,
The little Bird is Nice!!!!!!!!!
Those Radial Fighters Campaign: 1/72 FW 190 A5
Delta 2 Campaign: 1/48 Hobby Boss Mirage IIIC
Navy Boys on those Postage Stamps 1/72 Airfix Sea Harrier FA2
Working: Trumpeter A-5 Vigilante
Waiting: Phantom 60 Campaign
Buenos Aires, Argentina
Member Since: May 21, 2012
entire network: 765 Posts
KitMaker Network: 10 Posts
Posted: Wednesday, March 19, 2014 - 04:22 PM UTC
Those Radial Fighters Campaign: 1/72 FW 190 A5
Delta 2 Campaign: 1/48 Hobby Boss Mirage IIIC
Navy Boys on those Postage Stamps 1/72 Airfix Sea Harrier FA2
Working: Trumpeter A-5 Vigilante
Waiting: Phantom 60 Campaign
Wisconsin, United States
Member Since: September 11, 2009
entire network: 1,917 Posts
KitMaker Network: 133 Posts
Posted: Wednesday, March 19, 2014 - 07:59 PM UTC
Quoted Text
@Alex,
The little Bird is Nice!!!!!!!!!
Ditto! Well done!
-Sean H
Current: model railroad layout
Stalled a while ago:
. 1950's Chrome, WW II Twins
Last completed: Police Car
South Carolina, United States
Member Since: December 03, 2009
entire network: 2,160 Posts
KitMaker Network: 123 Posts
Posted: Thursday, March 20, 2014 - 05:11 AM UTC
Thanks guys.
I'm really liking the cockpit detail Lee and Jose have done.
Buenos Aires, Argentina
Member Since: May 21, 2012
entire network: 765 Posts
KitMaker Network: 10 Posts
Posted: Friday, March 21, 2014 - 05:39 PM UTC
Thanks for your comment Alex and Sean!!!!
Those Radial Fighters Campaign: 1/72 FW 190 A5
Delta 2 Campaign: 1/48 Hobby Boss Mirage IIIC
Navy Boys on those Postage Stamps 1/72 Airfix Sea Harrier FA2
Working: Trumpeter A-5 Vigilante
Waiting: Phantom 60 Campaign
Buenos Aires, Argentina
Member Since: May 21, 2012
entire network: 765 Posts
KitMaker Network: 10 Posts
Posted: Saturday, March 22, 2014 - 10:40 AM UTC
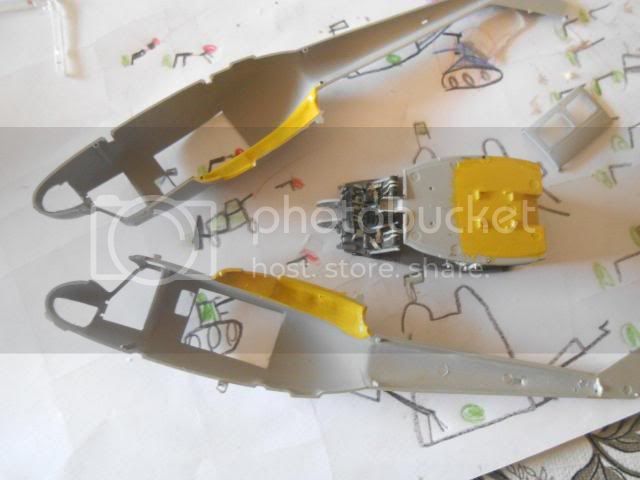
A little update...
Those Radial Fighters Campaign: 1/72 FW 190 A5
Delta 2 Campaign: 1/48 Hobby Boss Mirage IIIC
Navy Boys on those Postage Stamps 1/72 Airfix Sea Harrier FA2
Working: Trumpeter A-5 Vigilante
Waiting: Phantom 60 Campaign
Ecuador
Member Since: March 25, 2004
entire network: 84 Posts
KitMaker Network: 5 Posts
Posted: Monday, April 07, 2014 - 12:36 PM UTC
Nice builds everybody Im going in with a AH-1W Super Cobra


Buenos Aires, Argentina
Member Since: May 21, 2012
entire network: 765 Posts
KitMaker Network: 10 Posts
Posted: Monday, April 07, 2014 - 06:38 PM UTC
@Gonzalo:
Nice!!!!!!!!!!!!!
Those Radial Fighters Campaign: 1/72 FW 190 A5
Delta 2 Campaign: 1/48 Hobby Boss Mirage IIIC
Navy Boys on those Postage Stamps 1/72 Airfix Sea Harrier FA2
Working: Trumpeter A-5 Vigilante
Waiting: Phantom 60 Campaign
Merlin
 Senior Editor
#017
United Kingdom
Member Since: June 11, 2003
entire network: 17,582 Posts
KitMaker Network: 2,250 Posts
Posted: Saturday, April 12, 2014 - 07:25 PM UTC
Hi there
Sorry for the lousy quality photo, but I snapped a quick shot of my Fire Scout before I head off to work to show I haven't been entirely idle.

All the best
Rowan
BEWARE OF THE FEW...
As I grow older, I regret to say that a detestable habit of thinking seems to be getting a hold of me. - H. Rider Haggard
#523
Idaho, United States
Member Since: February 28, 2014
entire network: 342 Posts
KitMaker Network: 13 Posts
Posted: Wednesday, April 23, 2014 - 01:53 PM UTC
Ecuador
Member Since: March 25, 2004
entire network: 84 Posts
KitMaker Network: 5 Posts
Posted: Thursday, April 24, 2014 - 10:58 AM UTC