Michigan, United States
Member Since: June 10, 2008
entire network: 230 Posts
KitMaker Network: 59 Posts
Posted: Saturday, December 12, 2015 - 12:24 AM UTC
My second contribution.
Been doing more stuff with wood and had no good way to store those long skinny items. I made a rack for the school to store balsa for the science Olympiad program and liked it so much I made one for me too. I had a skinny place between some storage shelves and the spray booth, so I made it to fit there and use the space.
Made of cut-offs of 2" dia PVC pipe. put a scrap of lexan on the bottom. Stuck them together with PVC pipe cement.


EJ
Fair Winds and Following Seas
EJ
matt
 Campaigns Administrator
New York, United States
Member Since: February 28, 2002
entire network: 5,957 Posts
KitMaker Network: 2,626 Posts
Posted: Saturday, December 12, 2015 - 04:08 PM UTC
I have the same thing for my Brass (only it's old Plastruct ABS tube) it works great!!!
Tools & Supplies Forum Moderator
United States
Member Since: December 19, 2013
entire network: 1 Posts
KitMaker Network: 1 Posts
Posted: Sunday, December 13, 2015 - 02:43 AM UTC
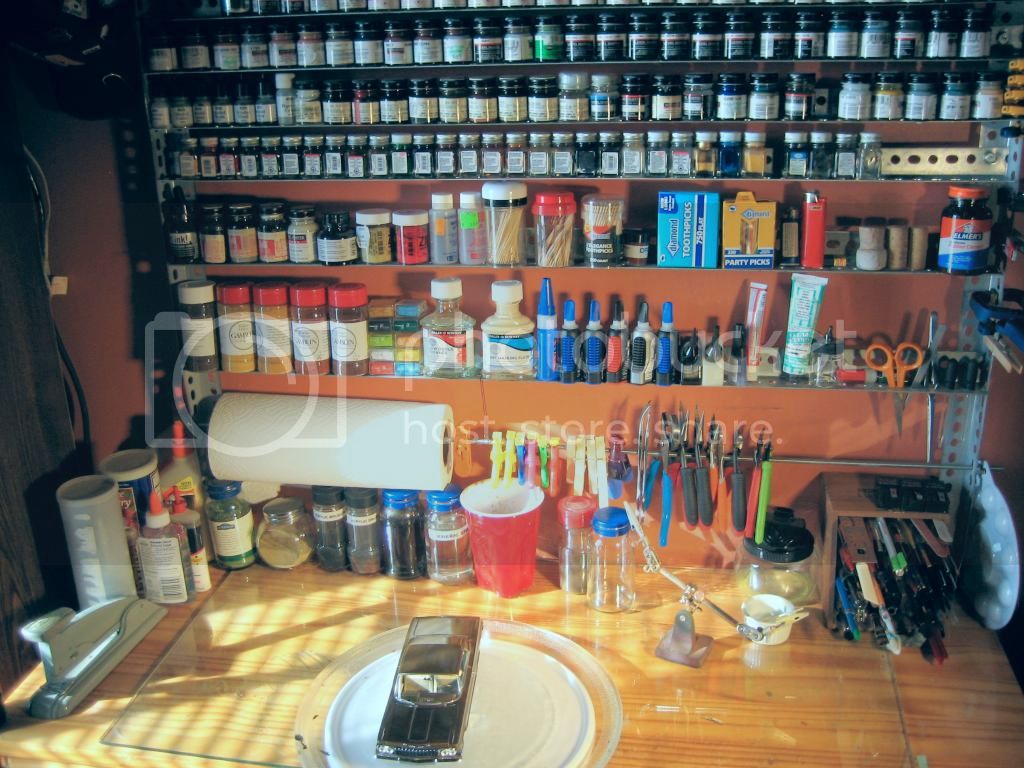
Here is my paint racking system...I wanted a paint rack that i could change as my paints changed and shelves added as needed... most are made from wood and the shelves can not be moved... mine can...its made from angle steel purchased at one of the big box stores.and bolted together using 1/2 inch nut and bolts... so simple to take a shelf out or add one, move one up or down...added a rod to hold paper towels and tools at the bottom
Namabiiru
Associate Editor 
#399
Rhode Island, United States
Member Since: March 05, 2014
entire network: 2,888 Posts
KitMaker Network: 489 Posts
Posted: Sunday, December 13, 2015 - 05:27 PM UTC
Very cool ideas, EJ and Joe.

New South Wales, Australia
Member Since: May 20, 2014
entire network: 197 Posts
KitMaker Network: 34 Posts
Posted: Sunday, December 13, 2015 - 05:58 PM UTC
Great ideas here guys! Thanks for sharing.
Michigan, United States
Member Since: June 10, 2008
entire network: 230 Posts
KitMaker Network: 59 Posts
Posted: Sunday, December 13, 2015 - 06:34 PM UTC
Quoted Text
Here is my paint racking system...I wanted a paint rack that i could change as my paints changed and shelves added as needed... most are made from wood and the shelves can not be moved... mine can...its made from angle steel purchased at one of the big box stores.and bolted together using 1/2 inch nut and bolts... so simple to take a shelf out or add one, move one up or down...added a rod to hold paper towels and tools at the bottom
I like it! The nipper rack and the little box for exacto's and sanding sticks too. Lots of great ideas there.
EJ
Fair Winds and Following Seas
EJ
England - West Midlands, United Kingdom
Member Since: August 01, 2012
entire network: 960 Posts
KitMaker Network: 175 Posts
Posted: Friday, December 18, 2015 - 11:54 PM UTC
I've taken some ordinary clothes pins and reversed them to make some inexpensive clamps like these.


England - West Midlands, United Kingdom
Member Since: August 01, 2012
entire network: 960 Posts
KitMaker Network: 175 Posts
Posted: Saturday, December 19, 2015 - 12:02 AM UTC
Is there a gallery to post our completed work to? Or, is this forum the posting place?
Dunedin, New Zealand
Member Since: September 17, 2012
entire network: 266 Posts
KitMaker Network: 69 Posts
Posted: Tuesday, December 22, 2015 - 03:02 PM UTC
After a slight mishap of a 7kg Lathe Chuck rolling onto my old vac-forming box there was a need for a replacement so after a quick hunt through my scraps/off-cuts I was able to scrounge enough materials for my needs

.
A bit of cutting and sanding and job done

.
Made a few slight changes/modifications from the old set-up to simplify things plus resized the boxes and frames to more user friendly sizes

:


Hopefully the photo's are self explanatory

.
Michigan, United States
Member Since: June 10, 2008
entire network: 230 Posts
KitMaker Network: 59 Posts
Posted: Thursday, December 24, 2015 - 10:03 PM UTC
My daughter in law made this custom apron for me for Christmas. Long enough to cover below my knees while sitting at the bench. Should protect my shirt and pants from paint and glue. I'm to lazy to change for a 30 minit modeling session. The black fabric on the bottom catches and shows up stray bits really well.

EJ
Fair Winds and Following Seas
EJ
#073
Pennsylvania, United States
Member Since: October 05, 2002
entire network: 2,659 Posts
KitMaker Network: 865 Posts
Posted: Friday, December 25, 2015 - 06:34 PM UTC
Hello everyone.
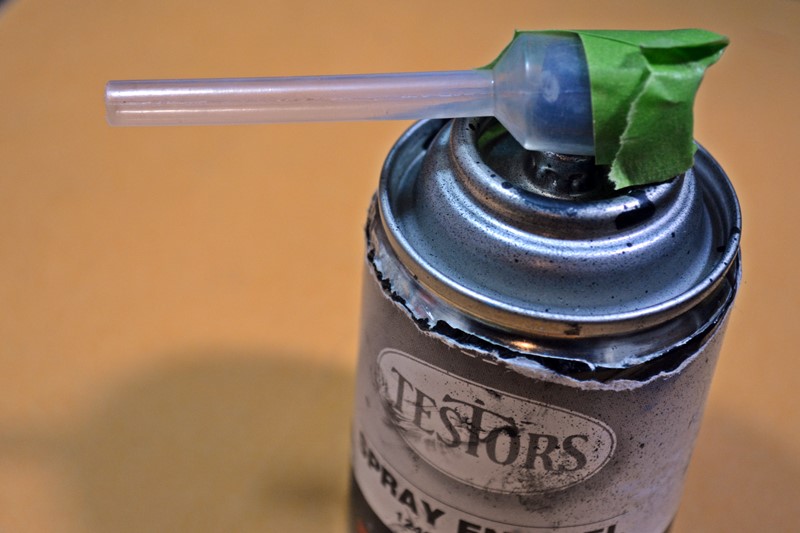
Here is a little tool I built to help me with decanting spray paint so I can use it in my airbrush. It is a variation of the straw method, but for me the advantage is ease of use, although it does require more cleanup when your done.
Photo #1 shows a standard pippette, side by side with my modified Pippette. It is cut down and a slot cut for the spray nozzle.
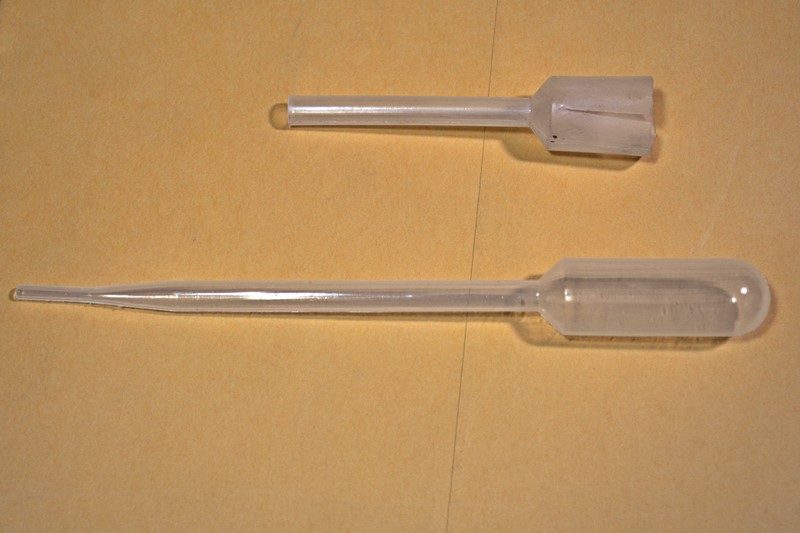
Photo #2 shows it slid over the nozzle of a spary can. Be sure to line the open part of the nozzle to the open end of the pippette.
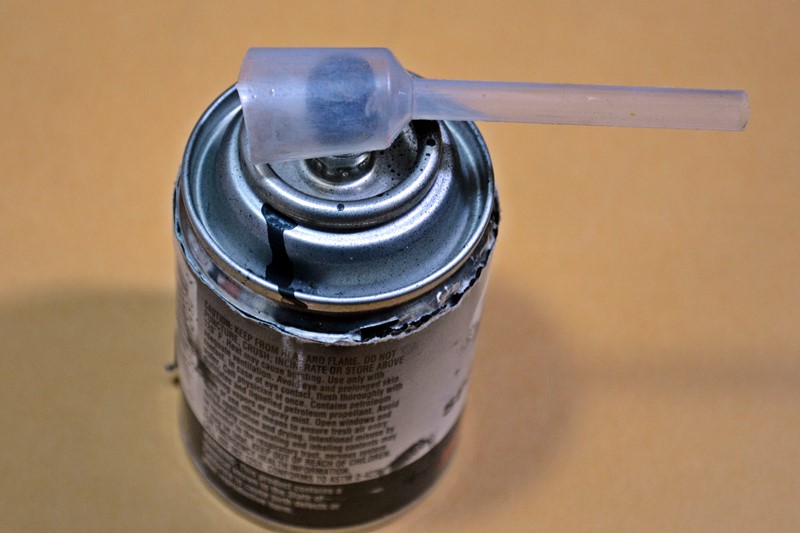
Photo #3 shows how I use tape to seal the pippette over the spray can, again be sure to line up the nozzle opening with the pippette opening.
and Photo #4 shows the angle I hold the spray can to decant my paint. Also as mentioned after use the pippette needs to be cleaned and I use a cheap store brand thinner...
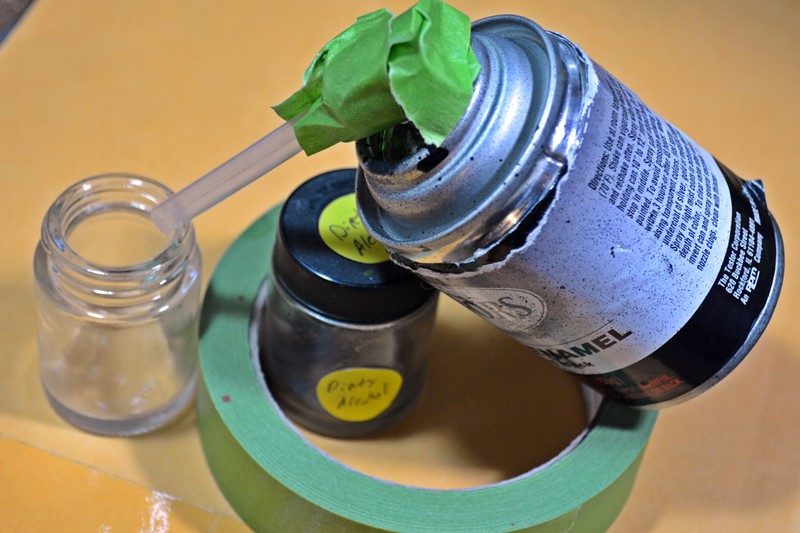
and thats my offering for this year.
Delbert
Just Your Everyday Average Model Builder
Namabiiru
Associate Editor #399
Rhode Island, United States
Member Since: March 05, 2014
entire network: 2,888 Posts
KitMaker Network: 489 Posts
Posted: Tuesday, December 29, 2015 - 07:26 PM UTC
Thanks for another fun and informative campaign, Matt!
Michigan, United States
Member Since: June 10, 2008
entire network: 230 Posts
KitMaker Network: 59 Posts
Posted: Tuesday, December 29, 2015 - 09:25 PM UTC
Second that. Great BAT15. Really looking forward to BAT16.
EJ
Fair Winds and Following Seas
EJ
Namabiiru
Associate Editor #399
Rhode Island, United States
Member Since: March 05, 2014
entire network: 2,888 Posts
KitMaker Network: 489 Posts
Posted: Tuesday, December 29, 2015 - 11:29 PM UTC
#257
Ontario, Canada
Member Since: October 11, 2011
entire network: 812 Posts
KitMaker Network: 105 Posts
Posted: Wednesday, December 30, 2015 - 10:04 AM UTC
My entry, I hope I am under the deadline,if not oh well. It is a set of helping hands made from a piece of steel flat bar, some wire and alligator clips.


Modelling is something we never perfect. We should never quit learning new tricks and be willing to share what we have learned on our own.
Namabiiru
Associate Editor #399
Rhode Island, United States
Member Since: March 05, 2014
entire network: 2,888 Posts
KitMaker Network: 489 Posts
Posted: Thursday, December 31, 2015 - 08:23 PM UTC
Matt,
Have you awarded ribbons yet? When I look at the campaign page it appears there is a problem with the award image. Not sure.
Myanmar
Member Since: March 05, 2004
entire network: 4,011 Posts
KitMaker Network: 879 Posts
Posted: Thursday, December 31, 2015 - 09:54 PM UTC
Another round of useful tips and ideas

Thanks everyone!

i watched a scale plastic figure crawl along the edge . . . of an exacto blade . . . that's my dream , it's my nightmare . . . . . . . crawling , slithering . . . . . along the edge . . . . . . of an exacto . . . . . blade . . . . and surviving
England - West Midlands, United Kingdom
Member Since: August 01, 2012
entire network: 960 Posts
KitMaker Network: 175 Posts
Posted: Saturday, January 02, 2016 - 10:44 PM UTC
Have the ribbons for BAT been awarded?
matt
Campaigns Administrator New York, United States
Member Since: February 28, 2002
entire network: 5,957 Posts
KitMaker Network: 2,626 Posts
Posted: Saturday, January 02, 2016 - 11:02 PM UTC
Not yet guys, the laptop at home is down.... hopefully once I get to work tomorrow!!!
Tools & Supplies Forum Moderator
matt
Campaigns Administrator New York, United States
Member Since: February 28, 2002
entire network: 5,957 Posts
KitMaker Network: 2,626 Posts
Posted: Sunday, January 03, 2016 - 07:01 PM UTC
ACK.. I can't find the ribbon on my computer... and I'm not sure what's up with the uploaded one... Could whoever created it please resend it???
Thanks!!!
Tools & Supplies Forum Moderator
Namabiiru
Associate Editor #399
Rhode Island, United States
Member Since: March 05, 2014
entire network: 2,888 Posts
KitMaker Network: 489 Posts
Posted: Sunday, January 03, 2016 - 07:49 PM UTC
Matt,
If we went with either of the two proposed awards on page 2 of this thread you can right-click on it to save it to your computer and then re-upload it.
matt
Campaigns Administrator New York, United States
Member Since: February 28, 2002
entire network: 5,957 Posts
KitMaker Network: 2,626 Posts
Posted: Sunday, January 03, 2016 - 08:02 PM UTC
Awards done.... I know I still owe a pic of the threaded inserts i installed in the bench.....
Tools & Supplies Forum Moderator
England - West Midlands, United Kingdom
Member Since: August 01, 2012
entire network: 960 Posts
KitMaker Network: 175 Posts
Posted: Sunday, January 03, 2016 - 08:35 PM UTC
Matt, thank you for hosting a fun campaign.
#012
Wyoming, United States
Member Since: November 07, 2003
entire network: 3,098 Posts
KitMaker Network: 899 Posts
Posted: Wednesday, January 06, 2016 - 05:12 AM UTC
Thank you for the campaign and for the ribbon Matt.
Randy
If any white man tries to destroy what is mine, or take what is mine, or take my lands, I will take my gun, get on my horse, and go punish him. Chief Low Dog - Oglala Sioux Chief
South Carolina, United States
Member Since: December 14, 2006
entire network: 1,355 Posts
KitMaker Network: 336 Posts
Posted: Thursday, January 07, 2016 - 05:00 AM UTC
Yes, thank you Matt for another great BaT Campaign.
When does BaT 5 start?
ESSAYONS!
"Man does not live until he looks to the future, and that is his salvation in the worst of times.".... (Author Unknown)
AMPS #2102


