

1⁄35Making Custom Decals
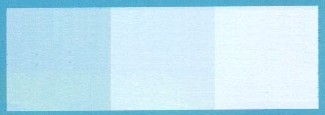
The saturation of many colors, especially lighter colors, after a single printing pass is rather pale. To get good solid reds and yellows when printing, I need to run multiple passes of the color print image. This is true of the white ink as well. A single white printing is not fully opaque. I routinely run three passes of white print to get a solid white that is opaque. I do the same on color printing passes, using three printing passes of the color image to make the colors more vibrant.
This multiple pass process also helps reduce the half-tone grain in the images. If the register of the additional printing passes is off by just a half a pixel (not much), the half-tone grain of the second pass misses the half-tone grain of the preceding pass and the two passes work together to provide a more solid color area.
 |
||
| 1 print pass | 2 print passes | 3 print passes |
Putting this in perspective, I made seven printing passes to create my A-4
Skyhawk decals -- three white followed by three color followed by a single black
pass. As I mentioned earlier, the printer is not fast at printing, especially in
the V-Photo Print mode used on the color passes. Adding the time together to do
these seven passes of printing amounts to nearly fifteen minutes I spent
printing one set of the Skyhawk decals.
I have read in various places where running multiple passes through the printer
causes the print head to scuff off the already printed colors as it prints the
new ones. I do not know what printer models the people writing this were using.
To date, I have yet to run into this issue with my printing on the MD-5000. I do
get occasional scratches in the images, caused by the print head. These can
easily be fixed by quick touch-ups in appropriately matching paints after the
decals are applied to the model. I needed to do this touch-up on the diamond
sashes of my Skyhawk in a couple places.
About the Author


All Rights Reserved. Please read our Conditions of Use and Privacy Policy.