

I am starting a new project to build an M929/930 Dump Truck. I am looking for scale drawings or blue prints.
I think I have pulled down every picture there is on the web - even completed models - but can't find line drawings.
Scratchbuilders!: Armor/AFV
This is a group for armor scratchbuilding questions, topics and projects.
This is a group for armor scratchbuilding questions, topics and projects.
Hosted by Mike Kirchoff
M929/930 Dump Truck Box
Shadowfax

Member Since: November 02, 2006
entire network: 389 Posts
KitMaker Network: 43 Posts

Posted: Saturday, November 11, 2006 - 06:54 AM UTC


Sandy

Member Since: June 24, 2002
entire network: 628 Posts
KitMaker Network: 212 Posts
Posted: Sunday, November 12, 2006 - 11:55 PM UTC
Hi for all things US Army vehicle try Olive Drab .com and use their search engine for drawings and comanies who make the vehicle also try the section on selling manuals . My first port of call for any US related subject good luck cheers ian 
Shadowfax
Member Since: November 02, 2006
entire network: 389 Posts
KitMaker Network: 43 Posts
Posted: Friday, November 17, 2006 - 10:05 AM UTC
Sandy, that was a great site. Thanks.
I had a friend that worked at TACOM Detroit a few years back and I was able to get some drawings from him. When you blow them up on a copier or computer scan, the lines get rather large or thick to be more accurate..
I can work with these for now, but any time I can get better "recon", all the better...
Shadowfax
Member Since: November 02, 2006
entire network: 389 Posts
KitMaker Network: 43 Posts
Posted: Thursday, December 28, 2006 - 09:08 AM UTC
Haven't had much luck with this... Does anyone know the name of the manufacture of these trucks? It was not Oshkosh. AM General only seems to want to showcase their Hummer.
Any ideas are appreciated. I am hoping that this subject is old enough to be in the public domain, and that it's been de-classified.
Any ideas are appreciated. I am hoping that this subject is old enough to be in the public domain, and that it's been de-classified.
Shadowfax
Member Since: November 02, 2006
entire network: 389 Posts
KitMaker Network: 43 Posts
Posted: Monday, January 29, 2007 - 05:08 AM UTC
This project has officially started!
I have found hat drawings I could and scaled them to the size I need.
I am using Italeri's "Big Foot" for the chassis and LOTS of Evergreen and Plastruct for the scratch parts. I may throw in some Eduard photo etch for yucks as well.
I have started a KitMaker album on the subject at http://photos.kitmaker.net/showgallery.php/cat/18695 for those wanting to follow along in my pain and agony on this project.
You may be asking: Why not use the resin after market available? I asked myself that as well, but I have been planning this project since 1997 - just after I finished the Wrecker for Fine Scale Modeler Magazine. http://photos.kitmaker.net/showphoto.php/photo/167865/cat/500/ppuser/21980
I am too stubborn to let it go now.
Wish me luck.

Murdo

Member Since: May 25, 2005
entire network: 2,218 Posts
KitMaker Network: 760 Posts

Posted: Monday, January 29, 2007 - 05:48 AM UTC
Just a thought...
Why not do it as part of the "A Cut above The Rest" or "ACUTR" scratchbuild campaign? It sounds perfect for it.
Why not do it as part of the "A Cut above The Rest" or "ACUTR" scratchbuild campaign? It sounds perfect for it.
Shadowfax
Member Since: November 02, 2006
entire network: 389 Posts
KitMaker Network: 43 Posts
Posted: Monday, January 29, 2007 - 07:02 AM UTC
That campaign idea has potential... Not sure how to get that started. Maybe the moderator will see this thread.
As a truck driver, this project could take me years to finish. While sitting at the truck stop here in Laredo, TX, I started removing parts off the tree to clean and sand them... Really wish I had brought glue...
As a truck driver, this project could take me years to finish. While sitting at the truck stop here in Laredo, TX, I started removing parts off the tree to clean and sand them... Really wish I had brought glue...

RobinNilsson

Member Since: November 29, 2006
entire network: 6,693 Posts
KitMaker Network: 1,042 Posts
Posted: Monday, January 29, 2007 - 05:02 PM UTC
Quoted Text
Really wish I had brought glue...
Nail polish remover can be used to glue styrene.
It should be aceton free and contain something called
ethyl-acetate. This should be more easily available than
ordinary styrene glue.
It works just as good as ordinary styrene glue so it's not
just a "cheap replacement".
/ Robin

barv
Member Since: December 24, 2004
entire network: 1,594 Posts
KitMaker Network: 0 Posts

Posted: Monday, January 29, 2007 - 07:05 PM UTC

Robin check it out here.....
https://armorama.kitmaker.net/forums/83534#692943
p-m if need help
aye
 BARV
BARV (GOSMG)
Murdo
Member Since: May 25, 2005
entire network: 2,218 Posts
KitMaker Network: 760 Posts
Posted: Tuesday, January 30, 2007 - 05:10 AM UTC
Oh Mark!
Darth Barv has responded to your call.
Deny the dark side at your peril.
Give us a shout mate, we'll help as much as we can.
Darth Barv rules!
Darth Barv has responded to your call.
Deny the dark side at your peril.
Give us a shout mate, we'll help as much as we can.
Darth Barv rules!
Shadowfax
Member Since: November 02, 2006
entire network: 389 Posts
KitMaker Network: 43 Posts
Posted: Thursday, February 01, 2007 - 05:02 AM UTC
Thanks everyone. I will try to live up to expectation...
I have been model building on and off since I was 11... and damn, I just turned 42 last weekend!
I worked 4 years at a local hobby shop where I got to experiment with resin kits and resin casting. With my employee discount I stocked my parents basement enough to keep me busy for the rest of my life. Hopefully it's a long one.
My biggest model achievement to date is my kit bashed Military Wrecker project that was published in Fine Scale Modeler Magazine. It was entered in one of their contests, didn't win, but garnered an article all the same.
I belong to (and a founding member) of the Motor City Armor & Figure Society (gratuitous plug), and am currently driving a truck to pay the mortgage.
Again... my thanks for your support on this project.
Removed by original poster on 02/02/07 - 21:01:15 (GMT).
Shadowfax
Member Since: November 02, 2006
entire network: 389 Posts
KitMaker Network: 43 Posts
Posted: Saturday, February 03, 2007 - 09:41 AM UTC
Well, I got started on the dump box. It was messy, but I got a good chunk of it completed.
I am using Evergreen plastic (both sheet and rod) and a combination of Testors liquid, Tamiya liquid and CA glues. Instead of trying to cut THREW the plastic, I use the score and snap method to get the parts off the plastic card.
Dump Truck translated to plastic card
The bulk of the flat stock is 0.020 inch thick. I realize this translates to 1 inch thick in real life, but to go thinner, would present warping and puckering of the plastic when glue is applied. The support structures are 0.060 x 0.060 square rod and 0.080 x 0.125 rectangle rod. The cab overhang supports use 0.080 angle, notched and curved over the upper arch.
There is still a lot of clean up on these parts, and I suspect Tamiya putty will come into play real soon.
The saga continues...
Shadowfax
Member Since: November 02, 2006
entire network: 389 Posts
KitMaker Network: 43 Posts
Posted: Sunday, February 18, 2007 - 03:16 AM UTC
I have made some progress this weekend on the dump truck. I decided to create live hinges for the tailgate section. Using candy foil and lots of patients, I did alright.
I am having problems with creating the correct shape of the dump box side supports . If anybody has good closeups of this area - preferably with measurement - I would be much appreciative.
As it stands, I will probably end up sculpting them... actually one and cast the rest off that master.
I am having problems with creating the correct shape of the dump box side supports . If anybody has good closeups of this area - preferably with measurement - I would be much appreciative.
As it stands, I will probably end up sculpting them... actually one and cast the rest off that master.
barv
Member Since: December 24, 2004
entire network: 1,594 Posts
KitMaker Network: 0 Posts
Posted: Sunday, February 18, 2007 - 09:01 PM UTC
Looking at pic (right vehicle ?).

...seems easiest way is to cut 2 plastic pieces and join on the up side ....at desired angle ..and trim to fit (short -top angled----bottom splayed to fit

hope it helps
aye
BARV (GOSMG)
Shadowfax
Member Since: November 02, 2006
entire network: 389 Posts
KitMaker Network: 43 Posts
Posted: Monday, February 19, 2007 - 08:00 AM UTC
Thanks Steve,
I wish it were that simple. Closer look at these supports, shows them to be 3 triangles (in their most basic shapes). It's hard to tell the exact size because most photos of this section are taken at oblique angles to the plates.
I have a process idea, but it doesn't scale well. I guess my fingers are to big LOL. It reminds me of origami.
[img]http://mywebpages.comcast.net/marklopiccola1965/ArtWork/BoxSupports.gif/img]
This picture is the best I can describe it...
Shadowfax
Member Since: November 02, 2006
entire network: 389 Posts
KitMaker Network: 43 Posts
Posted: Friday, June 26, 2009 - 04:18 PM UTC
Well, I am back on this project again. I have lots of time now being laid off, and this conversion is a real time consumer. Here is how far I have gotten as of today.
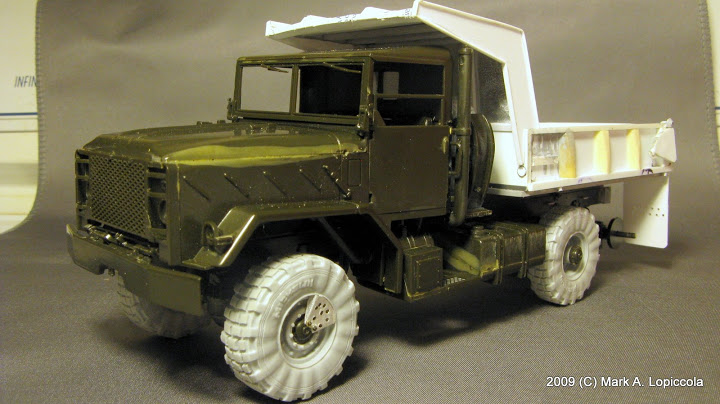
If you want to tackle this one yourself, you can see all the gory details at: http://picasaweb.google.com/lopicma/DumpTruck# I am not sure if it's cheaper than Hobby Fan kit, but I can tell you, but the HF kit might be less frustrating.
Stay tuned, as I will continue to post to that link as I make progress.
Mark Lopiccola

martyncrowther

Member Since: September 12, 2007
entire network: 1,548 Posts
KitMaker Network: 91 Posts

Posted: Saturday, June 27, 2009 - 11:47 AM UTC
This is just insanely cool. Well done mate.

SteveReid
Member Since: September 07, 2007
entire network: 212 Posts
KitMaker Network: 52 Posts

Posted: Saturday, June 27, 2009 - 02:23 PM UTC
Mark-
brilliant work man- thanks for posting it.
Steve
brilliant work man- thanks for posting it.
Steve
 |

WEB HOSTING BY


Copyright ©2021 KitMaker Network and Kitmaker Network, a subsidiary of Silver Star Enterprises
All Rights Reserved. Please read our Conditions of Use and Privacy Policy.
All Rights Reserved. Please read our Conditions of Use and Privacy Policy.