_GOTOBOTTOM
Scratchbuilders!: Armor/AFV
This is a group for armor scratchbuilding questions, topics and projects.
Hosted by Mike Kirchoff
Vulture gunship
coldwarrior
Visit this Community
Iowa, United States
Member Since: September 27, 2006
entire network: 54 Posts
KitMaker Network: 0 Posts
Posted: Tuesday, October 10, 2006 - 08:24 AM UTC
Hi again. Here is my mock up of a Vulture gunship from Forge World. This is used in Games Workshops Warhammer 40k. I cant stress to you how help full it is to make a mock up of your project!!! It helps in seeing where things will connect and also gives you a great idea of what will be necessary for sub assemblies. Any who, Im looking at even more angles with this one. So I need to figure out a better way of joining plates. One thing I plan to do is use thinner styrene sheet on this project.

Has anyone tried sheathing a solid core with styrene? For example, pink foam insulation shaped and then covered with plates of styrene. The wing supports will not be very wide to work with, but involve many angles. I think making ribs would overly complicate this part, but I dont know. If you can think of another way I would like to hear it.

RichardM
Visit this Community
Quebec, Canada
Member Since: August 13, 2006
entire network: 383 Posts
KitMaker Network: 27 Posts
Posted: Wednesday, October 18, 2006 - 08:39 PM UTC
Nice mockup of the Vulture.

It will be difficult to use plasticard on foam. Plastic glue and superglue will disolve the foam in an instant. And trying to use white glue for the plasticard skin will not yield good results.

My suggestion, if you want to use foam, would be to cover it with a few layers of thinned white glue to seal the foam properly and use superglue (sparingly) to cover it with plasticard. As for the plasticard I think that 0.25mm would be more than ok for the skin and it will be quite easy to keep it in shape with all the various contour of the beast.

BTW, I'm also a WH40K fan. I have a very big (and unpainted ) Ork army with all sort of scratchbuilded Ork vehicle (Gobsmasha, Spleenrippa, looted Hellhound...)

coldwarrior
Visit this Community
Iowa, United States
Member Since: September 27, 2006
entire network: 54 Posts
KitMaker Network: 0 Posts
Posted: Thursday, October 19, 2006 - 04:33 AM UTC
Thanx for the reply! Glad to hear you play 40k. I have not played as of yet (just got my opposing force of nids in the mail), but I'm more into the building of things than the game. I started with LOTR, moved on to WFB, and have had some IG stuff for quite a while. Be sure to check out my tank in another post!

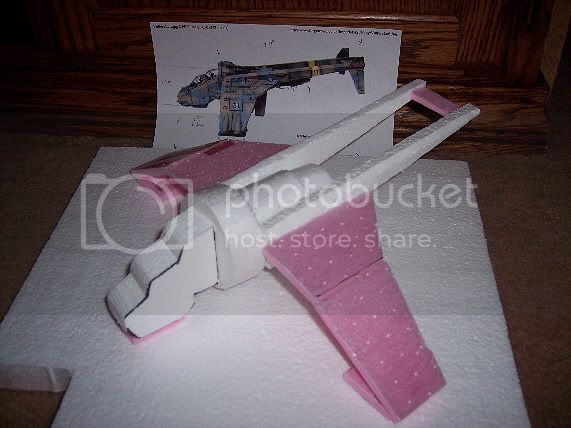
I have made the cockpit out of foam, and then made it again when I realized 2 AM calculations are futile. So with the right sized shape made Im looking into sheathing it in v thin styrene (hmm hope I have enough on hand). Since the pink foam I used was not thick enough I epoxied two cuts together to form the blank. Epoxy does not eat the foam (at least the kind I have) and holds like a tiger! So I see many trim, epoxy, wait sessions in my future. I think I may have also solved one of my problems for some situations. By using thin styrene I wont have to worry about the joint angles as much.

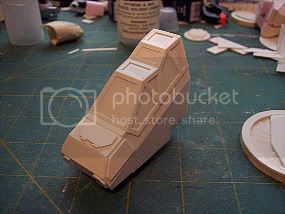
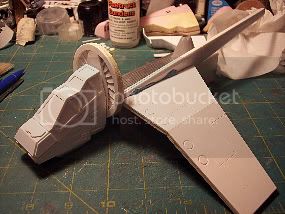
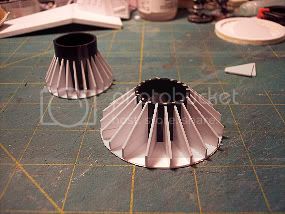
Here are a few wips....


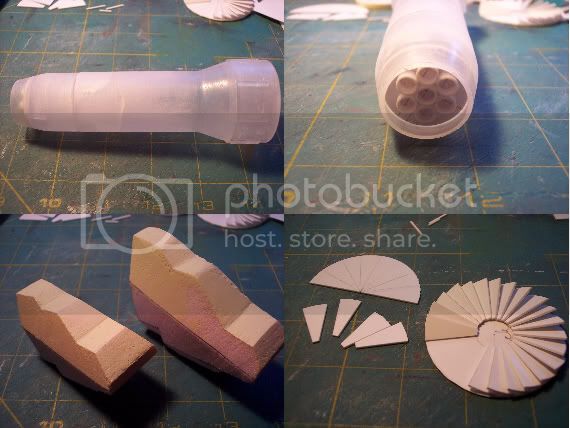
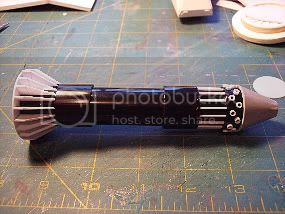
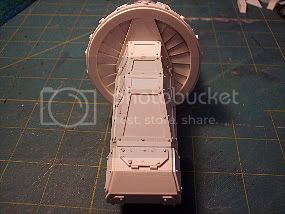
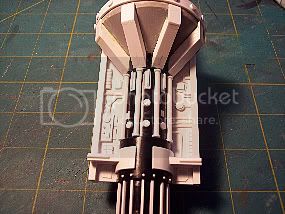
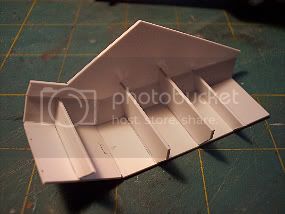
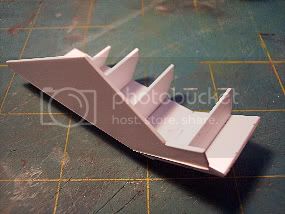
First is my fuselage. This is actually a syringe container which was close enough to the shape and size that I could not pass it up. Next is the tail. Then the cockpit shapes, the first try and the right sized one. Lastly is the turbine in progress. Once I finish the fins Ill squash them down one by one and weld. Ill be adding a rim cap to that. I'll drill a hole in the center, chuck in a drill, clean up the circumference, and fill the gaps with wood putty.

So far so good, I can say that now cuz all the cussing and spitting is over up to this point, lol.
coldwarrior
Visit this Community
Iowa, United States
Member Since: September 27, 2006
entire network: 54 Posts
KitMaker Network: 0 Posts
Posted: Monday, October 23, 2006 - 09:39 PM UTC
Here is the latest pic. I took this one before finishing the panels. So as of now their is more done on this sub than in the pic. Although I have made some progress with the canopy, the fuselage has taken a step back Im almost to the point of laminating to achieve the tapers. Till next time....


insolitus
Visit this Community
Goteborgs och Bohus, Sweden
Member Since: July 28, 2005
entire network: 649 Posts
KitMaker Network: 113 Posts
Posted: Monday, October 23, 2006 - 10:08 PM UTC
This will be intresting to see Doug! As an old GW-gamer it's nice to see that someone just not buys everything from GW but instead build something himself!
Keep up the good work!
coldwarrior
Visit this Community
Iowa, United States
Member Since: September 27, 2006
entire network: 54 Posts
KitMaker Network: 0 Posts
Posted: Tuesday, October 24, 2006 - 11:56 PM UTC
Thanx for the comments. Well here is another pic. This time all but the rivets are done on the cockpit. As of now without the rivets this section has 71 parts!!! Thing is I cut strips and framed out the canopy piece by piece. I would have cut the whole frame from a solid sheet but I was low on that thickness so it cost me several hours.


I have ordered some tubes for the body and so will have to wait till it arrives.
coldwarrior
Visit this Community
Iowa, United States
Member Since: September 27, 2006
entire network: 54 Posts
KitMaker Network: 0 Posts
Posted: Saturday, October 28, 2006 - 09:30 AM UTC
We have wings!!!! Or at least a wing. So here is the buld so far...


Still lots to do and I hope I get my tubes this Monday! Its good that I have to wait though as I still have another wing and boom to do. Ive gotten a lot done save for the trick-or-treaters out having fun tonight.
coldwarrior
Visit this Community
Iowa, United States
Member Since: September 27, 2006
entire network: 54 Posts
KitMaker Network: 0 Posts
Posted: Tuesday, October 31, 2006 - 11:16 AM UTC
Back again with some more parts...


Here is the fuselage and the main taper to fit to it. Yes yes I did have some trouble with my math again and made the part too small. So far I now have almost enough smaller parts to make another one in a different scale, lol.
ti
Visit this Community
Dalarnas, Sweden
Member Since: May 08, 2002
entire network: 2,264 Posts
KitMaker Network: 254 Posts
Posted: Tuesday, October 31, 2006 - 01:39 PM UTC
Wow!! that is some really fine scratchbuilding there my friend. I can image the time takes to cut out all those pieces. Whew!!! Excellent.
Rohby
Visit this Community
California, United States
Member Since: September 29, 2006
entire network: 18 Posts
KitMaker Network: 0 Posts
Posted: Saturday, November 04, 2006 - 06:17 AM UTC
Hey Coldwarrior, cool I must have missed this thread of yours! Very NICE work!! I had a feeling you knew what you were talking about when you posted on my mini-tank thread

SteveBuscemi
Visit this Community
Upper Austria, Austria
Member Since: August 04, 2006
entire network: 88 Posts
KitMaker Network: 0 Posts
Posted: Saturday, November 04, 2006 - 01:42 PM UTC
Damn coldwarrior, this is unbelievable. The canopy looks absolutely insane!
How did you make the frame around the windows? Is that one piece? I can't see any joins,....

That is what I call first class scratch building! I am not really into WH but that doesn't matter. Just by seing this, I wanna go ahead and build one myself lol.

Awesome man! Keep us posted on your next steps, and please give some more details on how you made different things! Thx man!

Anyhow, grat stuff!! Keep it up!

Heli
coldwarrior
Visit this Community
Iowa, United States
Member Since: September 27, 2006
entire network: 54 Posts
KitMaker Network: 0 Posts
Posted: Sunday, November 05, 2006 - 12:48 AM UTC
Thanx everyone! Glad you are enjoying this project. The frame on the canopy is all separate pieces. You can see some very tiny imperfections along them irl. After finishing it I would recommend making the frames as whole pieces. After some sanding though I was able to make it fairly smooth again.

After 70+ rivets last night I was too tired to update so here are some more pics....


It is coming right along but I would have to say this only about 1/2 done at this point due to the amount of detail and under carriage left. Plus I have to re make the left wing as when I copied it to invert I forgot to check the 1:1 scale button. The left wing is only about 5% smaller but that is enough to throw the whole balance out of wack.
SteveBuscemi
Visit this Community
Upper Austria, Austria
Member Since: August 04, 2006
entire network: 88 Posts
KitMaker Network: 0 Posts
Posted: Sunday, November 05, 2006 - 02:07 AM UTC
Great stuff again! I can't get enough of this project!

I have a few questions if you allow.

How did you get the detail engraved in teh wing? Did you use a CNC router or something like that?

How did you make these "rings" on teh fuselage, did you punch those out of teh plastic card? And if yes, can you put a pick of the tool in here?

Appreciate it!

Anyhow, I will be checking for more progress pics and descriptions every day!

This is absolutely wack man! Two thumbs up!!!!!

Heli
coldwarrior
Visit this Community
Iowa, United States
Member Since: September 27, 2006
entire network: 54 Posts
KitMaker Network: 0 Posts
Posted: Sunday, November 05, 2006 - 03:38 AM UTC
LOL! Well Im glad you like. Sure who wouldn't want a CNC and a laser engraver or heck why not a resin prototyping booth!!! No this wonderfull detail can be achieved with the simple use of a two tools! A steel ruler and any tool with a blunt edge. I use the back of one of my sculpting tools from squadrin. The one that look like a mini butter knife has a rather square spine and works perfect for scribing. It just a matter of being careful to start and stop where necessary and the ruler keeps you straight.

As for the larger rivets I used a leather punch. You can get them for about $5 at a craft store. It is a little crude but gets the job done. Their are a coupe of things to keep in mind though. You may want to hammer the tool for thicker cuts (be careful not to hit yourself!), and use something like a rod of bamboo skewer to pop the piece out nothing that will scratch or dull the blade. Its not nearly going to be as nice as a dedicated styrene punch but good enough for me at the cost. I also use a regular 1/4 inch hole punch which will set you back $1. When its dull just toss it out and open a new one!

Im not sure how everyone here transfers their patterns to the styrene, but I use a push pin. Simply lay the pattern over the sheet of styrene and hold or tape it down. Now go about pricking the styrene with the push pin at all the necessary intersections. One note on this though, dont worry about trying to line your paper pattern to the edge of the styrene. It just not worth it and if you put it in from the edge you will get more accurate parts. Trust me, its only one more cut anyway. This will also help tremendously when it comes to panel scribing as you will feel a click when you hit the stopping point.
coldwarrior
Visit this Community
Iowa, United States
Member Since: September 27, 2006
entire network: 54 Posts
KitMaker Network: 0 Posts
Posted: Saturday, November 11, 2006 - 12:58 AM UTC
I forgot to mention the circles on the wing were punched out before joining the other layers. Then I sanded the punched out circles and the holes and glued them in place.

I have actually had all this new stuff done for about a week, but didnt have the time to put it one here. In that same week I have not done anything more new to it.

This part shows the under carriage (continuation of the cockpit). Im sure I could have built this differently and more easily, but hindsight is 50/50.


Now I need to scribe on these new panels and add a few details. Beyond that another wing, landing gear, some more overall details, and then some weapons.
kglack43
Visit this Community
Alabama, United States
Member Since: September 18, 2003
entire network: 842 Posts
KitMaker Network: 0 Posts
Posted: Monday, December 04, 2006 - 09:03 AM UTC
Doug,

Your project is wonderful.

Your scratchbuilding workmanship is A-Number 1.

and "Hind-sight" is 20/20.

kevin
troubble27
Visit this Community
New Jersey, United States
Member Since: October 10, 2003
entire network: 783 Posts
KitMaker Network: 0 Posts
Posted: Tuesday, December 05, 2006 - 11:45 PM UTC
Doug,

I gotta tell ya, IM not too into futuristic models like this. But I have to admit, this is really interesting and incredibly well done! You got skills dude. Keep up the great work
coldwarrior
Visit this Community
Iowa, United States
Member Since: September 27, 2006
entire network: 54 Posts
KitMaker Network: 0 Posts
Posted: Thursday, December 07, 2006 - 04:52 AM UTC
Thanx all! I cant wait to get back to this one, just not enough free time this close to the holidays. I still dont even have the second wing done, er redone. Im glad you all like the project but belive me all I have done does not hold a candle light to what I have seen! Dont worry though sb with styrene will be with me as long as I live!
BM2
#151
Visit this Community
Virginia, United States
Member Since: November 19, 2005
entire network: 1,361 Posts
KitMaker Network: 327 Posts
Posted: Sunday, January 07, 2007 - 02:31 AM UTC
Impresive - most impressive-
http://www.youtube.com/watch?v=6A0rwG39Jzk
 _GOTOTOP