_GOTOBOTTOM
 Community Forum: Kaki Model Malaysia
Want to meet up with modelers in your country or region? This is the place.
Waffen-SS progress
Silantra
Visit this Community
Putrajaya, Malaysia
Member Since: March 04, 2004
entire network: 2,511 Posts
KitMaker Network: 1,296 Posts
Posted: Monday, February 06, 2006 - 08:06 AM UTC
hi all...

as promised in the status update page, here are some photos of the updates.

The base kit was DML Ambush at Poteau (Ardennes) build OOTB.


The head still in progress. The heads (not botaks) are given a coat of Vallejo 876 Brown Sand.
The shadow were created with mix of 876 Brown Sand, 909 Vermillion, 929 Light Brown and 815 Basic Skin tone (2:1:2:5).
I will add higlights later and further details them.
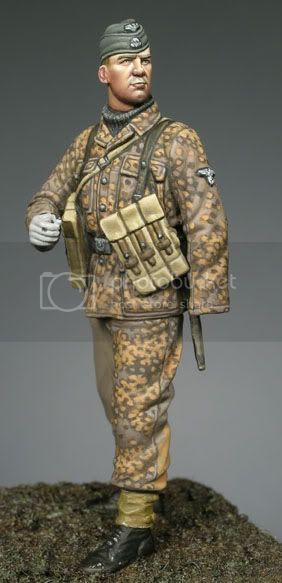
The first SS.

I'm going to paint this guys with SS Oakleaf (type 2 pattern). The base color was a mixture of 872 Choc. Brown, 821 Beige and 825 Cammo Pale Brown (1:5:3). I lay several coat of this base color. Next i painted the large green spot made up from mix of 833 Cammo Bright Green and 969 Park Green (2:1).
Not shown in the photo is my latest progress where i carefully draw a border line along this green spot with 979 Cammo Dark Green.

The second SS.
He's wearing the great coat. In this photo is still in pre shadow stage.


The pre-shadow is made up of mixture 980 Black Green and 950 Black. (1:1)
Later last night i put a coat of the base color made from mixture of 830 German WW2 Field Grey and 868 Dark Sea Green (1:1). This form a solid field grey color. (sorry forgot to take the update photo..)

NExt is the 3rd SS


the base color is the same as in figure 1.
However the green spot are lay carefully in such manner to creat the plane tree cammo pattern. The green pattern is made from 833 Bright Green, 857 Golden Olive (1:1).
However i didnt like the pattern. Maybe i will repaint this guys in SS-Oakleaf (autumn) pattern. Only time will tell...hehehe

The 4th SS


He is in Autumn Oakleaf pattern.
The base color was made from 821 Cammo Beige, 819 Iraqi Sand, 815 Basic Skin Tone (3:1:2) with a bit of 835 Salmon Rose.
I will add the yellow and orange spot later.

Well this is for now....

any comments are welcome.

seelianglim
Visit this Community
Kuala Lumpur, Malaysia
Member Since: August 04, 2005
entire network: 80 Posts
KitMaker Network: 0 Posts
Posted: Monday, February 06, 2006 - 08:29 AM UTC
Hi Zaidi

I have the same set of figures and i think ur painting is better than mine. Perhaps i need to revisit these set of figures and repaint them again.

Those green spots, are they really that green?

sllim
Silantra
Visit this Community
Putrajaya, Malaysia
Member Since: March 04, 2004
entire network: 2,511 Posts
KitMaker Network: 1,296 Posts
Posted: Monday, February 06, 2006 - 08:36 AM UTC

Quoted Text

Hi Zaidi

I have the same set of figures and i think ur painting is better than mine. Perhaps i need to revisit these set of figures and repaint them again.

Those green spots, are they really that green?

sllim


Lim,

yeah...the green spot is really like that. I think u may find it too bright. and according to the book "Uniforms Camouflage of the Waffen-SS" the green spot is really bright.

beachbum
Visit this Community
Kuala Lumpur, Malaysia
Member Since: March 05, 2004
entire network: 1,735 Posts
KitMaker Network: 0 Posts
Posted: Monday, February 06, 2006 - 10:57 AM UTC
Boss I wrote a reply on my humble views for these figs in the "other" forum including a botak joke.

Personally I've tried the pre shadow method when I first did figs but it didn't work so well for me. I always found the basecoat masking the preshadows. I suppose its easier for planes to do preshadowing or maybe at that time tak cukup skills.
Silantra
Visit this Community
Putrajaya, Malaysia
Member Since: March 04, 2004
entire network: 2,511 Posts
KitMaker Network: 1,296 Posts
Posted: Monday, February 06, 2006 - 11:36 AM UTC

Quoted Text

Boss I wrote a reply on my humble views for these figs in the "other" forum including a botak joke.

Personally I've tried the pre shadow method when I first did figs but it didn't work so well for me. I always found the basecoat masking the preshadows. I suppose its easier for planes to do preshadowing or maybe at that time tak cukup skills.


CK,

i also found that way. Preshading is not my style...but i did give it a try...and personally, i did favour this method.


here's some of your observation in the other forum:


Quoted Text


Overall everything is coming along well. Since I'm not familiar with SS camo I can't comment much of the % area covered by the green or the shape. It does appear a bit thin especially in the 2nd pic on his right shoulder. Of course I'm sure you will overlay it with another color like in the pea pattern.


that's right....the color is thin and i didnt realise until i saw the photo.....i will overlay a darker green along the edge of the bright green to form the oakleaf pattern and more black green along the side....the pattern is a bit complex in my mind....i seem havent figure it out yet...
but this pattern can be considered not to complex compare with the 3rd guy (plane tree)


Quoted Text


The second is I've found it very hard to have highs and shadows on uniform with camo. I've used your book's method Zaidi where after putting in the base coat I paint in the shadows and highs as though it didn't have camo. Then I applied the camo. Found it works to some extent for the shadows but not so much for the highs. I don't know whether you want to use that method or just stick with the camo only.


i will follow the book but will lay the shadow later...i thought this maybe another method .. perhap a succecive thin wash of umber will do the shadow,,,


Quoted Text


The 3rd. pic has a good basecoat going for the top. Painting pure black is always tricky as there is nothing more black than black for shadows. Your basecoat there should leave you enough tone to go down and up for the shadows and highs respectively. I hope the pant color in the 5th pic (4th. SS) will not be the basecoat as it is quite dark and painting a dark shadow there will be difficult.


I have painted the 3rd dude with field grey color as we speak...but dont have the photo taken...
The pants will be layered with a few coat of field grey until i got good tone (or tune)...


Quoted Text


Faces coming along well. May I suggest a very dark shade of shadow for the areas where the eyes and nose meet to give it more depth.


Noted...will take this in consederation...

thanks for the long observation
beachbum
Visit this Community
Kuala Lumpur, Malaysia
Member Since: March 05, 2004
entire network: 1,735 Posts
KitMaker Network: 0 Posts
Posted: Monday, February 06, 2006 - 12:11 PM UTC
Boss I just noticed something additional. In the 3rd. pic (2nd SS man) the index finger holding the pistol a bit too panjang. I think its because your shading in between the fingers was a bit wide and too long. If you paint a bit of basecoat between the sleeve and the knuckles it will help to reduce the length of the fingers.

Boss maybe I can help you on the camo. Can you post a pic of which camo you're doing so maybe we can plan it together which paint to go first and how much. I enjoy camo painting as I always find it a challenge.
Silantra
Visit this Community
Putrajaya, Malaysia
Member Since: March 04, 2004
entire network: 2,511 Posts
KitMaker Network: 1,296 Posts
Posted: Monday, February 06, 2006 - 12:14 PM UTC

Quoted Text

Boss I just noticed something additional. In the 3rd. pic (2nd SS man) the index finger holding the pistol a bit too panjang. I think its because your shading in between the fingers was a bit wide and too long. If you paint a bit of basecoat between the sleeve and the knuckles it will help to reduce the length of the fingers.

Boss maybe I can help you on the camo. Can you post a pic of which camo you're doing so maybe we can plan it together which paint to go first and how much. I enjoy camo painting as I always find it a challenge.


CK...

yeah i noticed it too...

thanks for higlihting it

the cammo on the 4th SS is something like this although in my reference book, the color is a bit lighter. Maybe to show the worn look


the green spot cammo i tarak picture la...

seelianglim
Visit this Community
Kuala Lumpur, Malaysia
Member Since: August 04, 2005
entire network: 80 Posts
KitMaker Network: 0 Posts
Posted: Monday, February 06, 2006 - 12:21 PM UTC


He cacat one is it? Funny , the figure looks different from mine. They must used a different head

sllim

Silantra
Visit this Community
Putrajaya, Malaysia
Member Since: March 04, 2004
entire network: 2,511 Posts
KitMaker Network: 1,296 Posts
Posted: Monday, February 06, 2006 - 12:28 PM UTC

Quoted Text


He cacat one is it? Funny , the figure looks different from mine. They must used a different head

sllim


Lim that fig is painted by Jaumme Ortiz..i got the in progress photo of his work. Yeah he changed the head and arms as well

beachbum
Visit this Community
Kuala Lumpur, Malaysia
Member Since: March 05, 2004
entire network: 1,735 Posts
KitMaker Network: 0 Posts
Posted: Monday, February 06, 2006 - 01:11 PM UTC
Aaah...its the pea pattern. The brown one is for Autumn and the green one is the spring pattern if I'm not mistaken. Floogen has a lot of experience with the pea pattern. But since he's not around I'll try my best to help out. Before I forget Jaumme's work is excellent as always.

Okay for the Autumn pea pattern I would say the darker brown patch takes up about 60-70 % of the total area. It would be the 1st. color I will add after the basecoat. In your spring pea pattern it would be the green color.

The next color to go in again for the Autumn pattern would be the orange-brown spots ( I'll called it the 2nd. color). That will be painted over the 1st color and take up about 60 % of area the 1st color. Then another 10% will be the basecoat painted in dots. The remaining 20 % of the 1st color will be allowed to remain.

Since its a pea pattern, I would suggest that after painting an irregular shape for the 1st. color you go along the edges of the 1st. color and make dots with the same color to create the dotted effect seen at the edges of the 1st. color.

2nd. color and basecoat should also be applied in a dot fashion to create the pea pattern.

Hope that wasn't too confusing. The trick is seeing one color at one time. Look at the area covered and the pattern next. Paint in stages. Try one patch first and complete 1st., 2nd. and basecoat color before going over the entire uniform. That way you don't have to repaint everything in case anything goes wrong.
Silantra
Visit this Community
Putrajaya, Malaysia
Member Since: March 04, 2004
entire network: 2,511 Posts
KitMaker Network: 1,296 Posts
Posted: Monday, February 06, 2006 - 01:24 PM UTC

Quoted Text

Aaah...its the pea pattern. The brown one is for Autumn and the green one is the spring pattern if I'm not mistaken. Floogen has a lot of experience with the pea pattern. But since he's not around I'll try my best to help out. Before I forget Jaumme's work is excellent as always.

Okay for the Autumn pea pattern I would say the darker brown patch takes up about 60-70 % of the total area. It would be the 1st. color I will add after the basecoat. In your spring pea pattern it would be the green color.

The next color to go in again for the Autumn pattern would be the orange-brown spots ( I'll called it the 2nd. color). That will be painted over the 1st color and take up about 60 % of area the 1st color. Then another 10% will be the basecoat painted in dots. The remaining 20 % of the 1st color will be allowed to remain.

Since its a pea pattern, I would suggest that after painting an irregular shape for the 1st. color you go along the edges of the 1st. color and make dots with the same color to create the dotted effect seen at the edges of the 1st. color.

2nd. color and basecoat should also be applied in a dot fashion to create the pea pattern.

Hope that wasn't too confusing. The trick is seeing one color at one time. Look at the area covered and the pattern next. Paint in stages. Try one patch first and complete 1st., 2nd. and basecoat color before going over the entire uniform. That way you don't have to repaint everything in case anything goes wrong.


haiya, for that age u seem to remember lot of thing. Yeah..i tend to confuse on the cammo pattern name. hehehe
thanks for the tips Tang....
i will try to remember it once i get home...

well, more photos are coming........
beachbum
Visit this Community
Kuala Lumpur, Malaysia
Member Since: March 05, 2004
entire network: 1,735 Posts
KitMaker Network: 0 Posts
Posted: Monday, February 06, 2006 - 08:58 PM UTC
Boss I went back to the house and checked the painting scheme behind a Tamiya box and its called the Oak leaf pattern as you mentioned. I did remember reading it somewhere its called the pea pattern as well.

The Tamiya scheme has an additional color as well for the Autumn version not seen on Jaumme's figure. Its a very dark reddish brown but its spots are less than 5-10 % of the 1st. color. But since you have the book your version would be the most accurate.

Anyway I will be away for 1 day on Wednesday. Have to go on some useless trip with the Big Boss.
masterqq
Visit this Community
Georgetown, Malaysia
Member Since: April 22, 2005
entire network: 101 Posts
KitMaker Network: 0 Posts
Posted: Tuesday, February 07, 2006 - 06:23 AM UTC
Boss,

I got the same set in progress too... I will show some photos later....
Silantra
Visit this Community
Putrajaya, Malaysia
Member Since: March 04, 2004
entire network: 2,511 Posts
KitMaker Network: 1,296 Posts
Posted: Sunday, February 19, 2006 - 05:54 AM UTC
another update

(i knew i'm slow..)

i decided to change the uniform for the 3rd guy....
so i did the oakleaf autumn pattern instead

this is the progress..the paints still wet lagi...


i paint the base a few layer of light brown and painted the orange spot...
then outline with dark brown

as u can see, ada cacat sikit...i will add a few spot to cover some of the mistake

seelianglim
Visit this Community
Kuala Lumpur, Malaysia
Member Since: August 04, 2005
entire network: 80 Posts
KitMaker Network: 0 Posts
Posted: Sunday, February 19, 2006 - 07:04 AM UTC
MMmm....Day-Glo Orange for the bedroll...Mmm...No wonder the Germans lost...


sllim :-)

(main-main onli)
beachbum
Visit this Community
Kuala Lumpur, Malaysia
Member Since: March 05, 2004
entire network: 1,735 Posts
KitMaker Network: 0 Posts
Posted: Sunday, February 19, 2006 - 09:05 PM UTC
Good progress thus far Boss. Coming along well and it should look even better once the 3rd color is applied. Might be my poor eyesight but I think they maybe some flash dekat his right hand (the one withouth the gloves) at the fingers. I always have this problem of tertinggal some flash especially dekat the fingers. Drives me crazy and it always shows up in the photos just when I think I'm done.

Lim you're wronglah. The reason he has a electric pink zeltbahn is because he's going to attend a Gay Party and electric pink is the in-color. :-) :-) Yes, yes revenge, sweet revenge
Silantra
Visit this Community
Putrajaya, Malaysia
Member Since: March 04, 2004
entire network: 2,511 Posts
KitMaker Network: 1,296 Posts
Posted: Monday, February 20, 2006 - 05:44 AM UTC

Quoted Text

Good progress thus far Boss. Coming along well and it should look even better once the 3rd color is applied. Might be my poor eyesight but I think they maybe some flash dekat his right hand (the one withouth the gloves) at the fingers. I always have this problem of tertinggal some flash especially dekat the fingers. Drives me crazy and it always shows up in the photos just when I think I'm done.

Lim you're wronglah. The reason he has a electric pink zeltbahn is because he's going to attend a Gay Party and electric pink is the in-color. :-) :-) Yes, yes revenge, sweet revenge


CK,
what do you mean?? btw, it's the left hand that ada glove..not the right??
well, the glove have not being painted...what's you saw there were the white primer and some black wash which i did in the very early stage....

and

that's is not a zeltbahn la....(jeng..jeng..jeng..jeng...jeng...)
beachbum
Visit this Community
Kuala Lumpur, Malaysia
Member Since: March 05, 2004
entire network: 1,735 Posts
KitMaker Network: 0 Posts
Posted: Monday, February 20, 2006 - 09:28 AM UTC
Aiyaa Boss I mentioned the right hand lah. That's why I put in brackets in my post 'the one WITHOUT the gloves'. If you look at the fingertips on the right hand it has some flash on it.

For a young man mata already gone. This means it'll even be easier to bunuh you with my Hitman (jeng jeng jengjeng jengjeng).

Are you sure itu bukan zeltbahn, looks like a zeltbahn to me. Anyway electric pink is the "in" color for gay parties. :-) :-) :-)
Silantra
Visit this Community
Putrajaya, Malaysia
Member Since: March 04, 2004
entire network: 2,511 Posts
KitMaker Network: 1,296 Posts
Posted: Monday, February 20, 2006 - 09:38 AM UTC

Quoted Text

Aiyaa Boss I mentioned the right hand lah. That's why I put in brackets in my post 'the one WITHOUT the gloves'. If you look at the fingertips on the right hand it has some flash on it.

For a young man mata already gone. This means it'll even be easier to bunuh you with my Hitman (jeng jeng jengjeng jengjeng).

Are you sure itu bukan zeltbahn, looks like a zeltbahn to me. Anyway electric pink is the "in" color for gay parties. :-) :-) :-)


ahhh old man.,....trying to threat me again..

pardon me la..it's not my eyes but i'm reading the post in a hurry before going to meet the boss for toolbox meeting...hahaha
anyway, that's not the flash la...i dont use flash in close-up photo.....that finger is still tak siap la


maybe this dude is gay and perhap all others waffen-ss uniform designers are...i dont give a damn...hahahahaha


hey, i waited for your hitman tapi still takde..maybe he's lost in putrajaya

CKLOO
Visit this Community
Kuala Lumpur, Malaysia
Member Since: January 14, 2006
entire network: 64 Posts
KitMaker Network: 50 Posts
Posted: Monday, February 20, 2006 - 09:42 AM UTC
its very true in my case that I need to take snapshots of my kits to see the imperfections. Guess the focus helps with a still shots.
Boss, the camo patterns looks alittle off scale lah. Smaller brush will help ?
CKLOO
Visit this Community
Kuala Lumpur, Malaysia
Member Since: January 14, 2006
entire network: 64 Posts
KitMaker Network: 50 Posts
Posted: Monday, February 20, 2006 - 09:50 AM UTC

the actual scale, Boss.
seelianglim
Visit this Community
Kuala Lumpur, Malaysia
Member Since: August 04, 2005
entire network: 80 Posts
KitMaker Network: 0 Posts
Posted: Monday, February 20, 2006 - 10:50 AM UTC

Quoted Text

its very true in my case that I need to take snapshots of my kits to see the imperfections. Guess the focus helps with a still shots.


Yes, i agree. Actually i had taken numerous pics of my models, but many show flaws when i view them on the PC .

sllim
beachbum
Visit this Community
Kuala Lumpur, Malaysia
Member Since: March 05, 2004
entire network: 1,735 Posts
KitMaker Network: 0 Posts
Posted: Monday, February 20, 2006 - 11:03 AM UTC
Bukan camera flash lah Boss. Extra plastic flash. You can see it a bit on the thumb and some on the finger tips of the right hand.

Guys what do you think? Is that extra plastic at the fingertips of the right hand or is my eyes really going?
Silantra
Visit this Community
Putrajaya, Malaysia
Member Since: March 04, 2004
entire network: 2,511 Posts
KitMaker Network: 1,296 Posts
Posted: Monday, February 20, 2006 - 11:32 AM UTC

Quoted Text

its very true in my case that I need to take snapshots of my kits to see the imperfections. Guess the focus helps with a still shots.
Boss, the camo patterns looks alittle off scale lah. Smaller brush will help ?


Loo,

i agree with u...
I've been trying to alter some of the pattern. I'm using 00 and 0 size brush...but the 00 punye tip dah split...hard to get them on fine pointer shape...maybe i would get winsor newton miniature series 7 000

i agree with you on the camera stuff. the problem is i dont have computer at home..so i cant view it large enough to see the imperfection. my camera's 3" LCD dont show much...

Silantra
Visit this Community
Putrajaya, Malaysia
Member Since: March 04, 2004
entire network: 2,511 Posts
KitMaker Network: 1,296 Posts
Posted: Monday, February 20, 2006 - 11:34 AM UTC

Quoted Text

Bukan camera flash lah Boss. Extra plastic flash. You can see it a bit on the thumb and some on the finger tips of the right hand.

Guys what do you think? Is that extra plastic at the fingertips of the right hand or is my eyes really going?


CK,

now i know what u mean...
in fact i did check them a few times for that....tapi it only appear in camera shot...

arghhhhhhhhhhhhhhh

i thought i've removed them all


 _GOTOTOP