

I have read about chipping with salt, and tried it once... not very successfull.
What size should the grains be?
In my case, I first painted the AFV dark gray. Then applied water to the areas that should be chipped and then salted the areas.
Then I painted it with a lighter shade of gray.
I got the chipped paint effect, but it seemed like the salt extracted water from the tamiya acryllics paint. The result was a very light gray circle around the chpped area...
Could it be that I did not use "real" salt but a healty substitue for salt we in Norway call "Seltin"?
Hosted by Jim Starkweather
Paintchipping with salt

Norseman

Member Since: April 26, 2002
entire network: 270 Posts
KitMaker Network: 0 Posts
Posted: Sunday, October 30, 2005 - 11:51 PM UTC


Salvo

Member Since: August 14, 2005
entire network: 311 Posts
KitMaker Network: 98 Posts

Posted: Monday, October 31, 2005 - 12:00 AM UTC
I have also tried the salt technique. It works ok, but there is a better method, at least I think.
Paint your model with the base coat, then with a torn up Scotch Brite pad (or equivalant) apply either Humbrol Maskol or Vallejo Clear mask with the torn up pad in the chipped areas you want. Then apply your top coat of paint. Once you paint has cured all you do is rub your finger over the masked areas and the mask will come up leaving the base coat showing through. Here are a couple pictures of the techniques results.

Hope this helps.
Cheers,
Ryan
Paint your model with the base coat, then with a torn up Scotch Brite pad (or equivalant) apply either Humbrol Maskol or Vallejo Clear mask with the torn up pad in the chipped areas you want. Then apply your top coat of paint. Once you paint has cured all you do is rub your finger over the masked areas and the mask will come up leaving the base coat showing through. Here are a couple pictures of the techniques results.
Hope this helps.
Cheers,
Ryan
Norseman
Member Since: April 26, 2002
entire network: 270 Posts
KitMaker Network: 0 Posts
Posted: Monday, October 31, 2005 - 12:04 AM UTC
Quoted Text
Paint your model with the base coat, then with a torn up Scotch Brite pad (or equivalant) apply either Humbrol Maskol or Vallejo Clear mask with the torn up pad in the chipped areas you want.
I'm not familiar with Scotch Brite. Is that a kind of microfiber cloth?

Henk

Member Since: August 07, 2004
entire network: 6,391 Posts
KitMaker Network: 1,600 Posts

Posted: Monday, October 31, 2005 - 12:07 AM UTC
Hi Henrik,
I had a similar problem when I tried the Salt method with Tamiya Acrylics. I have not tried it since (as I prefer Maskol) but maybe a try with Enamals might work?
Cheers
Henk
I had a similar problem when I tried the Salt method with Tamiya Acrylics. I have not tried it since (as I prefer Maskol) but maybe a try with Enamals might work?
Cheers
Henk
Salvo
Member Since: August 14, 2005
entire network: 311 Posts
KitMaker Network: 98 Posts
Posted: Monday, October 31, 2005 - 12:15 AM UTC
Microfiber I believe is the same thing. It's the pads you use to scrub kitchen counters if that helps any?????

PvtParts
Member Since: June 18, 2003
entire network: 1,876 Posts
KitMaker Network: 626 Posts
Posted: Monday, October 31, 2005 - 12:19 AM UTC
For the salt method use a large crystal salt.Kosher salt is one.I believe sea salt would be another. Could also buy salt from a pet store..the type used to make fish tank water briny.

winchweight

Member Since: December 30, 2003
entire network: 513 Posts
KitMaker Network: 0 Posts

Posted: Monday, October 31, 2005 - 12:24 AM UTC
 Hi mate. Scotchbrite is just a brand name for non stick pan scourers. They are usually green pads about 4 inches by 3 inches, made of a coarse woven fibre. They should only be a few krona, dollar or whatever for a pack of 3 or 4.

Norseman
Member Since: April 26, 2002
entire network: 270 Posts
KitMaker Network: 0 Posts
Posted: Monday, October 31, 2005 - 12:45 AM UTC
Quoted Text
Scotchbrite is just a brand name for non stick pan scourers.
Ok, I think I know what you meen now. I'll try to get some of those.

allycat

Member Since: October 03, 2004
entire network: 942 Posts
KitMaker Network: 88 Posts
Posted: Monday, October 31, 2005 - 01:01 AM UTC
I've used the scouring pad method on my desertized italeri T-55 - but slightly different.
First I sprayed the whole thing a sand colour, then used the scouring pad to 'chip' the surfaces using a dark green colour.
If you do it this way round you don't get the chipping near the inside 'edges' (where the tops of the track guards meet the side bulkhead for instance).
Looking at old construction equipment at building sites it seems that scratching and chipping occurs more in exposed areas than in recesses etc.
Hope this helps
Tom
viper29_ca

Member Since: October 18, 2002
entire network: 2,247 Posts
KitMaker Network: 718 Posts

Posted: Monday, October 31, 2005 - 01:14 AM UTC
The problem with the salt technique you are describing is because you are using acrylic paint...the water/alcohol in the paint mixes with the salt and slightly dissolves it, leaving the white residue.
If you use enamel paints, you won't have the same problem. But enamels are that much more of a pain in the butt.
If you use enamel paints, you won't have the same problem. But enamels are that much more of a pain in the butt.

Norseman
Member Since: April 26, 2002
entire network: 270 Posts
KitMaker Network: 0 Posts
Posted: Monday, October 31, 2005 - 01:18 AM UTC
Sounds like the salt technique is not so good when using Tamiya Acrylics. I'll try using masking and scotch brite instead. Thanks for all the advise.
You guys reply fast....
You guys reply fast....
AJLaFleche
Member Since: May 05, 2002
entire network: 8,074 Posts
KitMaker Network: 2,574 Posts
Posted: Monday, October 31, 2005 - 01:21 AM UTC
Quoted Text
Looking at old construction equipment at building sites it seems that scratching and chipping occurs more in exposed areas than in recesses etc.
Hope this helps
Tom
More importantly, look at period photographs of the equipment you're modeling. Construction equipmnet is treated significantly diifferently than military equipment and is likely a lot older than any World War II combat equipment ever got to be. The oldest tanks in German service would have been barely 6 years old at the end of the war.

thebear
Member Since: November 15, 2002
entire network: 3,960 Posts
KitMaker Network: 331 Posts
Posted: Monday, October 31, 2005 - 09:00 AM UTC
I used the salt on Tamiya paints and I too had the whitening of the paint around the salt but I just integrated the effect into my weathering and it acctually looks quite good.
Rick
Rick


Marty
Member Since: June 16, 2002
entire network: 2,312 Posts
KitMaker Network: 871 Posts

Posted: Monday, October 31, 2005 - 09:11 AM UTC
Quoted Text
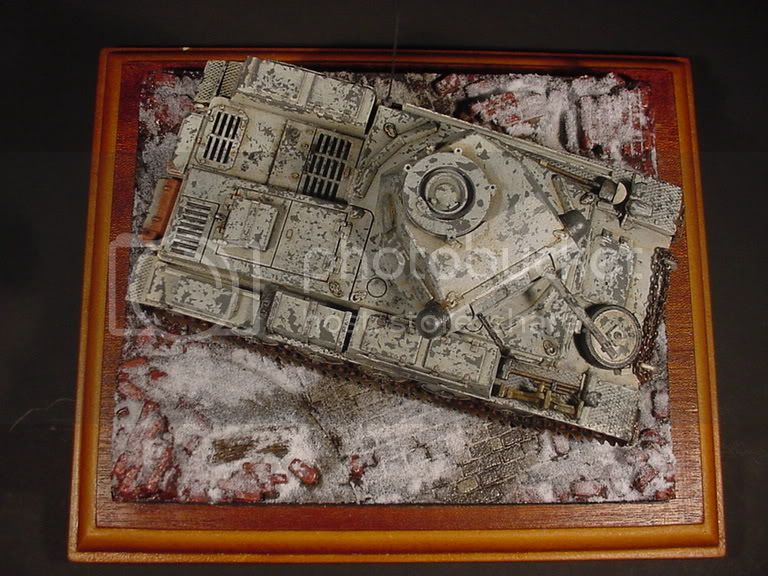
I used the salt on Tamiya paints and I too had the whitening of the paint around the salt but I just integrated the effect into my weathering and it actually looks quite good.
Same here. Below is a photo of a project I have been working on for a while now. You can see the slight discoloration around the paint chip areas. I was able to soften the contrast by applying a wash and dry-brushing the model. I think that discoloration actually added a little bit more realism.


Norseman
Member Since: April 26, 2002
entire network: 270 Posts
KitMaker Network: 0 Posts
Posted: Friday, November 04, 2005 - 11:50 PM UTC
Went to the store today to buy a scotch brite pad. There were quite many to choose from. I came home with this one:


Did I pick the right one?
Did I pick the right one?
 |

WEB HOSTING BY


Copyright ©2021 KitMaker Network and Kitmaker Network, a subsidiary of Silver Star Enterprises
All Rights Reserved. Please read our Conditions of Use and Privacy Policy.
All Rights Reserved. Please read our Conditions of Use and Privacy Policy.