

Most of the items I use for storage in my hobby room are homemade. I have finally outgrown the paint rack that I originally built for my tamya paints.
What I am wondering is, does anyone have any plans that they have used to make their own paint rack, either wall mounted or freestanding? If so, could someone please share this idea with me and others, who I am sure need the same problem fixed.
Thanks in advance.
Modeling in General
General discussions about modeling topics.
General discussions about modeling topics.
Hosted by Jim Starkweather
Paint Racks???

Armour66

Member Since: April 21, 2002
entire network: 200 Posts
KitMaker Network: 0 Posts
Posted: Friday, September 20, 2002 - 07:59 AM UTC


m1garand
Member Since: February 08, 2002
entire network: 1,248 Posts
KitMaker Network: 0 Posts
Posted: Friday, September 20, 2002 - 09:35 AM UTC
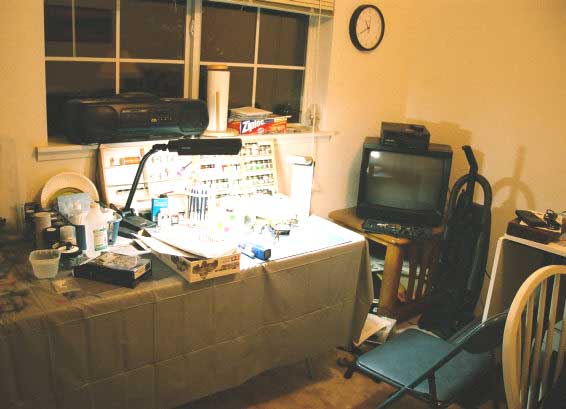
I use wooden utensil trays. You can kinda see them in this picture.


Kencelot
Member Since: December 27, 2001
entire network: 4,268 Posts
KitMaker Network: 1,174 Posts
Posted: Friday, September 20, 2002 - 10:34 AM UTC
I can't offer any plans for a "homemade" rack but, I can offer this cool product I ran across a little while ago:
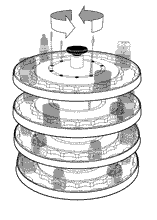 This is the 80 jar holder, they also have a 40.
If you're interested you can go here: Vatican Enterprises
This is the 80 jar holder, they also have a 40.If you're interested you can go here: Vatican Enterprises

Armour66
Member Since: April 21, 2002
entire network: 200 Posts
KitMaker Network: 0 Posts
Posted: Saturday, September 21, 2002 - 08:03 AM UTC
Thanks BC and Ken. I appreciate it.
NOW....if anyone else has any ideas feel free to share.
NOW....if anyone else has any ideas feel free to share.

tank34boss
Member Since: December 01, 2001
entire network: 39 Posts
KitMaker Network: 0 Posts
Posted: Saturday, September 21, 2002 - 09:04 AM UTC
i don't have 1 yet,mine to is home made, but my idea stems from a couple of old
spice racks i found beside the street on trash day."One man's trash--" #:-)
spice racks i found beside the street on trash day."One man's trash--" #:-)

kkeefe
Member Since: May 12, 2002
entire network: 1,416 Posts
KitMaker Network: 0 Posts
Posted: Saturday, September 21, 2002 - 10:00 AM UTC
Well, if you stop by "the author" page on my website, you can see what I have built so far.
(Pay no attention to the 'stiff' at the top of the page.)
Thanks,
Kevin Keefe
Mortars in Miniature
(Pay no attention to the 'stiff' at the top of the page.)
Thanks,
Kevin Keefe
Mortars in Miniature


PorkChop
Member Since: September 11, 2002
entire network: 3,179 Posts
KitMaker Network: 307 Posts
Posted: Saturday, September 21, 2002 - 10:17 AM UTC
Armour66:
While not a rack, I use a lazy susan from Target that cost about $10. While it's only 2-tiered, it was signficantly cheaper than the version sold as a hobby product .(It was my wife's idea one day was I was complaining about storing paints. Maybe I shouldn't "hide" all those kits from her, she may have more ideas)
While not a rack, I use a lazy susan from Target that cost about $10. While it's only 2-tiered, it was signficantly cheaper than the version sold as a hobby product .(It was my wife's idea one day was I was complaining about storing paints. Maybe I shouldn't "hide" all those kits from her, she may have more ideas)


screamingeagle
Member Since: January 08, 2002
entire network: 1,027 Posts
KitMaker Network: 269 Posts

Posted: Sunday, September 22, 2002 - 02:15 AM UTC
Hi Chris, unfortunately I don't have a dig.cam or scanner to post a photo, but
I made my own custom paint rack.
I went to Home Depot and got a sheet of 1/4" plywood 18" X 36". Then bought
some 3/4" X 1-1/2 " plank's which I cut to an 18 " long for the shelves. ( the width was just right to hold any brand of paint bottles/tin's ).
I glued and nailed these planks to the plywood backboard for the shelves, and spaced them
all 3 " apart which will also give me room for any of the various paint bottle height's.
Then I added 1/2 " decorative molding to the front of the planks/shelves.
The racks can hold well over 100 bottles/tin's of various sizes brands of paints, and this is exactly why I made my own paint rack.
I also stained & polyurethaned the rack for a nice look. I plan to have pic's of my hobbyroom
up on MSN next moth so look for my post. Making a custom paint rack, gives you the control
of building one that fit's yuor need's. Just draw out a sketch of what you think you would
like it to look like, with dimensions, and head to Home Depot. I hope this give's you some
ideas. GOOD LUCK !
By the way ...........the whole project including stain & poly, only cost me $17.
- ralph

Armour66
Member Since: April 21, 2002
entire network: 200 Posts
KitMaker Network: 0 Posts
Posted: Sunday, September 22, 2002 - 10:18 AM UTC
Thanks everyone for all of the help.....
SALUTE!!!!

SALUTE!!!!

sfilak
Member Since: August 11, 2002
entire network: 45 Posts
KitMaker Network: 0 Posts
Posted: Sunday, September 22, 2002 - 10:26 AM UTC
Another thing you might want to consider is to purchase one of those miniature drawer cabinets from the local hardware store (the ones with the clear Lucite drawers, usually associated with storing screws, nuts, bolts, washers, etc). I found one that is a perfect fit for MM enamels on the lower set of drawers, where I keep all of my most commonly used aircraft colors (mostly grays and a few others). The smaller drawers on the top are perfect for storing Humbrol and Xtracolor tins, as well as small tools, airbrush nozzles, Q-Tips, Microbrushes, X-Acto blades, etc. You can usually pick them up very cheaply, and they do wonders for organizing the workbench.

REMEARMR

Member Since: August 17, 2002
entire network: 443 Posts
KitMaker Network: 82 Posts
Posted: Sunday, September 22, 2002 - 03:00 PM UTC
If you don't have a permanent work area why not try a fishermans box. The box comes with many different draws and compartments of different sizes. You can fit the majority of your kit in here and when your finished, close it up and all your stuff is secure in one place.
Robbo
Robbo

sgtreef
Member Since: March 01, 2002
entire network: 6,043 Posts
KitMaker Network: 1,603 Posts
Posted: Monday, September 23, 2002 - 07:08 PM UTC
What I do is have the old lady at the cabinet shop rip me some 3/4" plywood birch veneer wood to say about 25" and cut some pieces for rows at the same time and what we do is make a spacer shoot two nails in each piece then take a back 1/4" plywood again birch veneer shoot it on with staple gun then run router around outside done screw to wall.
Armour66
Member Since: April 21, 2002
entire network: 200 Posts
KitMaker Network: 0 Posts
Posted: Thursday, September 26, 2002 - 01:06 PM UTC
Quoted Text
What I do is have the old lady at the cabinet shop rip me some 3/4" plywood birch veneer wood to say about 25" and cut some pieces for rows at the same time and what we do is make a spacer shoot two nails in each piece then take a back 1/4" plywood again birch veneer shoot it on with staple gun then run router around outside done screw to wall.
Thanks, Jeff. You just reminded me that I have a friend that works at a local cabinet shop. Time to call in a favor.

 |

WEB HOSTING BY


Copyright ©2021 KitMaker Network and Kitmaker Network, a subsidiary of Silver Star Enterprises
All Rights Reserved. Please read our Conditions of Use and Privacy Policy.
All Rights Reserved. Please read our Conditions of Use and Privacy Policy.