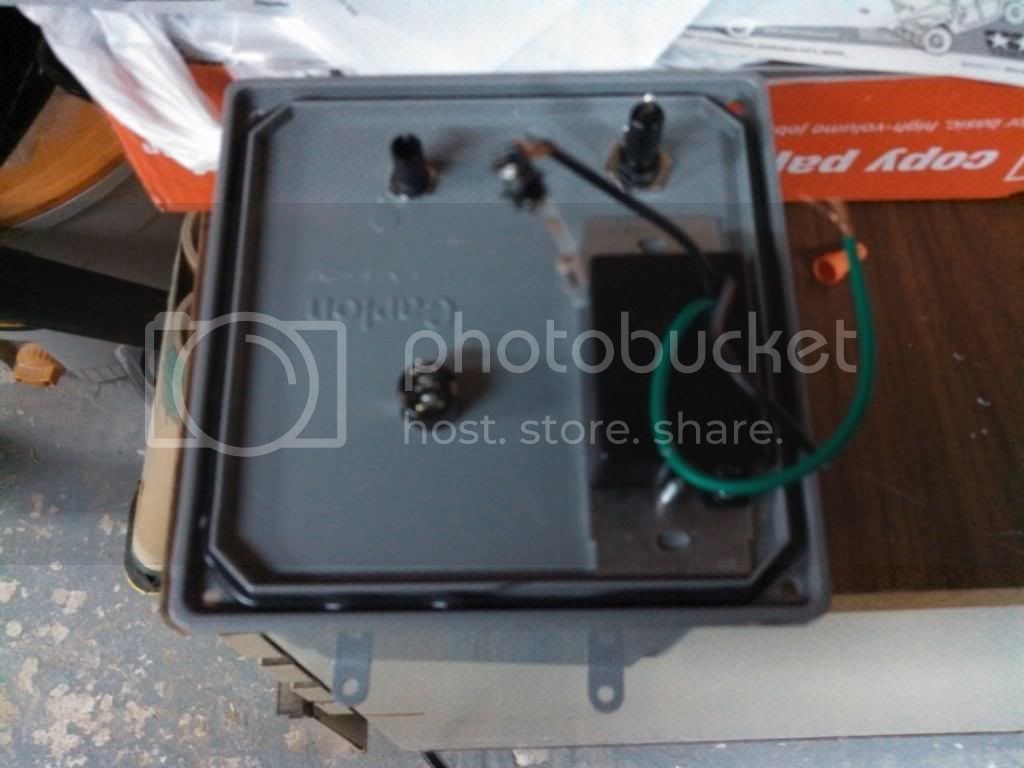
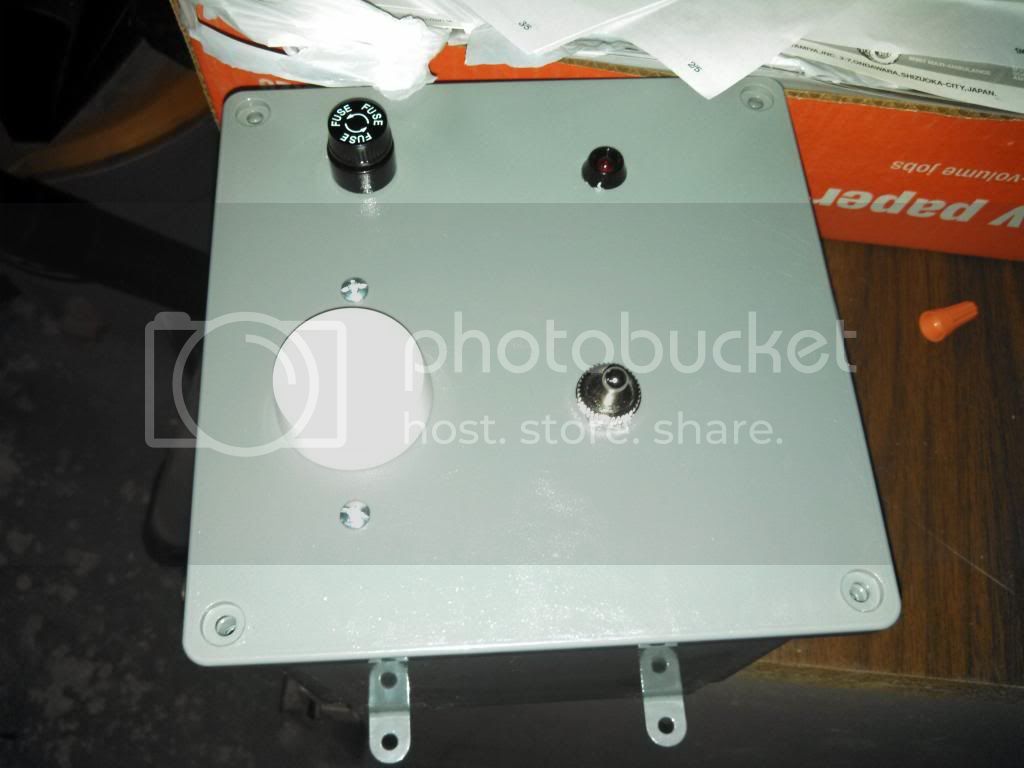
_GOTOBOTTOM
Tools & Supplies
Discussions on the latest and greatest tools, glues, and gadgets.
Hosted by Matt Leese
New Build a Tool Campaign or GB????
Disith
Visit this Community
Scotland, United Kingdom
Member Since: April 02, 2014
entire network: 62 Posts
KitMaker Network: 16 Posts
Posted: Monday, April 07, 2014 - 07:27 AM UTC

Quoted Text


Quoted Text

I got a start on the hot wire foam cutter. I got the on/off switch, dimmer switch, power indicator light & fuse holder all assembled into the housing. the transformer is ordered for it... and a co-worker should be bringing me a few slightly used guitar strings for a starting point. I'm hoping to start wiring it tonight, (after picking up some wire. Hopefully pics tonight or tomorrow morning.


You guys are shaming me....I slapped a couple of bits of MDF together and called it good, while Matt and Neil are busy working on the next Apollo program!


in fact most of mine was slapping a few bits of mdf together its just I put it in a box and added some electrics. but I love the look of your track jig will be poaching the idea if you dont mind
Namabiiru
Staff MemberAssociate Editor
MODEL SHIPWRIGHTS
#399
Visit this Community
Rhode Island, United States
Member Since: March 05, 2014
entire network: 2,888 Posts
KitMaker Network: 489 Posts
Posted: Monday, April 07, 2014 - 10:09 AM UTC
Please do!

matt
Staff MemberCampaigns Administrator
Visit this Community
New York, United States
Member Since: February 28, 2002
entire network: 5,957 Posts
KitMaker Network: 2,626 Posts
Posted: Monday, April 07, 2014 - 09:35 PM UTC
Here's the start of the hot wire foam cutter.

backside of cover:


outside of cover:


Wiring diagram from here:

Wiring info
Disith
Visit this Community
Scotland, United Kingdom
Member Since: April 02, 2014
entire network: 62 Posts
KitMaker Network: 16 Posts
Posted: Tuesday, April 08, 2014 - 12:33 PM UTC
looking good there matt cant wait to see it finished,
damn I just realised I was moving my pictures around and they have been deleted and it wont let me edit the post to correct the links.
anyway on a side note I had a quiet evening tonight and was a bit bored so I knocked up a prototype for a tool to hold tank hulls and turrets while you paint them


let me know what you think so far
Namabiiru
Staff MemberAssociate Editor
MODEL SHIPWRIGHTS
#399
Visit this Community
Rhode Island, United States
Member Since: March 05, 2014
entire network: 2,888 Posts
KitMaker Network: 489 Posts
Posted: Tuesday, April 08, 2014 - 01:08 PM UTC
Ohh! I'm stealing that idea! Probably make a couple; maybe even with interchangeable flanges for different sized turrets.

matt
Staff MemberCampaigns Administrator
Visit this Community
New York, United States
Member Since: February 28, 2002
entire network: 5,957 Posts
KitMaker Network: 2,626 Posts
Posted: Wednesday, April 09, 2014 - 02:22 AM UTC
That's a cool idea!!!
Disith
Visit this Community
Scotland, United Kingdom
Member Since: April 02, 2014
entire network: 62 Posts
KitMaker Network: 16 Posts
Posted: Wednesday, April 09, 2014 - 10:17 AM UTC

Quoted Text

Ohh! I'm stealing that idea! Probably make a couple; maybe even with interchangeable flanges for different sized turrets.


exactly what I was thinking, did some more work on it and added some different size bars need to make a smaller end piece for the smaller tanks. the trick is to lock it off with the thicker rod when you have just enough tension any more and you can pull the model apart if don't have a locking piece or your not careful when tightening.


KoSprueOne
Visit this Community
Myanmar
Member Since: March 05, 2004
entire network: 4,011 Posts
KitMaker Network: 879 Posts
Posted: Wednesday, April 09, 2014 - 01:33 PM UTC
Dude, you nailed it I'm going to make one of these


DeskJockey
Visit this Community
Virginia, United States
Member Since: July 17, 2006
entire network: 1,558 Posts
KitMaker Network: 376 Posts
Posted: Thursday, April 10, 2014 - 11:42 PM UTC
Since this appears to have become the de-facto campaign thread, I'll shift my posts over here. I've pretty much finished one of my two exhaust vent plates, and just need to put the hinges on the second one to finish it up. Once I do that, I'll test-fit them on the window to see which one I like better, then attach the exhaust outlet to the chosen one.

Here's what they look like right now. I used window gaskets around the sides of the MDF to help with insulation and to keep the MDF from soaking up any moisture in the window sill.


My earlier posts are in the (very quiet) campaign thread here .
Disith
Visit this Community
Scotland, United Kingdom
Member Since: April 02, 2014
entire network: 62 Posts
KitMaker Network: 16 Posts
Posted: Friday, April 11, 2014 - 04:13 AM UTC
Looks good planned something similar for mine but havent had a chance to do anything about it yet so interested to see how yours goes, also I would like to see the setup of the booth you have if you dont mind I always like to see others work areas
DeskJockey
Visit this Community
Virginia, United States
Member Since: July 17, 2006
entire network: 1,558 Posts
KitMaker Network: 376 Posts
Posted: Saturday, April 12, 2014 - 01:44 PM UTC

Quoted Text

Looks good planned something similar for mine but havent had a chance to do anything about it yet so interested to see how yours goes, also I would like to see the setup of the booth you have if you dont mind I always like to see others work areas


Neil--glad to share. Here's a picture of my spray booth. The booth itself is a Paasche I got four years ago. It's right next to the window I spray out of (you can see the corner of the window at the lower left side of the image) and sits on a kitchen cart (the Ikea Verkbam, to be exact) which we no longer needed when we moved to our current house. I have this all set up right next to my workbench (which is to the right, where you see the regulator). The compressor is under the workbench.


As for the exhaust vent plate, I finished the main assembly today by attaching the hinges. These were cheap surface-mount cabinet hinges from Home Depot.


I tried out both versions of the plate (hinged and full-length) and both work pretty well and are easy to slide in and out of the window sash channels. Given that, I think I'll go with the full-length plate, as it insulates better (and that's one of the key reasons I built this). Now I need to attached the exhaust vent itself. First, I cut out all slats that block airflow, as I don't want to hamper my booth's performance in any way:


With that done, I'll epoxy the vent onto the MDF, then attach the flexible duct with the collar and call it done.
matt
Staff MemberCampaigns Administrator
Visit this Community
New York, United States
Member Since: February 28, 2002
entire network: 5,957 Posts
KitMaker Network: 2,626 Posts
Posted: Tuesday, April 15, 2014 - 09:45 PM UTC
I managed to finally get some of the wiring done on the hot wire cutter: (sorry for the blurriness)
Disith
Visit this Community
Scotland, United Kingdom
Member Since: April 02, 2014
entire network: 62 Posts
KitMaker Network: 16 Posts
Posted: Wednesday, April 16, 2014 - 06:23 AM UTC
Looking good there matt ive had no time to make any other tools atm started working on my diorama base again but I might get a chance to put doors on the storage cuboard I made under my spraybooth this weekend
matt
Staff MemberCampaigns Administrator
Visit this Community
New York, United States
Member Since: February 28, 2002
entire network: 5,957 Posts
KitMaker Network: 2,626 Posts
Posted: Monday, July 21, 2014 - 10:15 PM UTC
Bump.... Still not much progress with my tool builds... hopefully it'll calm down some... but the week in CT/Boston with the wife's family was relaxing.
HARV
#012
Visit this Community
Wyoming, United States
Member Since: November 07, 2003
entire network: 3,098 Posts
KitMaker Network: 899 Posts
Posted: Tuesday, July 22, 2014 - 12:07 AM UTC
I still want to take part but other events have held that up. I have four reviews to finish up and then I won't have anything occupying my modeling time. So I should be able to get going on some of the tool ideas that I have. Nothing as fancy or large scale as some of the already shown projects......but still a tool all the same.

Thanks,
Randy
 _GOTOTOP