 |
Pouring the Mold |
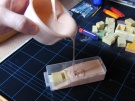
In the picture I used two colors, just for the picture.
Of course one color is enough. A small tube of dye costs about a dollar (or
euro), only a fraction of the cost of one ruined mold!
I use disposable equipment : plastic stirring-thingies and a cleaned
yoghourt cup in this case. It is stirred. Notice how interesting the use of
dye can be. You'd NEVER see if it's properly mixed if you just stir the
white silicone and its transparent hardener. BTW, you can actually SEE the
hardener in the previous picture. It's a watery puddle on top of the white
silicone.
As soon as you mix, you get air bubbles. You can avoid these if you have a
vacuum machine. You can also avoid them by using a vibrator or (my method)
gently tapping on the side of the mold container when the mold is poured.
This makes all air bubbles come to the surface. Don't cheat when you make
the mixture. Using more transparent component makes your mold cure faster,
but it also gets harder and reduces the mold's lifetime. When you make it
cure faster, you may not allow enough time for the air bubbles to float to
the surface. This process can take over an hour. The mold needs four to 24
hours to harden before you can manipulate it.
The moment of truth : the silicone mixture is poured into the container with
the original. If you screw up one of the previous stages (original is not
properly fixed to the bottom, both components are not well measured or well
stirred), you can kiss your original goodbye after this stage. Trust me, it
happens. If you're sloppy like me, it frequently happens.
Making silicone molds is easy, but you have to follow
the rules or you get punished. Your well trained modeler's eye has noticed I
am pouring the stuff with my BARE hands, not using a glove. That was only
for the picture. I had to remove some of that yoghurt from my hands, and
that is NOT recommendable. When you spoil some wet ready-mixed silicone on
your working surface or on any HARD material : leave it be. When the
silicone has cured, you can just pick it up and throw it away. Removing
liquid silicone is an absolute pain in the neck.
When the container is filled with the silicone, gently tap on the sides with
a hard object. These taps stir the air bubbles and make them come to the
surface. Air bubbles in the mold become resin bubbles when you start
casting. Air bubbles in your resin become small holes (you've seen those in
commercial resin kits, too!) when the resin hardens.
Notice the yellow, red and blue dye tubes in the background... Copyright ©2002 - Text and
Photos by Jan Van der Cruysse (General
Failure). All Rights Reserved. |
| Project Photos

|
 |


