

Hi, I am rather new to modeling and I just bought a Badger 360 airbrush. I thought I could just hook it up to a canister of badger propellant and start spraying. Unfortunately the threaded connector on the hose is too big to screw on to the canister. I've been looking around online for any information on adapters but I haven't found anything. I found out about something called a Badger Propel Valve, designed to regulate propel canisters, but the part you screw in to looks too small to work with my airhose.
What do I have to get to get this brush to work with my canned propellant?
Hosted by Matt Leese
Badger 360 question

goldstandard

Member Since: March 29, 2007
entire network: 208 Posts
KitMaker Network: 0 Posts

Posted: Thursday, March 29, 2007 - 08:49 AM UTC

Emeritus

Member Since: March 30, 2004
entire network: 2,845 Posts
KitMaker Network: 424 Posts

Posted: Thursday, March 29, 2007 - 11:52 AM UTC
You can't connect the hose directly to the propellant can (and if you could, painting wouldn't be very pleasant), you need a propel valve. Like this one: 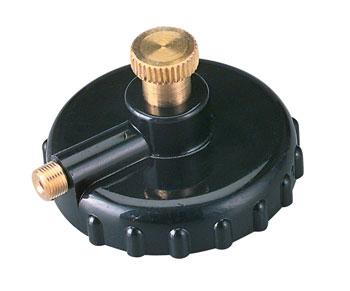
You have a 360. Did it come with an air hose?
I also have that airbrush and it came with a braided hose like this.
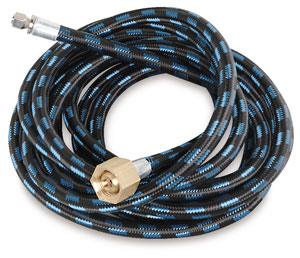
This fits to the valve above. The propel valve may look too small to screw to the hose, but the loose outer brass piece fits to 1/4 inch connectors, the valve screws directly to the hose.
Or do you have this type of hose, used mainly in Asian airbrushes?

I have one, came with my Sparmax compressor. It doesn't fit to the 360 without adapters. But the braided hose fits to the compressor using a 1/4 inch adapter.
For getting started with painting, you need the airbrush itself, an air hose, and the propel valve (and the propellant, or course). Screw the propel valve to the propellant can (make sure the valve is closed so the pressure won't escape as you screw it in place), and connect the airbrush to the can with the air hose. You're ready to spray.
When you start painting, you need to set the right pressure by trial. Open the valve a little at a time until you get good a pressure level.
This can be a little tricky, as you have to eyeball the pressure without a pressure gauge, and the pressure isn't constant, it slowly decreases as you paint (requiring further adjustments), both by the actual consumption of propellant and because the pressure drops when the can cools down while in use.
You have a 360. Did it come with an air hose?
I also have that airbrush and it came with a braided hose like this.
This fits to the valve above. The propel valve may look too small to screw to the hose, but the loose outer brass piece fits to 1/4 inch connectors, the valve screws directly to the hose.
Or do you have this type of hose, used mainly in Asian airbrushes?
I have one, came with my Sparmax compressor. It doesn't fit to the 360 without adapters. But the braided hose fits to the compressor using a 1/4 inch adapter.
For getting started with painting, you need the airbrush itself, an air hose, and the propel valve (and the propellant, or course). Screw the propel valve to the propellant can (make sure the valve is closed so the pressure won't escape as you screw it in place), and connect the airbrush to the can with the air hose. You're ready to spray.
When you start painting, you need to set the right pressure by trial. Open the valve a little at a time until you get good a pressure level.
This can be a little tricky, as you have to eyeball the pressure without a pressure gauge, and the pressure isn't constant, it slowly decreases as you paint (requiring further adjustments), both by the actual consumption of propellant and because the pressure drops when the can cools down while in use.
goldstandard
Member Since: March 29, 2007
entire network: 208 Posts
KitMaker Network: 0 Posts
Posted: Friday, March 30, 2007 - 02:19 AM UTC
Thanks for the reply. I actually took a trip back to the hobbyshop and that is what they told me to use. I have the braided hose, and after exchanging the first propel valve (it was defective) I finally got it to work. I practiced a little to get the hang of it, then I went ahead and sprayed the base coat for my Academy 1:72 P-40E Warhawk kit. It turned out nicely and the paint dryed so fast I was able to just flip it over to get at the rest of the plane. I noticed it drys faster than my old testors single action external mix kit, perhaps because it lays a thinner layer of paint?
I heard that when you dunk the bottle in some room temperature water it helps equalize the pressure, but the bottle wants to float so I need to figure out how to weigh it down.
So far I have been using model master enamels but eventually I would like to try acrylics. For enamels I just spray paint thinner though the brush to clean it, but I am not sure what I should use for acrylics.
If the P-40 turns out alright I think I will post it to the forums. My first model, a P38, didn't turn out as well as I liked.
Emeritus
Member Since: March 30, 2004
entire network: 2,845 Posts
KitMaker Network: 424 Posts
Posted: Friday, March 30, 2007 - 06:05 PM UTC
Quoted Text
I noticed it drys faster than my old testors single action external mix kit, perhaps because it lays a thinner layer of paint?
That's likely.
I presume that earlier airbrush of yours was a bottom-feed type? Those require a higher pressure to draw the paint from the container to the nozzle when compared to gravity-feed brushes, so the paint flow is likely to be heavier.
Quoted Text
I heard that when you dunk the bottle in some room temperature water it helps equalize the pressure, but the bottle wants to float so I need to figure out how to weigh it down.
From what I've heard, it doesn't actually equalize the pressure, it prevents the cooling of the can that happens when using it, which leads to the pressure dropping.
Quoted Text
So far I have been using model master enamels but eventually I would like to try acrylics. For enamels I just spray paint thinner though the brush to clean it, but I am not sure what I should use for acrylics.
With the acrylic paints I usually work with (Vallejo, xtracrylics, lifecolor), I usually spray through with water to remove the most of the paint, then clean the brush under a running tap (I like tooth brushes resembling pipe cleaners, meant for removing stuff between your teeth), finishing by cleaning the nozzle and paint cup (and in general, all parts that end up covered with dried paint) with airbrush cleaner or other suitable thinner that can handle dried acrylics.
Tap water seems to be enough for the insides where paint usually doesn't dry up, but you need something stronger for removing dried paint.
Cleaning the insides with thinners now and then doesn't hurt either, as sometimes I notice some dried-up paint even after cleaning right after painting.
Quoted Text
If the P-40 turns out alright I think I will post it to the forums. My first model, a P38, didn't turn out as well as I liked.
Yeah, please do, it's always good to see new talents posting their work.
 |

WEB HOSTING BY


Copyright ©2021 KitMaker Network and Kitmaker Network, a subsidiary of Silver Star Enterprises
All Rights Reserved. Please read our Conditions of Use and Privacy Policy.
All Rights Reserved. Please read our Conditions of Use and Privacy Policy.