

I'm not sure what Yall do but I Paint on the insignia that is given unless it is to small but thats only because i'm not sure how to get the decals on correctly i've always had triouble doing this since i was 5 and started building models any thoughts ideas or questions?
P.S. I make 1/35th models and paint their decals almost exact but I can't strain my eyes too much longer or I'll lose my Marksmanship
Modeling in General
General discussions about modeling topics.
General discussions about modeling topics.
Hosted by Jim Starkweather
Painting insignias or using the decals

alphasniper

Member Since: February 05, 2002
entire network: 83 Posts
KitMaker Network: 0 Posts
Posted: Saturday, March 09, 2002 - 10:38 AM UTC

pipesmoker
Member Since: January 31, 2002
entire network: 649 Posts
KitMaker Network: 261 Posts

Posted: Saturday, March 09, 2002 - 11:01 AM UTC
Corey,
Decals can be tough. What I do is gloss coat the area where the decal is to go. Let it dry for a day. Follow the decal instructions for soaking. When the decal is ready to be set, wet the area where it goes with decal setting solution. Testors has one in the small square bottles or you can use something like Micro Set. When the decal is set to your satisfaction, blot it gently witha Qtip or Kleenex. After the decal dries, overcoat with a clear flat finish. If the decal is in an awkard place, it can be moved, while still wet, with a small, soft brush. If the decal has to conform to an uneven surface, after you have blotted it dry you can use something like Micro Sol to get the decal to settle down. DO NOT touch the decal if you have used a solution like Micro Sol. The decal WILL tear.The easist way to remember is "SET" to place the decal, and "SOL" for diSOLve, to get the decal to conform to an uneven surface. If the decal does not settle down after this. Let it dry completely and use a dilute solution of white glue and water. HTH
Decals can be tough. What I do is gloss coat the area where the decal is to go. Let it dry for a day. Follow the decal instructions for soaking. When the decal is ready to be set, wet the area where it goes with decal setting solution. Testors has one in the small square bottles or you can use something like Micro Set. When the decal is set to your satisfaction, blot it gently witha Qtip or Kleenex. After the decal dries, overcoat with a clear flat finish. If the decal is in an awkard place, it can be moved, while still wet, with a small, soft brush. If the decal has to conform to an uneven surface, after you have blotted it dry you can use something like Micro Sol to get the decal to settle down. DO NOT touch the decal if you have used a solution like Micro Sol. The decal WILL tear.The easist way to remember is "SET" to place the decal, and "SOL" for diSOLve, to get the decal to conform to an uneven surface. If the decal does not settle down after this. Let it dry completely and use a dilute solution of white glue and water. HTH

cfbush2000
Member Since: December 01, 2001
entire network: 1,796 Posts
KitMaker Network: 479 Posts

Posted: Saturday, March 09, 2002 - 02:49 PM UTC
I wish I had the eyes and hands needed to paint markings. Actually, I'll bet they look better than decals. You should post some pictures of your work.

KMM

entire network: 91 Posts
KitMaker Network: 0 Posts
Posted: Saturday, March 09, 2002 - 03:05 PM UTC
Quoted Text
use a dilute solution of white glue and water
What exactly does the water/glue solution do? Does it make the decal blend better with a dull surface, like on a tank?

Maki

Member Since: February 13, 2002
entire network: 5,579 Posts
KitMaker Network: 538 Posts
Posted: Saturday, March 09, 2002 - 06:22 PM UTC
I've also painted insignias on my models... Never learned to work properly with decals. I've heard about MicroSet and MicroSol but wasn't able to find it in any hobbyshop I visited...
So this is what I do: I outline the decals very lightly with a pointed pencil and just follow the lines with paint (usually with a pointed toothpick)... it worked very well so far for rather simple insignia.
Mario M.
So this is what I do: I outline the decals very lightly with a pointed pencil and just follow the lines with paint (usually with a pointed toothpick)... it worked very well so far for rather simple insignia.
Mario M.


HunterCottage

#116

Member Since: December 19, 2001
entire network: 1,717 Posts
KitMaker Network: 590 Posts
Posted: Saturday, March 09, 2002 - 07:27 PM UTC
I must admit that the idea of painting on the insignias and that is inticing, but when you can't paint you can't...
But I have looked at Eduards painting masks, pretty intresting idea/concept I think.
No I struggle like the rest with decals, what would life be without MicroSet and MicroSol
But I have looked at Eduards painting masks, pretty intresting idea/concept I think.
No I struggle like the rest with decals, what would life be without MicroSet and MicroSol

ArmouredSprue

Member Since: January 09, 2002
entire network: 1,958 Posts
KitMaker Network: 720 Posts
Posted: Saturday, March 09, 2002 - 07:55 PM UTC
Carey;
As far as I know the tips that Ron pointed is most eficient method to use, I do it (more or less ) and I would recommend it.
I got a Verlinden photoetch set for german WWII markings, but I didn´t get it a try yet....I´m not so confident by now about ussing it
Cheers!
As far as I know the tips that Ron pointed is most eficient method to use, I do it (more or less
) and I would recommend it.I got a Verlinden photoetch set for german WWII markings, but I didn´t get it a try yet....I´m not so confident by now about ussing it
Cheers!

Maki
Member Since: February 13, 2002
entire network: 5,579 Posts
KitMaker Network: 538 Posts
Posted: Saturday, March 09, 2002 - 07:58 PM UTC
Quoted Text
...what would life be without MicroSet and MicroSol
What would life be like with those... I'm still waiting to find out..
Mario M.

GunTruck
Member Since: December 01, 2001
entire network: 5,885 Posts
KitMaker Network: 1,405 Posts
Posted: Saturday, March 09, 2002 - 11:05 PM UTC
Quoted Text
Quoted Text...what would life be without MicroSet and MicroSol
What would life be like with those... I'm still waiting to find out..
Mario M.
Mario,
These two setting solutions are pretty good for difficult to work with decals - i.e. decals too thick to settle down over curves and details - or older decals that have lost their "bite" and the glue won't hold them down.
The decals for "Double Dare" on my M20 Armored Utility Car were really nice SuperScale Decals, but I had a difficult time getting them to settle down over the strengthening ribbing on the sheet metal of the M20 fender skirts. The decal solution allowed me to get them to adhere properly.
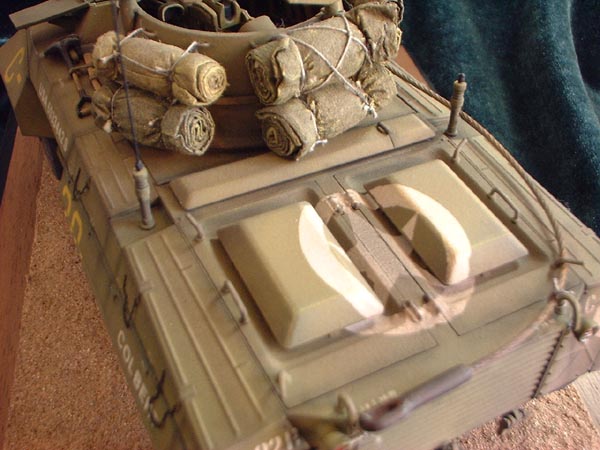
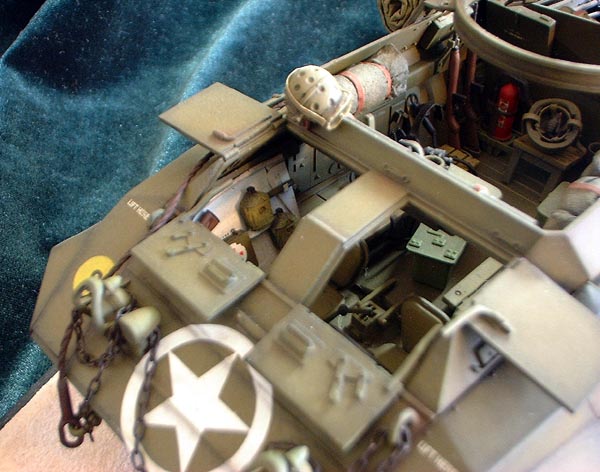
The National Insignia on my M8 Armored Car "Colbert" is a Verlinden dry-transfer. It is the most difficult application of a dry-transfer I've ever tried - and I won't do it again. You can work them around complex curves like the engine breather deck of the M8 / M20, but the exercise will make you want to pull your wisdom teeth out. Here, a decal softening solution with a suitable water-slide decal would have been less headache. Why did I go the other way? It's easy to get goaded into Advanced Modelers Syndrome. Instead of purchasing a replacement set of decals, I went insane and used VP dry-transfers. Lesson here is not to make things tougher on yourself.
Gunnie

Maki
Member Since: February 13, 2002
entire network: 5,579 Posts
KitMaker Network: 538 Posts
Posted: Saturday, March 09, 2002 - 11:52 PM UTC
Gunnie, great looking stuff... Lot of people use transfers with outstanding results. I think I will give it a go on my Warrior IFV... Hey does anybody know where can I get British insignia from Desert Storm? Archer has some good looking Union Jack flags and I thought about that too...
Mario M.
Mario M.
pipesmoker
Member Since: January 31, 2002
entire network: 649 Posts
KitMaker Network: 261 Posts
Posted: Sunday, March 10, 2002 - 06:27 AM UTC
Quoted Text
What exactly does the water/glue solution do? Does it make the decal blend better with a dull surface, like on a tank?
KMM,
It is best to gloss coat the area where you will be placing a decal. Less chance of air being caught under the decal, this leads to "silvering", If you have a difficult decal that just won't behave, use the diluted white glue mix. I will hold the decal in place. Then dull coat over and continue your weathering process.

210cav
Member Since: February 05, 2002
entire network: 6,149 Posts
KitMaker Network: 1,551 Posts
Posted: Monday, March 11, 2002 - 01:16 AM UTC
Gentlemen----I first used the gloss, micro set method with the Emhar 1/35 Whippet tank. They have a red and white marking for the front slope. Looks like it was painted on the vehicle. Became an instant believer and practitioner. Now, what really has me curious is the method displayed in the Osprey book on WW II dioramas. In this book, they show several Churchill tanks attacking a German position in France. They then display various improvements done to the Tamiya models. The author sprayed national insignias and a red traingle inside a white circle with an airbrush. He used a contact paper to mask the surface (I think it was called "fiske or friske paper"). Now, the point here, how did he get the sticky paper off without damaging the base coat? Has anyone else seen the book? If so, have you tried the technique I crudely explained?
thanks
DJ
thanks
DJ
GunTruck
Member Since: December 01, 2001
entire network: 5,885 Posts
KitMaker Network: 1,405 Posts
Posted: Monday, March 11, 2002 - 01:24 AM UTC
DJ - frisket paper is a low-tack medium. If you're careful not to leave it on the surface of your model too long (too long = overnight, an hour or even two is okay) it won't mar the finish underneath.
There are all brands available, I like the stuff I get from Art Stores, but Badger makes some good stuff too.
Gunnie
There are all brands available, I like the stuff I get from Art Stores, but Badger makes some good stuff too.
Gunnie
210cav
Member Since: February 05, 2002
entire network: 6,149 Posts
KitMaker Network: 1,551 Posts
Posted: Monday, March 11, 2002 - 02:44 AM UTC
Gunnie--so much to buy, so little time. Have you seen the Osprey Book? Did you use their technique?
thanks
DJ
thanks
DJ
Posted: Tuesday, March 12, 2002 - 02:27 AM UTC
Gunnie,
I'm at a loss for words at your pics on here! I may be converting to allied armor after all! More pics matey!
Nice one!
I'm at a loss for words at your pics on here! I may be converting to allied armor after all! More pics matey!
Nice one!
GunTruck
Member Since: December 01, 2001
entire network: 5,885 Posts
KitMaker Network: 1,405 Posts
Posted: Tuesday, March 12, 2002 - 02:30 AM UTC
Quoted Text
Gunnie--so much to buy, so little time. Have you seen the Osprey Book? Did you use their technique?
thanks
DJ
No Sir - I haven't seen that Osprey release. Do you think it's worth getting?
Gunnie
GunTruck
Member Since: December 01, 2001
entire network: 5,885 Posts
KitMaker Network: 1,405 Posts
Posted: Tuesday, March 12, 2002 - 02:32 AM UTC
Quoted Text
Gunnie,
I'm at a loss for words at your pics on here! I may be converting to allied armor after all! More pics matey!
Nice one!
Thanks Marek! :-) I already told Paulo that I'd have to do something different before I got to 1000 posts - I went out and bought the OUTSTANDING AFV Club Sd.Kfz.11 3-ton Half-track. You guys are getting me interested in German WW II Armor - no small feat let me tell you!

Gunnie
alphasniper
Member Since: February 05, 2002
entire network: 83 Posts
KitMaker Network: 0 Posts
Posted: Tuesday, March 12, 2002 - 09:01 AM UTC
Gentalmen
Thanks for the "insight" you've probalbly kept me from losing mine. Those are excelent pics. Gunnie!! Now I'm off to count my pennies and go to the hobby store to get MicroSol and finally put my decals to use
Thanks again
Thanks for the "insight" you've probalbly kept me from losing mine. Those are excelent pics. Gunnie!! Now I'm off to count my pennies and go to the hobby store to get MicroSol and finally put my decals to use
Thanks again
pipesmoker
Member Since: January 31, 2002
entire network: 649 Posts
KitMaker Network: 261 Posts
Posted: Tuesday, March 12, 2002 - 10:19 AM UTC
Quoted Text
Now I'm off to count my pennies and go to the hobby store to get MicroSol and finally put my decals to use
Corey, just remember DO NOT attempt to move the decal after using MicroSol. It WILL tear.
Also, the MicroSol will make the decal wrinkle up, this is usual. The decal will flatten and conform as it dries.

TreadHead
Member Since: January 12, 2002
entire network: 5,000 Posts
KitMaker Network: 1,210 Posts

Posted: Tuesday, March 12, 2002 - 10:43 AM UTC
O.K. guys, was hanging around the thread where Gunnie was showing the pics of the incredible interior of his Stuart tank. Everyone was goo-goo about, as they should have been. BUT! Is it just me, or did you guys see, really see, the interior work on his M20 in the above pics? The top pic especially....unbelievable.
I just recently bought a Tamiya M20 with plans to really super detail it. You know, the whole enchilada. But instead, I think I'm just going to throw it in the garbage! May as well!
Tread.
I just recently bought a Tamiya M20 with plans to really super detail it. You know, the whole enchilada. But instead, I think I'm just going to throw it in the garbage! May as well!
Tread.

GunTruck
Member Since: December 01, 2001
entire network: 5,885 Posts
KitMaker Network: 1,405 Posts
Posted: Tuesday, March 12, 2002 - 11:48 AM UTC
Quoted Text
O.K. guys, was hanging around the thread where Gunnie was showing the pics of the incredible interior of his Stuart tank. Everyone was goo-goo about, as they should have been. BUT! Is it just me, or did you guys see, really see, the interior work on his M20 in the above pics? The top pic especially....unbelievable.
I just recently bought a Tamiya M20 with plans to really super detail it. You know, the whole enchilada. But instead, I think I'm just going to throw it in the garbage! May as well!
Tread.
Naw Tread - don't do that :-) Tamiya's M20 is so cool - go buy another!!!
Gunnie
 |

WEB HOSTING BY


Copyright ©2021 KitMaker Network and Kitmaker Network, a subsidiary of Silver Star Enterprises
All Rights Reserved. Please read our Conditions of Use and Privacy Policy.
All Rights Reserved. Please read our Conditions of Use and Privacy Policy.