Scotland, United Kingdom
Member Since: December 24, 2004
entire network: 1,594 Posts
KitMaker Network: 0 Posts
Posted: Friday, August 12, 2005 - 12:13 AM UTC

Waiting for paint to dry

....so.........
IMPROVED RIBBON BRIDGE
Picture from Prime Portal....http://www.primeportal.net/index.htm


........Frame

....Toolbox

........Lined up

.........Hook

.....in situ

................paint's dry.............

BARV
(GOSMG)
Indiana, United States
Member Since: July 19, 2003
entire network: 1,055 Posts
KitMaker Network: 428 Posts
Posted: Friday, August 12, 2005 - 05:08 AM UTC
Wow! Did you do all of the white out of sheet styrene?! I can't wait to see it finished! Thanks for your time.

When the Fueher says we are the master race, we go heil thhpt, heil thhpt, heil thhpt right to his Fueher face.
If stocks always go up in wartime, then how come my Gestapo stocks aren't worth anything?
Scotland, United Kingdom
Member Since: December 24, 2004
entire network: 1,594 Posts
KitMaker Network: 0 Posts
Posted: Friday, August 12, 2005 - 07:45 AM UTC
......Mathew
All out of "sheet"------only way that I know...
Thanks for the comments .......more to come
aye
BARV
(GOSMG)
Scotland, United Kingdom
Member Since: December 24, 2004
entire network: 1,594 Posts
KitMaker Network: 0 Posts
Posted: Friday, August 12, 2005 - 11:59 AM UTC
Problem.......wheels ......bigger than kit--------any thoughts --(Mr ROO...Sir).....any -one
aye
BARV
(GOSMG)

#003
Donegal, Ireland
Member Since: May 14, 2002
entire network: 9,763 Posts
KitMaker Network: 1,351 Posts
Posted: Friday, August 12, 2005 - 12:22 PM UTC
Hi Steve. Amazing build again. Can´t wait for more progress shots of this. Will it be workable?
I have some images of a Swedish similar item that might be of interest. Dont think they have any relevance to your item. I took them last year at an army exhibition, and by the time I got my camera out, they had already unloaded the bridge, so no pictures of the lorry loaded Im afraid..


8)
IPMS Stockholm
"The problem with common sense, is that it is not that common"
Scotland, United Kingdom
Member Since: December 24, 2004
entire network: 1,594 Posts
KitMaker Network: 0 Posts
Posted: Friday, August 12, 2005 - 07:55 PM UTC
#003
Donegal, Ireland
Member Since: May 14, 2002
entire network: 9,763 Posts
KitMaker Network: 1,351 Posts
Posted: Saturday, August 13, 2005 - 06:49 AM UTC
IPMS Stockholm
"The problem with common sense, is that it is not that common"
South Dakota, United States
Member Since: May 10, 2002
entire network: 971 Posts
KitMaker Network: 0 Posts
Posted: Saturday, August 13, 2005 - 07:21 AM UTC
If it would help, I can get measurements straight off the tires on Tueday.
Don
To quote the immortal words of Socrates, "I drank what?"
Scotland, United Kingdom
Member Since: December 24, 2004
entire network: 1,594 Posts
KitMaker Network: 0 Posts
Posted: Saturday, August 13, 2005 - 07:24 AM UTC
Gee.. Frank ......thanks a lot they are great.....love the "diggy" :-) :-) :-) ....Don .....Size's.....Yes Please!!!
May do one some time
.....aaah! its got those round rubber things again

:-) :-)
Muchos etc
aye
BARV
(GOSMG)
South Dakota, United States
Member Since: May 10, 2002
entire network: 971 Posts
KitMaker Network: 0 Posts
Posted: Tuesday, August 16, 2005 - 08:34 AM UTC
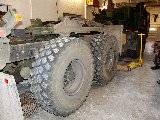
Tire size is 16.00R20
Tread width - 15"
Height - 51.5"
I also shot some area specific photos for you. They show the tire and toolbox area and their size relations. I will get those posted tonight.
Hope this helps
Don
To quote the immortal words of Socrates, "I drank what?"
Buskerud, Norway
Member Since: July 31, 2005
entire network: 1,871 Posts
KitMaker Network: 376 Posts
Posted: Tuesday, August 16, 2005 - 09:06 AM UTC
A Norwegian bridgelayer and Tanks. Leguan bridge on a Leopard 1 chassie
Erik

New York, United States
Member Since: January 29, 2004
entire network: 3,836 Posts
KitMaker Network: 1,121 Posts
Posted: Tuesday, August 16, 2005 - 09:39 AM UTC
Steve,
Looks like another great and interesting build. Im assuming 1/35th! What kit are you using. As for the bridge, will it be hinged to open and close. Where do you get your scale drawings, or do you draw them up yourself. Its always a pleasure seeing your scratch builds from the beginning to finish. Looking forward to see more and the finish of the "OLIFANT "
It feels like bible camp
Only Im not crying pretending Im somewhere else.
Happy Modeling
Joe
South Dakota, United States
Member Since: May 10, 2002
entire network: 971 Posts
KitMaker Network: 0 Posts
Posted: Tuesday, August 16, 2005 - 11:50 AM UTC
Here are 16 pictures of the rear section of the M1977 to show the tire in relation to the rest of the truck.
http://www.primeportal.net/hemtt/don/m1977_rear_walk.htm If you need any other areas of the M1977 photographically detailed, just let me know and I will get you taken care of.
Don Busack
To quote the immortal words of Socrates, "I drank what?"
Scotland, United Kingdom
Member Since: December 24, 2004
entire network: 1,594 Posts
KitMaker Network: 0 Posts
Posted: Tuesday, August 16, 2005 - 10:58 PM UTC
Thanks Don...as usual you have hit the spot ........exactly what I needed ..........making the "big" main arm at the mo ........tight when you are working in 10 's of " thou'sof an inch .......yep its tight ....but I'm getting there ....on third make ....working on 29 " between inner edge of " chassi frame"(20mm in scale)


And this is a "Hobby".......... :-) :-) :-)
Allways greatful for your pics......
aye
BARV
(GOSMG)
ps....more mil pics in "mail " soon
Scotland, United Kingdom
Member Since: December 24, 2004
entire network: 1,594 Posts
KitMaker Network: 0 Posts
Posted: Monday, August 22, 2005 - 10:33 AM UTC
Sorry ......I have deleted the pics that were herebecause.................they werebuilt all wrong
aye
BARV
(GOSMG)
Ontario, Canada
Member Since: July 17, 2005
entire network: 116 Posts
KitMaker Network: 0 Posts
Posted: Wednesday, August 24, 2005 - 05:24 AM UTC
wow "beautiful" work there i am amazed very good and attractive looking.
Graeme
"theres a heroe in all of us"
Scotland, United Kingdom
Member Since: December 24, 2004
entire network: 1,594 Posts
KitMaker Network: 0 Posts
Posted: Thursday, August 25, 2005 - 11:21 AM UTC
Hi All.........sorry no pics for the present ................found a nasty mistake which has resulted in almost total re-build
..........found that I had made clearance between "rams" and " carry-cradle" too tight ----the measurement should have been ..(scale)38"-wide------made the "
"thing (scale)34" wide.........(-0.057").and it jammed up SOLID--broke pins trying to free it---
...got to make new pivot points ..aaaaargh!!!!!!!!!!
Back in a day or so...
aye
BARV
(GOSMG)
Scotland, United Kingdom
Member Since: December 24, 2004
entire network: 1,594 Posts
KitMaker Network: 0 Posts
Posted: Saturday, August 27, 2005 - 12:46 PM UTC


