_GOTOBOTTOM
Scratchbuilders!: Armor/AFV
This is a group for armor scratchbuilding questions, topics and projects.
Hosted by Mike Kirchoff
homemade stone bricks... will it work??
dsc
Visit this Community
Gdańsk, Poland
Member Since: February 27, 2005
entire network: 247 Posts
KitMaker Network: 0 Posts
Posted: Tuesday, July 26, 2005 - 08:59 AM UTC
Hi all

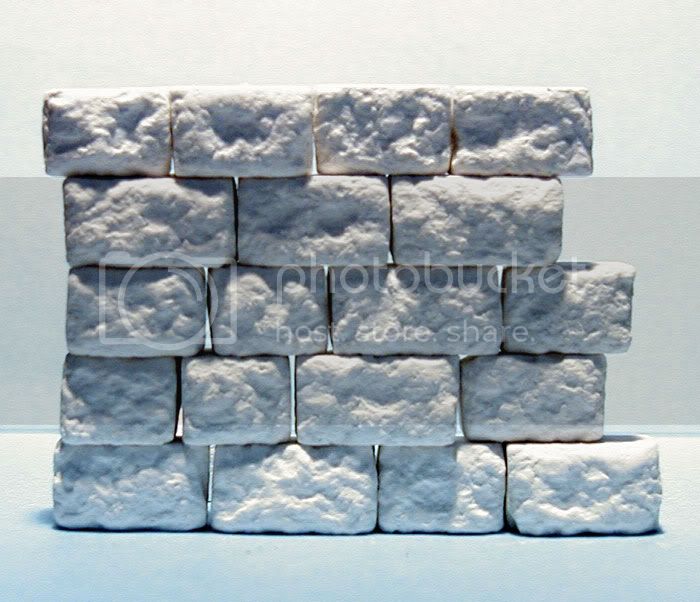
Some of you might remember my last scrtachbuilt stone wall, which was created using a dental tool and some dental plaster. After working with the wall for some time, I've realized that it's not very realistic. I mean it looks good, but still it lacks some detail that make a wall look almost real. First of all it's a bit to repetitive and regular. It's also too flat as usually the depth of stones in a wall varies, so that the whole surface looks uneven.
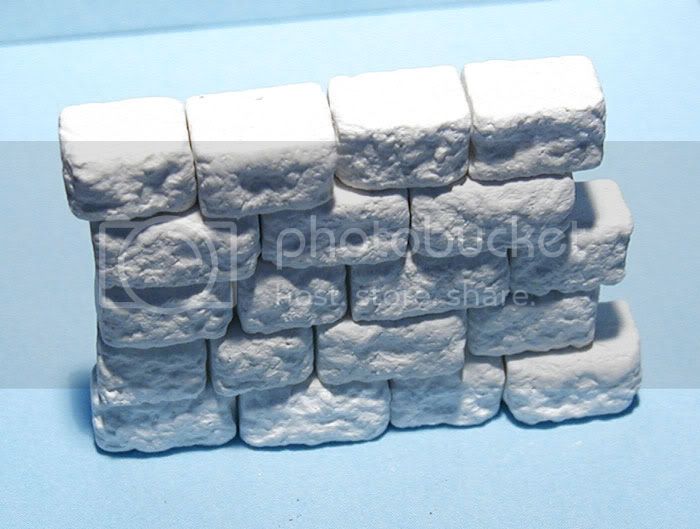
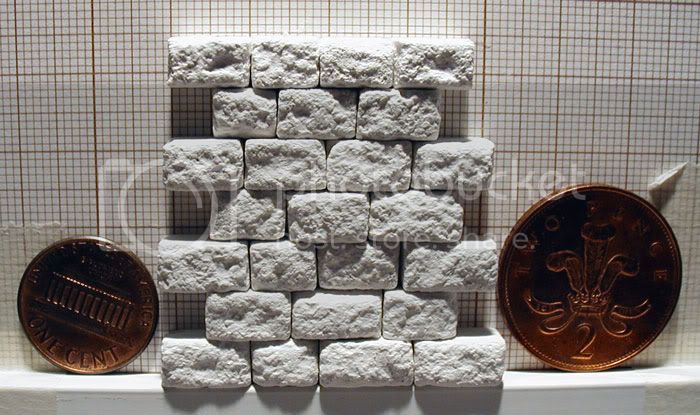
After doing some thinking I came up with an idea to build the wall using individual stone "bricks". That way I'll be able to shape the wall in any way I want and give it a more natural look. Here's a quick test piece to show you all what I'm talking about:


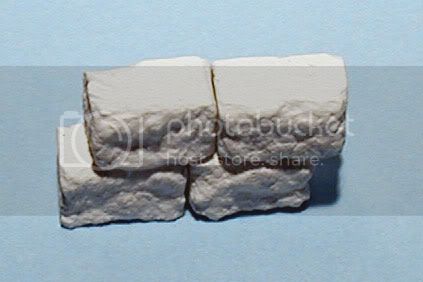
They are not glued yet, but should give an overall idea of how it's going to look. And here's my first question:
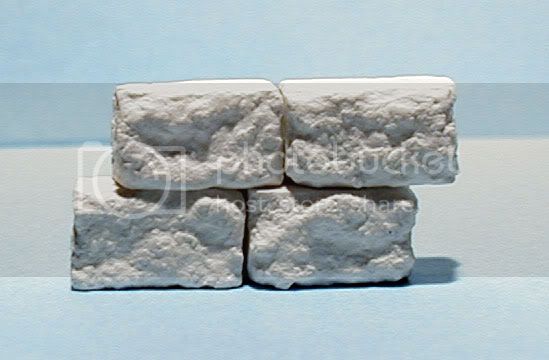
- do you like how it looks now or maybe it's better to add some mortar to join the rocks together?? should the rocks sit close together or maybe there should be a small amount of mortar sticking out from between the rocks??

I plan to make bigger wall panels (different styles and combinations) with cut out "teeth" to join them easier and hide the joints.

So what do you think?? Is it any good?

cheers,
dsc.

nato308
Visit this Community
Iowa, United States
Member Since: October 23, 2003
entire network: 884 Posts
KitMaker Network: 0 Posts
Posted: Tuesday, July 26, 2005 - 09:40 AM UTC
I like the stones, my vote would be to include the mortar inbetween the stones it adds just another nice touch of reality. As for the amount of mortar, I think thats a choice reserved for you as I have seen eurpoean walls with lots of it and some with small amounts. I would look at a reference photo from an area you want to model it from and get a feel for what they look like. Things can vary from village to village and country to country. I think it will work well for you. Two big thumbs up!
SSG_Q
Visit this Community
North Carolina, United States
Member Since: June 21, 2005
entire network: 115 Posts
KitMaker Network: 0 Posts
Posted: Tuesday, July 26, 2005 - 03:36 PM UTC
those look fantastic, a touch of "mortar" is all they lack. You should pictue them with a coin or something to show scale.
Mosseman
Visit this Community
Oklahoma, United States
Member Since: July 25, 2005
entire network: 153 Posts
KitMaker Network: 0 Posts
Posted: Tuesday, July 26, 2005 - 06:18 PM UTC
U can make hm bricks with plaster of paris, which i found out on this site. that works pretty good
TsunamiBomb
Visit this Community
Arizona, United States
Member Since: September 21, 2004
entire network: 1,447 Posts
KitMaker Network: 0 Posts
Posted: Tuesday, July 26, 2005 - 06:37 PM UTC

Quoted Text

U can make hm bricks with plaster of paris, which i found out on this site. that works pretty good


Where did he post that he needed help building the bricks that he had already made? Just Curious
BigJon
Visit this Community
England - West Midlands, United Kingdom
Member Since: July 12, 2005
entire network: 757 Posts
KitMaker Network: 110 Posts
Posted: Tuesday, July 26, 2005 - 07:09 PM UTC
I plan on doing this too but you're further than me !! I will be watching your progress carefully
dsc
Visit this Community
Gdańsk, Poland
Member Since: February 27, 2005
entire network: 247 Posts
KitMaker Network: 0 Posts
Posted: Wednesday, July 27, 2005 - 07:14 AM UTC
Paul: thanks for the comment and your kind words! I also think that adding mortar will make it look even more realistic. I plan to add it after glueing everything down, I will just leave some space between the rocks to add wall filler (to imitate mortar).

Eric: damn it!! I forgot to include a coin nn my new photos, but I promise I will include something for scale purposes the next time I photograph.

Jon: I will try to update often so watch this space:)

And now for the update:


I have two new photos showing pieces I finished recently. I have around 25 pieces now, but I plan to add some more. I will make a mold to copy this stones, so the more I make now, the less repetitive the wall is in the future. Hope you like them so far.
As usual any and all comments are more than welcome,

cheers,
dsc.
ThorsHammer
Visit this Community
New Jersey, United States
Member Since: February 25, 2005
entire network: 112 Posts
KitMaker Network: 0 Posts
Posted: Wednesday, July 27, 2005 - 09:51 AM UTC
I think its a great idea, especially making a mold of the already made bricks so you can speed up the production process
warthog
Visit this Community
Metro Manila, Philippines
Member Since: July 29, 2002
entire network: 1,460 Posts
KitMaker Network: 366 Posts
Posted: Wednesday, July 27, 2005 - 10:42 AM UTC
Damn they very good. Maybe you could try joing them together using wall spackle or putty...that would really simulate mortar. It would be as if you are really building a wall but in miniature. Spackles have good adhesive qualities and they are sometimes sturdier than plaster of paris. Maybe you could mix PVA glue with the spackle to make them more adhesive.

Just an idea... ....I sure do like the look of your bricks...

Cheers
dsc
Visit this Community
Gdańsk, Poland
Member Since: February 27, 2005
entire network: 247 Posts
KitMaker Network: 0 Posts
Posted: Sunday, July 31, 2005 - 10:28 AM UTC
Hi everyone

Here I am again with some new pictures. I've already made a small mold of a set of stones and I can cast around 30 pieces in one go, which really speeds things up. I also followed Eric's suggestion to include a coin in the picture for scale purposes (actually I've used two coins, a UK and US version). This test piece is glued together using normal wood glue. I will also make a small test piece that has mortar (wall spackle). I've calculated that a wall model in 1:35 scale should have around 0,5-0,7mm of mortar between individual stones (which would mean that it has aprox. 1,8-2,5cm of mortar between rocks in "reality"). Having two version of a stone wall will allow me to compare them and decide which looks better. So here's what I've got so far:


The second picture is the one with the coins. The one on the left is a one cent coin and the one on the right is a two pence coin. This should give most of you the idea of how big (or small) this thing is.

Hope you like it. If you have any ideas or suggestion feel free to post a reply,

cheers,
dsc.

PS.
Jared: thanks for your comment! A mold is a must in such projects, otherwise I would have to make around 1000 stones for a small building. And that would be crazy:)

Arvin: also thank you for your kind words. I think I will use wall spackle. I will leave some space between rocks when gluing them to a flat surface and then fill the holes with wall spackle to imitate mortar. I should post some pictures soon, so stay tuned:)

HILBERT
Visit this Community
Zuid-Holland, Netherlands
Member Since: August 07, 2004
entire network: 4,808 Posts
KitMaker Network: 360 Posts
Posted: Sunday, July 31, 2005 - 10:47 AM UTC
It looks really fantastic! I should not know what's wrong about.
Is your plan to paint the wall grey and then drybrush it??
Looks still impressive!

H
 _GOTOTOP