_GOTOBOTTOM
Scratchbuilders!: Armor/AFV
This is a group for armor scratchbuilding questions, topics and projects.
Hosted by Mike Kirchoff
wall from scratch, a short "how to" with pics
dsc
Visit this Community
Gdańsk, Poland
Member Since: February 27, 2005
entire network: 247 Posts
KitMaker Network: 0 Posts
Posted: Saturday, March 26, 2005 - 10:34 AM UTC
Hi

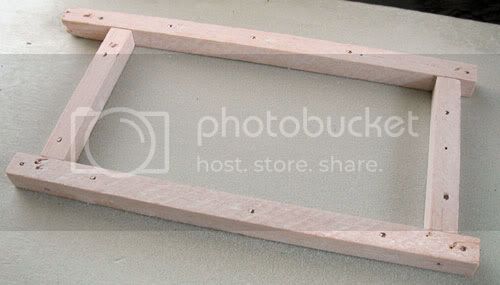
Just like I promised on the Building forum, here's a short post on how to create a rock wall. First of all create a small frame out of balsa wood or something similar. It really doesn't matter what you use, make sure it is more or less rectangle shaped. Use some dental plaster to cast a wall panel. Here you can see some photos showing a simple mould (made form balsa wood, I'm also using some styrodur for the base, those balsa wood beams are held in place using pins)and a mould with some plaster already poured in:


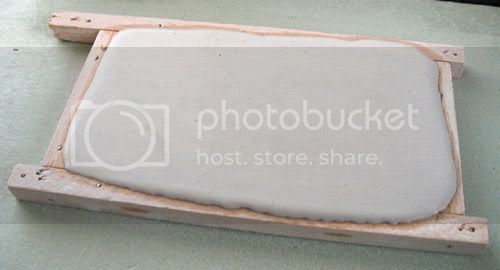
After about 6min (it really depends on the kind of plaster you're using) scrape the mould using a piece of plasticard (or a scraper). This picture shows the mould already scraped and ready for drying:

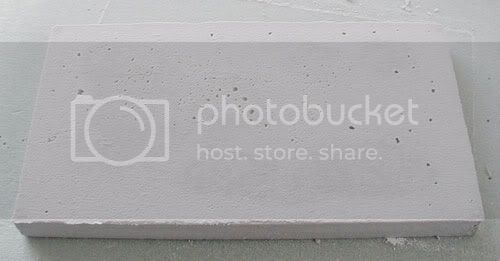
After about 25min, make sure the plaster is fairly dry and remove it from the mould (I had to decompose the whole frame to get the cast out). Here's a photo showing a panel removed frrm the mould, it's still wet so leave it for about a day to dry:

The next thing to do is to take a fairly uneven rock and press the rock against the panel's surface. This way we will create a cool texture which will be similar to a real wall. Unfortunatelly I haven't got a picture showing this process but you can see the final effect on a finished piece at the end of this post.
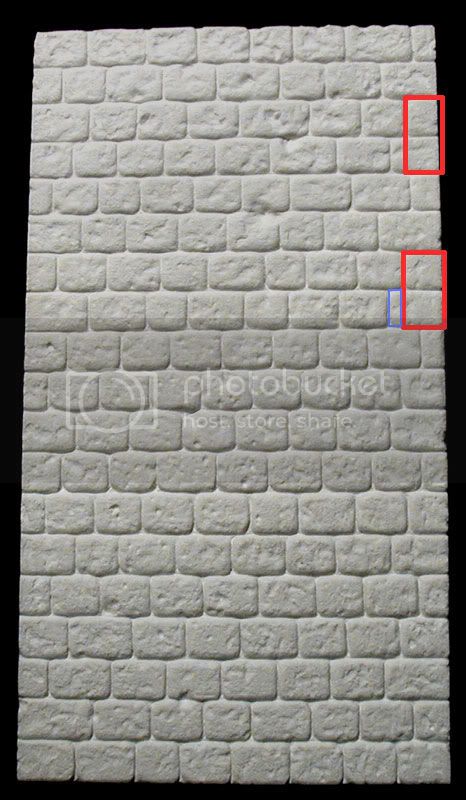
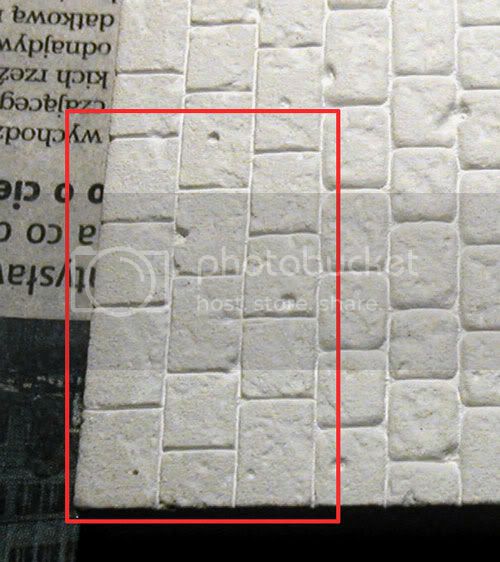
The next step is to scribe the wall to create all the rocks. I used some dental tools for this and I guess it is the best thing to use. You should be able to buy such tools at your local dentist store. After scribing some simple rectangle rocks which you can see here:


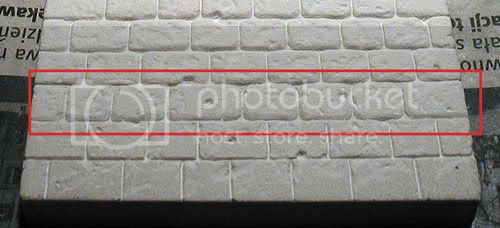
try to make them a little bit more oval (but not too much), making sure you scribe all those corners and edges, so the rocks is a bit smoother (normal rocks that are being exposed to a lot of rain and other factors tend to lose all sharp edges). Here you can see a row of rocks that shows what I'm talking about:

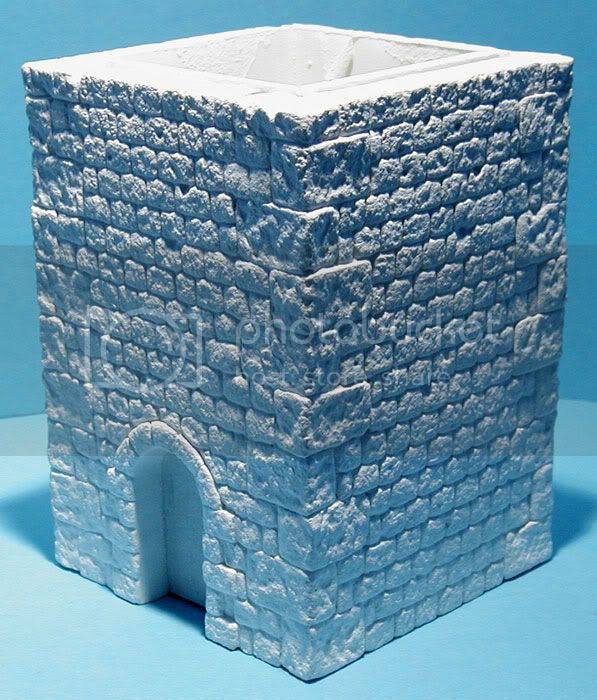
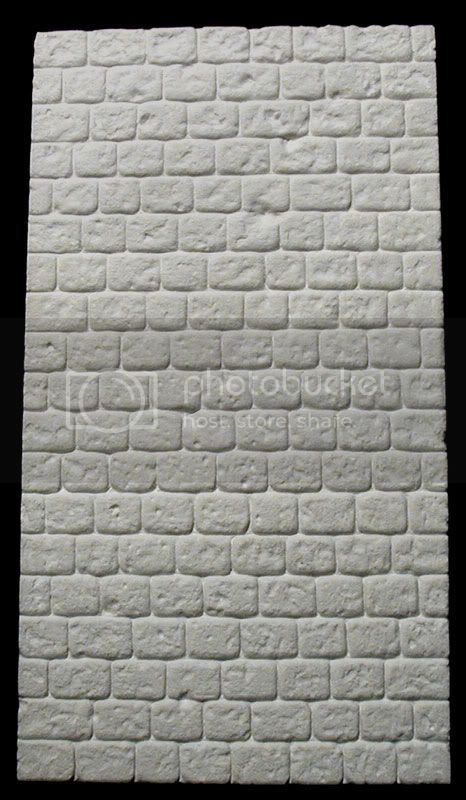
After that you just have to take a brush with some hard bristles and use it on the panel to bring out the details and remove any visible sharp edges. And that's pretty much the whole process. Here's a finished wall piece:

Hope this will help you with your next wall project:) The next thing I want to create is a corner piece which will allow me to connect similar wall panels. I'm still thinking about it, but will try to post some pics as soon as I take some. Cheers!!

dsc.

PS. Happy Easter Holidays!!
animal
Visit this Community
Member Since: December 15, 2002
entire network: 4,503 Posts
KitMaker Network: 1,163 Posts
Posted: Saturday, March 26, 2005 - 10:55 AM UTC
Yolu make it look very easy. Thanks for sharing this with us dcs.
Martinnnn
Visit this Community
Zuid-Holland, Netherlands
Member Since: April 26, 2004
entire network: 5,435 Posts
KitMaker Network: 454 Posts
Posted: Saturday, March 26, 2005 - 11:02 AM UTC
Looks great, I'm gonna give it a try!

thanks for sharing!

Martin
Eagle
Visit this Community
Noord-Brabant, Netherlands
Member Since: May 22, 2002
entire network: 4,082 Posts
KitMaker Network: 0 Posts
Posted: Saturday, March 26, 2005 - 07:26 PM UTC
DSC,

that's a nice and easy step by step. I most sure this will help some builders to create an excellent wall without having to use expensive aftermarket kits.

Thanks for sharing your knowledge !
dsc
Visit this Community
Gdańsk, Poland
Member Since: February 27, 2005
entire network: 247 Posts
KitMaker Network: 0 Posts
Posted: Sunday, March 27, 2005 - 02:34 AM UTC
Thanks for your kind words guys. I'm having some trouble with those corner pieces I've mentioned earlier. I'm considering two methods:
- make the corner piece rocks the same hight as those in the wall panel
- make the corner piece rocks two times higher than the rocks in the panel

The second idea might look nicer but it's a bit tricky, cause it's harder to actually hide the places where the corner meets the panel. Here's a photo to explain what I'm talking about:


I would have to cut away smaller pieces of the wall panel to make it interlock with the corner that I'm about to create. The red rectangles show the possible cut-aways. But such operation leaves me with a bunch of smaller, very narrow rock pieces, one of which is highlighted on the photo with a blue color. I have no idea how to eliminate this problem, so if anyone has anything usueful, please leave a comment, I would be more than grateful. Thanks in advance for any help.

dsc.
Danial
Visit this Community
Singapore / 新加坡
Member Since: May 23, 2005
entire network: 693 Posts
KitMaker Network: 390 Posts
Posted: Friday, June 03, 2005 - 08:21 PM UTC
u make it sound so easy...btw, wat abt polystyrene? can it b made into a wall too? how?
wampum
Visit this Community
Tekirdag, Turkey / Türkçe
Member Since: August 21, 2002
entire network: 3,289 Posts
KitMaker Network: 389 Posts
Posted: Friday, June 03, 2005 - 08:30 PM UTC
This is the same method I use for the walls. Plaster is a great material. Thanks for sharing with us dsc
Plasticbattle
#003
Visit this Community
Donegal, Ireland
Member Since: May 14, 2002
entire network: 9,763 Posts
KitMaker Network: 1,351 Posts
Posted: Friday, June 03, 2005 - 10:32 PM UTC

Quoted Text

The second idea might look nicer but it's a bit tricky, cause it's harder to actually hide the places where the corner meets the panel. Here's a photo to explain what I'm talking about:


I know exactly what you mean. There is an easier method of joining corners, that looks natural enough. If you look at a lot of Verlinden or Custom Dioramics houses they all use this easy system. I borrowed this picture made by Graywolf, so you can see for your self. It would be easy to make one of these and cast it for all your corners and even pillars for extra detail

Another way to hide joints at house corners to add a drain spout down the wall.

I used your method of "cast and scribe" to create a wall base for a 1/16 figure. Instead of using four straight sides, I made a 3-D mould for extra depth. There will be an article on the site in a week or so .. it has been allready sent in.

dsc
Visit this Community
Gdańsk, Poland
Member Since: February 27, 2005
entire network: 247 Posts
KitMaker Network: 0 Posts
Posted: Saturday, June 04, 2005 - 03:30 AM UTC
I'm a bit surprised (positively surprised) that there are new replies to this topic. I've really thought that it was dead, but I guess I was wrong, which is pretty cool:).

Danial: I think slodder has already answered your question in a similar "wall" topic, somewhere in the scratchbuilt section of the forum.

Wampum: thanks for your comment and I agree with you that plaster is a great material.

Plasticbattle: in the end I have used the second idea. It turned out pretty nice, you can see it here:


Your suggested method is a bit easier, but I think it looks a bit better when the corner pieces are overlapped by smaller wall rocks. I don't know if you understand what I'm trying to say, but in my opinion using identical corner pieces, gives an impression that the corner is a bit unstable (all the corner pieces stand on top of each other and except mortar aren't really connected with the surrounding walls). I guess that the "interlock" idea is a bit more realistic. It doesn't change the fact that the building on Greywolf's picture looks really cool.

Cheers,
dsc.
generalrazo
Visit this Community
Pennsylvania, United States
Member Since: May 26, 2005
entire network: 312 Posts
KitMaker Network: 0 Posts
Posted: Tuesday, June 07, 2005 - 03:55 PM UTC
I have to pick up some dental plaster!


Thanks for the inspiration,
Eddie
Graywolf
Staff MemberSenior Editor
HISTORICUS FORMA
Visit this Community
Izmir, Turkey / Türkçe
Member Since: December 01, 2001
entire network: 6,405 Posts
KitMaker Network: 1,013 Posts
Posted: Tuesday, June 07, 2005 - 05:55 PM UTC
hi Tom,
Thanks for the SBS,i always love to see posts about plaster in the forums and I see you are really good on that. Lets keep sharing info on making plasterwork.
I absolutely agree interlock idea looks more realistic especially for medieval structures.
best regards
dsc
Visit this Community
Gdańsk, Poland
Member Since: February 27, 2005
entire network: 247 Posts
KitMaker Network: 0 Posts
Posted: Wednesday, June 08, 2005 - 05:04 AM UTC
The best thing is that I've got into that whole "plastermania" action only a few months ago (thanks for the inspration Plasticbattle!!). I didn't think that I can achieve such great effects with only plaster and dental tools. The whole construction process can be a bit long, but if you do everything right the final effect is pretty stunning:) Plus it's much cheaper than buying stuff and you can make pretty much anything you need. So as you said: "Lets keep sharing info on making plasterwork"... now everybody get to work:)

cheers,

dsc.
TheLosers
Visit this Community
Visayas, Philippines
Member Since: June 06, 2005
entire network: 47 Posts
KitMaker Network: 13 Posts
Posted: Monday, June 27, 2005 - 12:31 AM UTC
tnx for the tip...by the way how thick is the wall...
dsc
Visit this Community
Gdańsk, Poland
Member Since: February 27, 2005
entire network: 247 Posts
KitMaker Network: 0 Posts
Posted: Tuesday, June 28, 2005 - 09:19 AM UTC
Well it really depends on how thick you want it to be. The one used in this tutorial is 1cm thick, which is usually too much. It's totally up to you, you decide how thick or thin you want it too be, but remember that bigger pieces (bigger surface) will tend to break more easily when too thin. Cheers and happy scribing

dsc.
Moezilla
Visit this Community
Texas, United States
Member Since: June 01, 2004
entire network: 1,161 Posts
KitMaker Network: 533 Posts
Posted: Tuesday, June 28, 2005 - 09:48 AM UTC
That's a really great "how to" article Tom , thanks for sharing it with us! Very cool project, may have to give it a go even if I don't need a wall at the moment. lol
 _GOTOTOP