

I must confess I have no idea about electricity. I would like to get a couple of LEDs parallel in a circuit with either a power source or a battery to light up the interior of a Nautilus model. But I have no idea what I need to order apart from the LEDs.
Right now I'm
at this set.
What else do I need?
Where can I learn about the bare minimum of circuit building for scale models? For another project I would like to use LED strips and LEDs at the same time in a circuit. Thank you.
Tips & Tricks
Ask about and post about tips and tricks you use while modelling.
Ask about and post about tips and tricks you use while modelling.
Hosted by Jim Starkweather
Using LEDs to light a model?

spongya

Member Since: February 01, 2005
entire network: 2,365 Posts
KitMaker Network: 474 Posts

Posted: Tuesday, October 23, 2018 - 07:47 AM UTC

varanusk

Member Since: July 04, 2013
entire network: 1,288 Posts
KitMaker Network: 337 Posts
Posted: Tuesday, October 23, 2018 - 07:37 PM UTC
I have never tried that but at first sight it should be quite simple. I guess that you just need a 12v power source for LED's and a switch. And maybe some cable.
For a parallel circuit you have to join all positive ends of the LED's to the positive pole of the power source (note that there is only one way to connect LED's, if you reverse it they will not light).
You will need to build something like this:
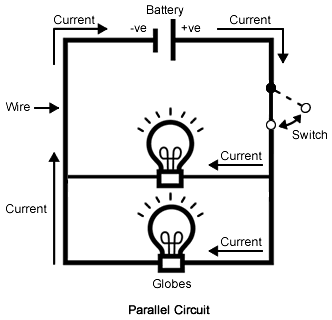
And this is a quick and simple video:
(BTW seems that the link you posted have quite high shipping costs, you can get them also at eBay with free shipping)
For a parallel circuit you have to join all positive ends of the LED's to the positive pole of the power source (note that there is only one way to connect LED's, if you reverse it they will not light).
You will need to build something like this:
And this is a quick and simple video:
(BTW seems that the link you posted have quite high shipping costs, you can get them also at eBay with free shipping)
spongya
Member Since: February 01, 2005
entire network: 2,365 Posts
KitMaker Network: 474 Posts
Posted: Tuesday, October 23, 2018 - 08:12 PM UTC
Dear Carlos,
That IS very simple indeed... so no need for capacitors and other complicated stuff? just the basic elementary circuit? Great stuff. I'll have to find a 12V power source (apart from batteries), and I'm golden.
That IS very simple indeed... so no need for capacitors and other complicated stuff? just the basic elementary circuit? Great stuff. I'll have to find a 12V power source (apart from batteries), and I'm golden.

Scarred

Member Since: March 11, 2016
entire network: 1,792 Posts
KitMaker Network: 482 Posts
Posted: Tuesday, October 23, 2018 - 09:04 PM UTC
I assume you are talking about Nautilus from 20,000 Leagues Under the Sea. You can buy lighting kits for models that are basically plug and play. They come with a circuit board, leds, wires, battery harness or power supplies and instructions. Here is a kit for the Nautilus:
https://www.culttvmanshop.com/Nautilus-Light-kit-from-VoodooFX_p_2642.html
more lighting stuff:
https://www.culttvmanshop.com/search.asp?keyword=lighting&search=
A site with good info on how to:
https://www.instructables.com/id/LED-Lighting-in-Plastic-Models/
Parts:
http://rocketfin.com/scale-model-led-lights.cfm
spongya
Member Since: February 01, 2005
entire network: 2,365 Posts
KitMaker Network: 474 Posts
Posted: Wednesday, October 24, 2018 - 01:36 AM UTC
My budget stopped at the PE set (and shipping), so the Voodoo kit is out, unfortunately. (Shipping is quite expensive to Hungary.) It's strictly DIY from now on. 
The article is awesome though. Thank you.
The article is awesome though. Thank you.
Scarred
Member Since: March 11, 2016
entire network: 1,792 Posts
KitMaker Network: 482 Posts
Posted: Wednesday, October 24, 2018 - 10:59 AM UTC
Know what you mean, I'm gathering parts for the Fine Molds Falcon. And the lighting kit is pricey.
spongya
Member Since: February 01, 2005
entire network: 2,365 Posts
KitMaker Network: 474 Posts
Posted: Wednesday, October 24, 2018 - 07:41 PM UTC
I have the AMT Falcon, which is also on the list of kits to be lit 
We'll see. I'll post the photos once I'm finished.
We'll see. I'll post the photos once I'm finished.

drabslab

Member Since: September 28, 2004
entire network: 2,186 Posts
KitMaker Network: 263 Posts

Posted: Tuesday, October 30, 2018 - 03:41 AM UTC
Quoted Text
I have never tried that but at first sight it should be quite simple. I guess that you just need a 12v power source for LED's and a switch. And maybe some cable.
For a parallel circuit you have to join all positive ends of the LED's to the positive pole of the power source (note that there is only one way to connect LED's, if you reverse it they will not light).
You will need to build something like this:
And this is a quick and simple video:
(BTW seems that the link you posted have quite high shipping costs, you can get them also at eBay with free shipping)
No, its not that simple. This schema works with standard lamps, not LED.
You will definitively need some complicated stuff as Andras states below.
Learning the bare minimum is a recepy for disaster. Its a nice project but you have to learn something about electronics to do it, I guarantee you that.
Believe me, I have never actually practiced electronics but know enough of it.


Namabiiru

#399
Member Since: March 05, 2014
entire network: 2,888 Posts
KitMaker Network: 489 Posts

Posted: Tuesday, October 30, 2018 - 04:28 AM UTC
At a minimum, LEDs require a resistor in series with the LED to keep the current from burning up the LED. This tutorial might be useful: https://itstillworks.com/13581280/how-to-design-a-simple-led-circuit

spongya
Member Since: February 01, 2005
entire network: 2,365 Posts
KitMaker Network: 474 Posts
Posted: Tuesday, October 30, 2018 - 04:45 AM UTC
Quoted Text
At a minimum, LEDs require a resistor in series with the LED to keep the current from burning up the LED. This tutorial might be useful: https://itstillworks.com/13581280/how-to-design-a-simple-led-circuit
Fortunately you can buy pre-wired LEDs, which make things a bit simpler. But yeah; not straightforward, unless you buy a kit.
Scarred
Member Since: March 11, 2016
entire network: 1,792 Posts
KitMaker Network: 482 Posts
Posted: Tuesday, October 30, 2018 - 04:54 AM UTC
Since the LED's he is looking at are pre-wired with the resistors that schematic will work, just replace the bulbs with the pre-wired LED's. A parallel circuit is best for this because each LED will get the same voltage. If they weren't pre-wired with the resistors all he'd have to do is add a 100 to 200 ohm resistor to each lead and solder them together. This was first week stuff in college, I have a couple of electronic degrees and many years of doing stuff like this. Now if he wanted flashing lights that is more complicated. You also need to block the light from bleeding thru the plastic so the inside of the kit needs to be painted black.
Watch this guys videos he covers most everything you need
Part one
https://m.youtube.com/watch?v=-IKiZlDY6Z8
Part two
https://m.youtube.com/watch?v=7r0V0qG6lMM
Part three
https://m.youtube.com/watch?v=nzsaZ7GGp_8
Watch this guys videos he covers most everything you need
Part one
https://m.youtube.com/watch?v=-IKiZlDY6Z8
Part two
https://m.youtube.com/watch?v=7r0V0qG6lMM
Part three
https://m.youtube.com/watch?v=nzsaZ7GGp_8
drabslab
Member Since: September 28, 2004
entire network: 2,186 Posts
KitMaker Network: 263 Posts
Posted: Tuesday, October 30, 2018 - 09:29 AM UTC
I had a look at these pre-wired LED: I don't like it.
Soldering a resistor directly on the LED has as disadvantage that it becomes (1/48 scale) a big lump that may be difficult to find place for in the inside of a wing, or fuselage.
In addition, this is made for 12 Volt. I would prefer 5 volt, or even 3.3 Volt which is closer to modern electronics standard, and allows using the endless amount of smartphone chargers that is lying around.
In addition, one of these raspberry babies
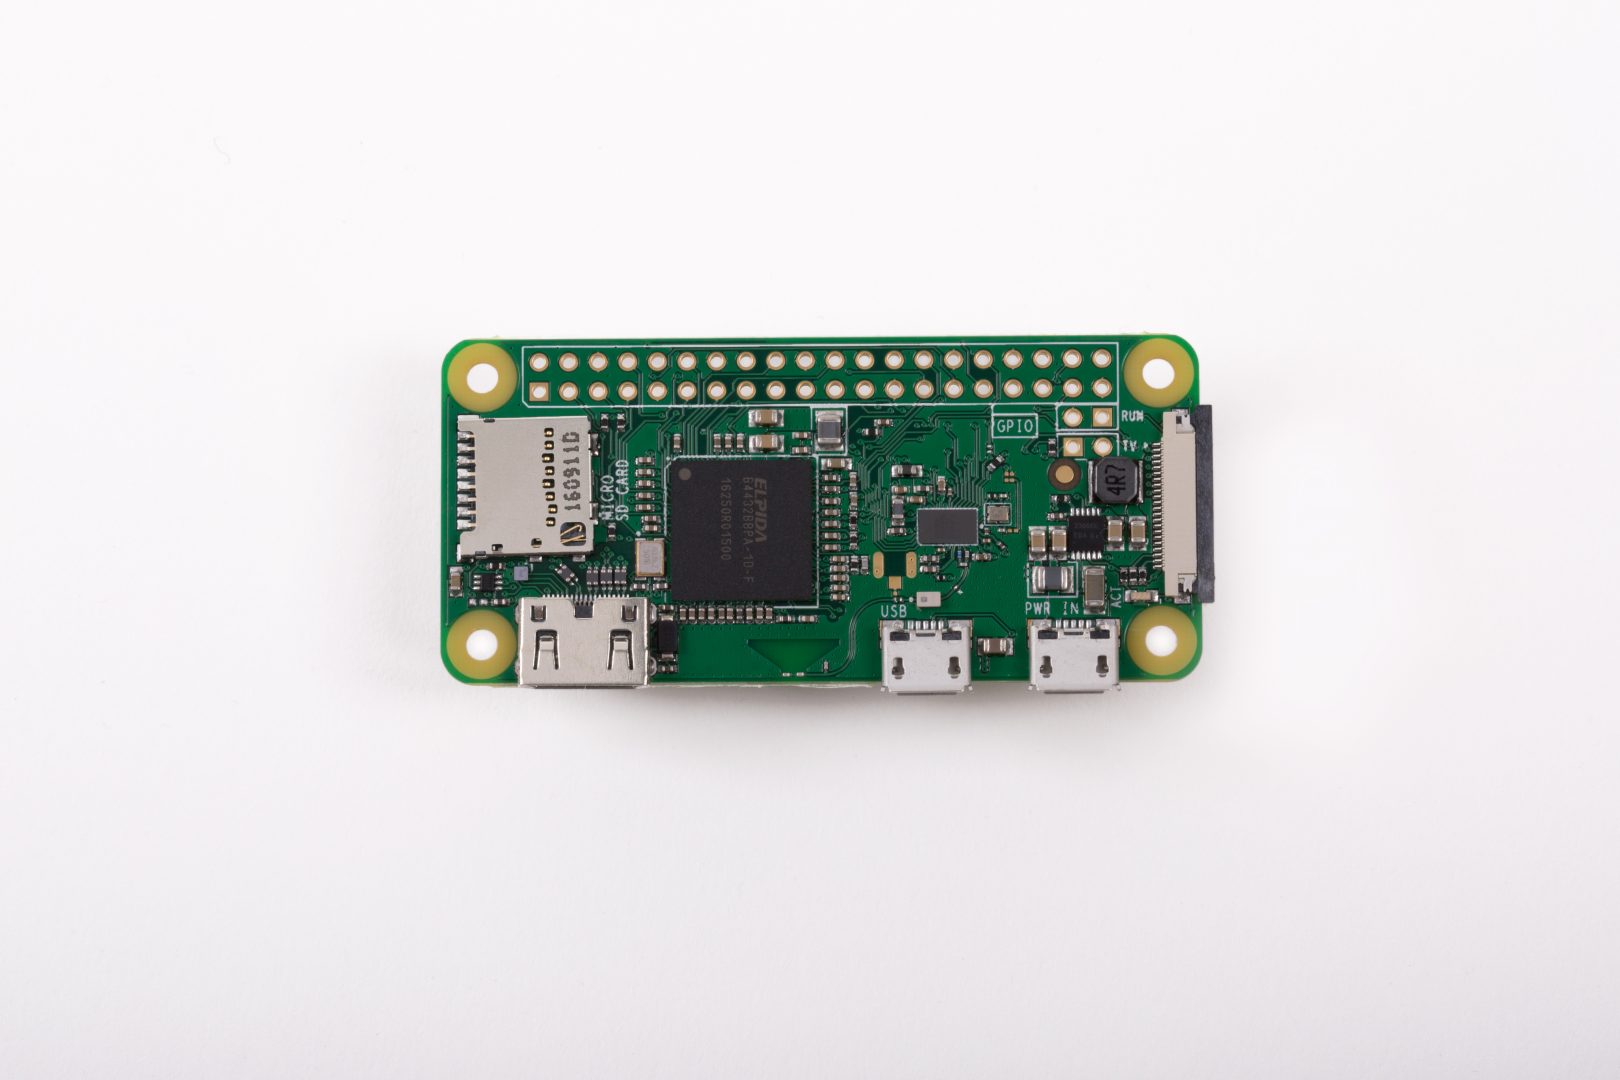
gives a world of fancy options.
Soldering a resistor directly on the LED has as disadvantage that it becomes (1/48 scale) a big lump that may be difficult to find place for in the inside of a wing, or fuselage.
In addition, this is made for 12 Volt. I would prefer 5 volt, or even 3.3 Volt which is closer to modern electronics standard, and allows using the endless amount of smartphone chargers that is lying around.
In addition, one of these raspberry babies
gives a world of fancy options.

165thspc

#521
Member Since: April 13, 2011
entire network: 9,465 Posts
KitMaker Network: 176 Posts
Posted: Tuesday, October 30, 2018 - 01:06 PM UTC
Check for listings on eBay.
You should be able to find either the pre-wired units or offerings of unsoldered LED's with correct matching resistors online.
Also look to the Model Railroad Hobby world for smaller more compact lighting units.
You should be able to find either the pre-wired units or offerings of unsoldered LED's with correct matching resistors online.
Also look to the Model Railroad Hobby world for smaller more compact lighting units.

Scarred
Member Since: March 11, 2016
entire network: 1,792 Posts
KitMaker Network: 482 Posts
Posted: Tuesday, October 30, 2018 - 03:24 PM UTC
Quoted Text
I had a look at these pre-wired LED: I don't like it.
Soldering a resistor directly on the LED has as disadvantage that it becomes (1/48 scale) a big lump that may be difficult to find place for in the inside of a wing, or fuselage.
In addition, this is made for 12 Volt. I would prefer 5 volt, or even 3.3 Volt which is closer to modern electronics standard, and allows using the endless amount of smartphone chargers that is lying around.
In addition, one of these raspberry babies
gives a world of fancy options.
You can get pico sized LEDs and solder in your own resisters where you want them. They don't have to be attached to the leads, I like them like that because I know that the resistor is already mounted and I don't have to worry about any thing other than the wiring. But the pico LED's are TINY! You could probably put them in a 1/144 scale plane with no problems. You need smaller you probably would need fiber optics.
Just found a pic for size comparison
https://glxscalemodels.com/wp-content/uploads/chip-sizes.jpg
 |

WEB HOSTING BY


Copyright ©2021 KitMaker Network and Kitmaker Network, a subsidiary of Silver Star Enterprises
All Rights Reserved. Please read our Conditions of Use and Privacy Policy.
All Rights Reserved. Please read our Conditions of Use and Privacy Policy.