

Hello Everyone.
I have almost finished the Hikawa Maru but can't find any diagrams/pictures showing how the derricks were rigged. I know a wire would go from the top pulley out to the arm but other than that I have no ides.
Thanks in advance.
Warren
Hosted by Jim Starkweather
Hikawa Maru Derrick Rigging

warreni

Member Since: August 14, 2007
entire network: 5,926 Posts
KitMaker Network: 271 Posts

Posted: Friday, November 03, 2017 - 07:57 AM UTC

RobinNilsson

Member Since: November 29, 2006
entire network: 6,693 Posts
KitMaker Network: 1,042 Posts
Posted: Friday, November 03, 2017 - 04:08 PM UTC
Oops. Big question.
I don't have any specific knowledge about this ship so I'll try to give a generic answer.
Larger ships tended to have two derricks next to each other (port and starboard side of the mast).
This setup allowed one derrick to be in a fixed position above the cargo hatch and the other in a fixed position out over the quay. The tops of the derricks had a line between them so that the distance could not increase. The hatch-derrick was secured with two lines (aft-forward) to eather the sea-side edge of the hatch or some securing points on the railing/bulwark at the sea-side of the ship. The quay derrick was secured in the same way to the quay side railing/bulwark.
The lifting lines for the two derricks were connected to each other, two winches, one for each lifting line. Both winches reels out their lines, the hatch winch slightly slower so that the combined hook hangs down from the hatch derrick. Load is attached, hatch winch reels in until the load is above deck. Quay winch starts reeling in to pull the load over to the ships side, hatch winch reels out to allow the load to move sideways, after a while the hatch line is slack and the load hangs from the quay derrick and line, the quay derrick starts reeling out to lower the load and the hatch winch reels out as well. The load reaches the quay and is disconnected. The process is reversed to bring the hook back in over the hatch and lower it for the next lift.
Try it with two strings tied to a shoe and lift the shoe from outside your left foot to outside your left foot without moving your arms in fron of your body
With only one derrick you had to have three winches, one for the load and one for each swing direction (port - starboard)
One derrick + three winches (maybe three isn't enough either)
or
Two derricks + two winches
A derrick is cheaper than a winch and the two derrick method is faster than swinging the booms.
/ Robin

Robbd01

#323

Member Since: February 13, 2013
entire network: 791 Posts
KitMaker Network: 161 Posts

Posted: Friday, November 03, 2017 - 06:49 PM UTC
Quoted Text
Oops. Big question.
I don't have any specific knowledge about this ship so I'll try to give a generic answer.
Larger ships tended to have two derricks next to each other (port and starboard side of the mast).
This setup allowed one derrick to be in a fixed position above the cargo hatch and the other in a fixed position out over the quay. The tops of the derricks had a line between them so that the distance could not increase. The hatch-derrick was secured with two lines (aft-forward) to eather the sea-side edge of the hatch or some securing points on the railing/bulwark at the sea-side of the ship. The quay derrick was secured in the same way to the quay side railing/bulwark.
The lifting lines for the two derricks were connected to each other, two winches, one for each lifting line. Both winches reels out their lines, the hatch winch slightly slower so that the combined hook hangs down from the hatch derrick. Load is attached, hatch winch reels in until the load is above deck. Quay winch starts reeling in to pull the load over to the ships side, hatch winch reels out to allow the load to move sideways, after a while the hatch line is slack and the load hangs from the quay derrick and line, the quay derrick starts reeling out to lower the load and the hatch winch reels out as well. The load reaches the quay and is disconnected. The process is reversed to bring the hook back in over the hatch and lower it for the next lift.
Try it with two strings tied to a shoe and lift the shoe from outside your left foot to outside your left foot without moving your arms in fron of your body
With only one derrick you had to have three winches, one for the load and one for each swing direction (port - starboard)
One derrick + three winches (maybe three isn't enough either)
or
Two derricks + two winches
A derrick is cheaper than a winch and the two derrick method is faster than swinging the booms.
/ Robin
Damn it I need pictures! Sad thing is I was in the Navy so this should not be confusing.
Cheers


warreni
Member Since: August 14, 2007
entire network: 5,926 Posts
KitMaker Network: 271 Posts
Posted: Saturday, November 04, 2017 - 12:24 AM UTC
But I was in the air force.... 

Black_sheep

Member Since: December 11, 2009
entire network: 823 Posts
KitMaker Network: 11 Posts
Posted: Saturday, November 04, 2017 - 01:31 AM UTC
Hi Warren,
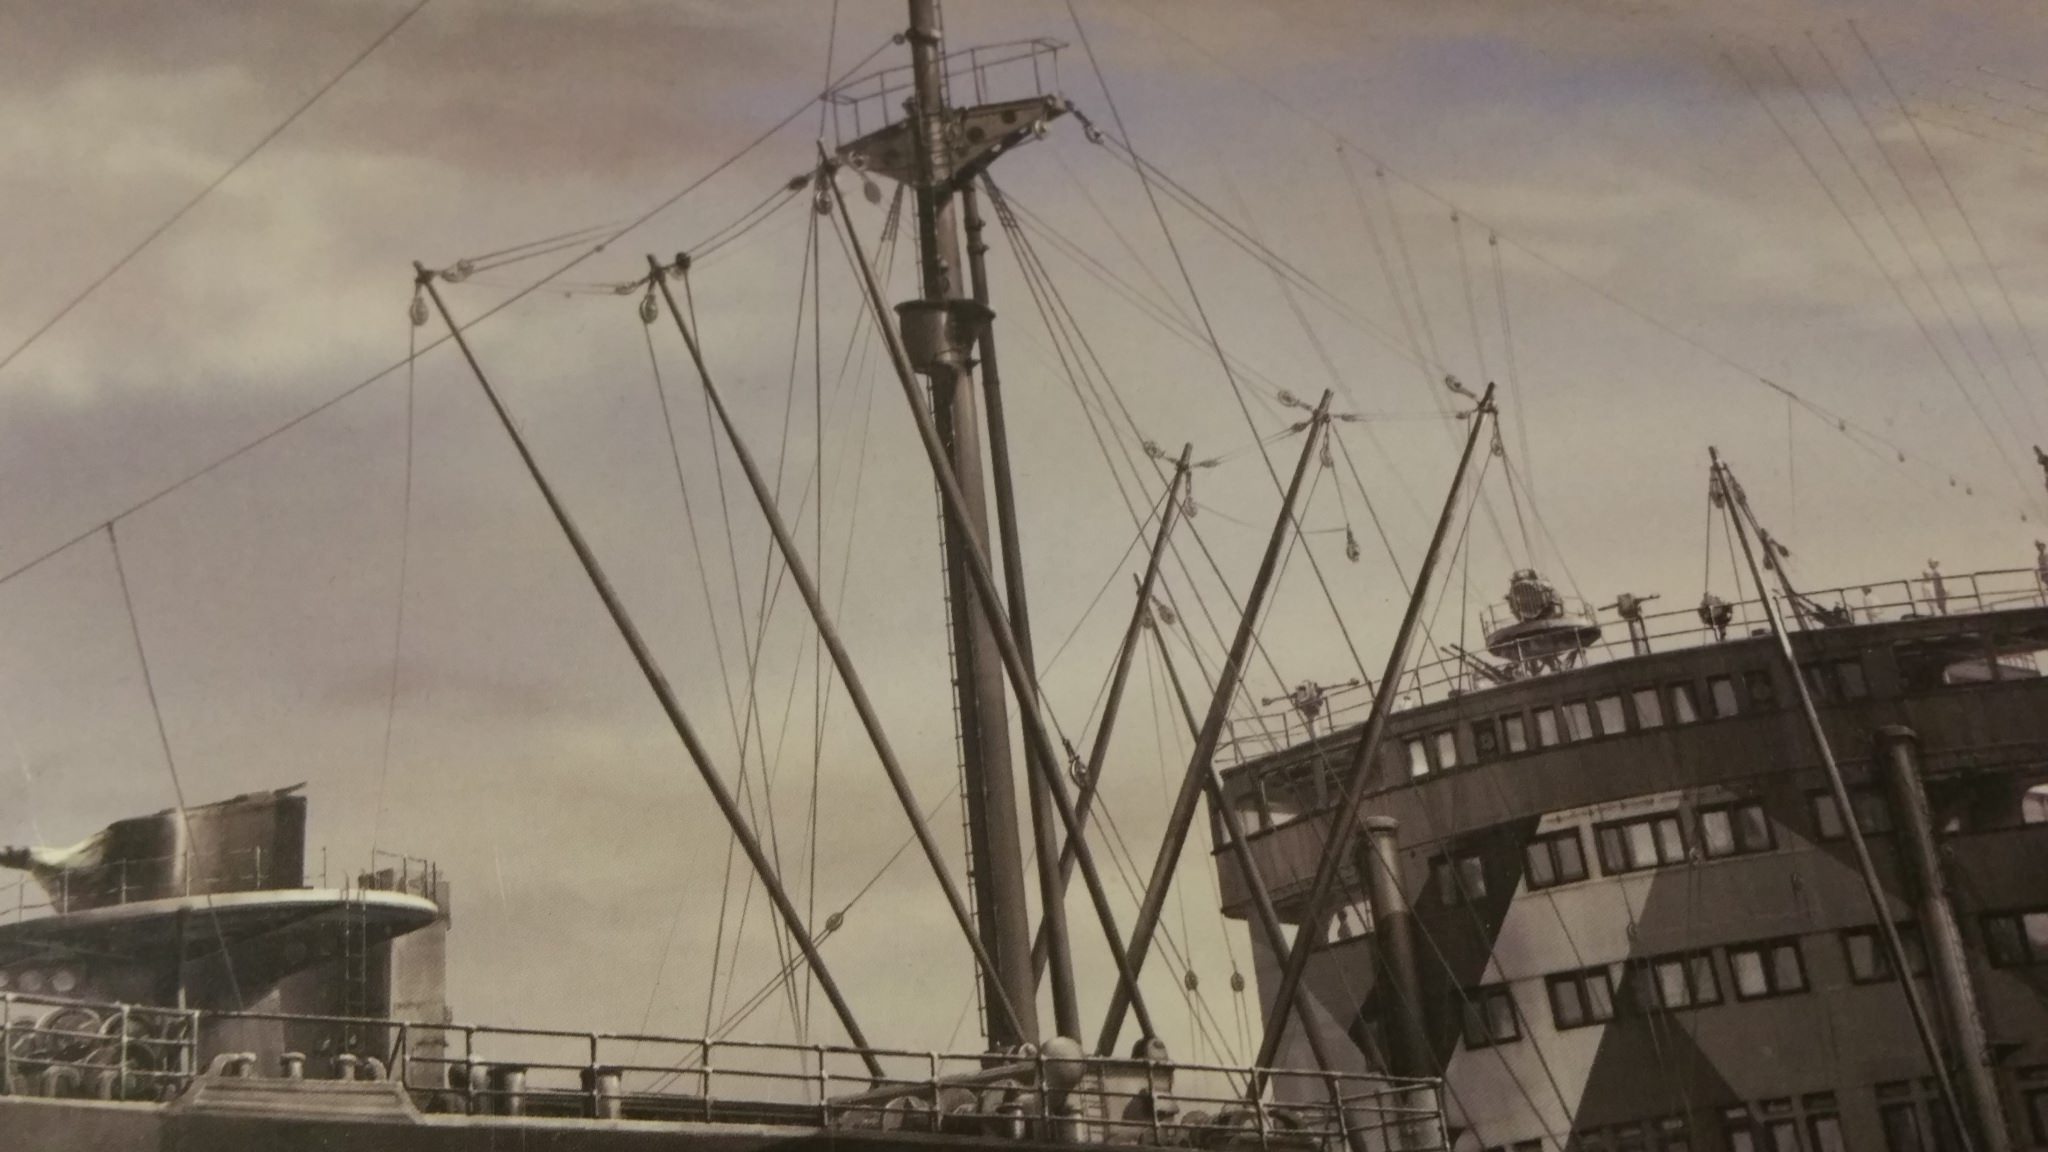
though I was serving in the infantry I may be able to help you . I do have the Heian Maru which is a sister ship of your Hikawa Maru. The boxart shows very nice the upper rigging of the derricks. I´ve made some zoomed pictures, maybe this is helpful to you:

Looking forward to your rigging. Your vote for my next ship build is also appreciated

Cheers
Thomas
though I was serving in the infantry I may be able to help you
. I do have the Heian Maru which is a sister ship of your Hikawa Maru. The boxart shows very nice the upper rigging of the derricks. I´ve made some zoomed pictures, maybe this is helpful to you:Looking forward to your rigging. Your vote for my next ship build is also appreciated
Cheers
Thomas
warreni
Member Since: August 14, 2007
entire network: 5,926 Posts
KitMaker Network: 271 Posts
Posted: Saturday, November 04, 2017 - 02:09 AM UTC
Thanks for that Thomas. I never thought of looking for the sister ship. A few more pulleys than I am using but that is fine.
 |

WEB HOSTING BY


Copyright ©2021 KitMaker Network and Kitmaker Network, a subsidiary of Silver Star Enterprises
All Rights Reserved. Please read our Conditions of Use and Privacy Policy.
All Rights Reserved. Please read our Conditions of Use and Privacy Policy.