

I've been reading a few articles and watched a couple videos on applying Zimmerit to model armor. I'll be doing 1/35 scale armor. One product I saw in a video was called No More nails. Looked like it would work well, but not sure I can find it locally (NC). Read where some people use putty, other use drywall mud. I would be concerned that drywall mud may chip off eventually, not sure how well it might adhere to smooth plastic. I was thinking about something like Liquid Nails. Apply with a homemade tool similar to the method in this video. Anybody tried Liquid Nails? Just wanting to find something fairly cheap and easy to find.
https://www.youtube.com/watch?v=VMU9EibyWXk#t=130.658208
Modeling in General
General discussions about modeling topics.
General discussions about modeling topics.
Hosted by Jim Starkweather
Zimmerit - Liquid Nails

Namerifrats

Member Since: May 26, 2014
entire network: 75 Posts
KitMaker Network: 15 Posts
Posted: Thursday, September 22, 2016 - 12:56 AM UTC

Tojo72
Member Since: June 06, 2006
entire network: 4,691 Posts
KitMaker Network: 668 Posts
Posted: Thursday, September 22, 2016 - 01:47 AM UTC
I have not,but don't let local availability stop you,I just searched Amazon and they seem to have it avsilable.

Emeritus

Member Since: March 30, 2004
entire network: 2,845 Posts
KitMaker Network: 424 Posts

Posted: Thursday, September 22, 2016 - 03:37 AM UTC
I have no experience with those No More Nails type adhesives, but based on that video it seems it could work quite well. The only thing to watch out for is the drying time, though. If it's too fast drying, you can end up with an application drying up before you get the pattern applied to it, restricts you to working with frustratingly small areas at a time, or forces you to work fast and sloppy.
However, Milliput I've used myself and can confirm it works well for making zimmerit. It doesn't dry too fast, bonds to suitably prepared plastic well enough (but not too well as to prevent chipping to be done if wanted), and also doesn't attack the plastic.
It takes a little bit of practice to get a hold of the technique, so I recommend trying it out on some styrene sheet first. Also, plan ahead and work with subassemblies and those in such building stages that you can easily reach all the needed areas.
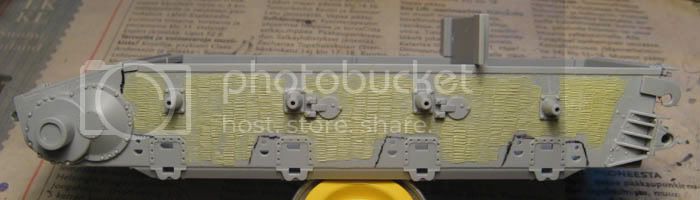
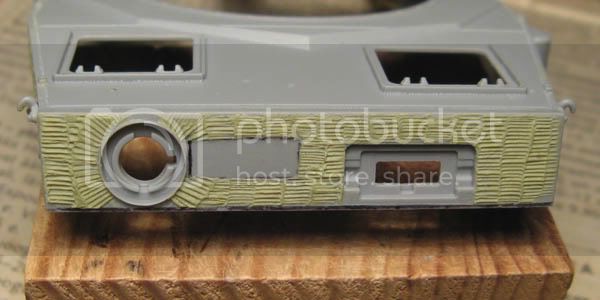
1) Prepare the areas where the zimmerit will go by crisscross scoring with a hobby knife and/or sanding with some coarse sandpaper to improve the adhesion of the Milliput. You can also mark the to-be-Zimmerited area if you want to.
2) Mix up some Milliput and apply it to the surface, spreading it thin enough but not too thin. It's hard to describe exact amounts and thicknesses, but you get a feeling of it with some practice.
3) Let it sit for about 10 minutes. Too little and the Milliput won't sculpt as well, too long and it gets too hard to sculpt and you risk it drying up before you finish that section of Zimmerit.
4) Apply the pattern with tools of your choosing.
I used a simple flat head screwdriver on my Panzer IV, working one notch at a time, moving from top to bottom, then moving to the next column. (note that for this Zimmerit pattern the tool needs to be held diagonally to produce the desired effect)

And when finnished (pun intended):
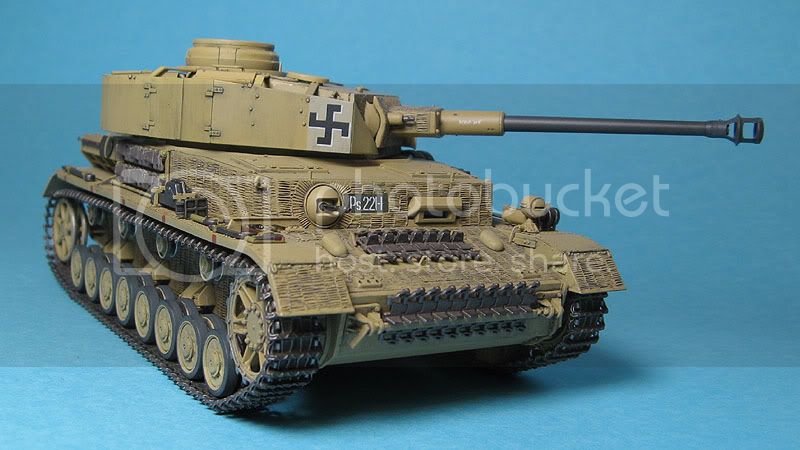
With practice you get a hang of the area size that can be done with a single application of Milliput without rushing it and risking the stuff drying up on you. As I built my Pz IV, I found that to be about the following: half of the hull side, turret front, front armor plate, one upper hull side, etc. Rather go for an area too small than too big at the beginning, and pick the areas so that the divisions fall on natural boundaries in the pattern you're doing and are easy to continue from with the next application.
Oh, now this wasn't really what you were asking for, but here goes anyway. Hope this helps. Or something.

However, Milliput I've used myself and can confirm it works well for making zimmerit. It doesn't dry too fast, bonds to suitably prepared plastic well enough (but not too well as to prevent chipping to be done if wanted), and also doesn't attack the plastic.
It takes a little bit of practice to get a hold of the technique, so I recommend trying it out on some styrene sheet first. Also, plan ahead and work with subassemblies and those in such building stages that you can easily reach all the needed areas.
1) Prepare the areas where the zimmerit will go by crisscross scoring with a hobby knife and/or sanding with some coarse sandpaper to improve the adhesion of the Milliput. You can also mark the to-be-Zimmerited area if you want to.
2) Mix up some Milliput and apply it to the surface, spreading it thin enough but not too thin. It's hard to describe exact amounts and thicknesses, but you get a feeling of it with some practice.
3) Let it sit for about 10 minutes. Too little and the Milliput won't sculpt as well, too long and it gets too hard to sculpt and you risk it drying up before you finish that section of Zimmerit.
4) Apply the pattern with tools of your choosing.
I used a simple flat head screwdriver on my Panzer IV, working one notch at a time, moving from top to bottom, then moving to the next column. (note that for this Zimmerit pattern the tool needs to be held diagonally to produce the desired effect)
And when finnished (pun intended):
With practice you get a hang of the area size that can be done with a single application of Milliput without rushing it and risking the stuff drying up on you. As I built my Pz IV, I found that to be about the following: half of the hull side, turret front, front armor plate, one upper hull side, etc. Rather go for an area too small than too big at the beginning, and pick the areas so that the divisions fall on natural boundaries in the pattern you're doing and are easy to continue from with the next application.
Oh, now this wasn't really what you were asking for, but here goes anyway. Hope this helps. Or something.

tatbaqui

#040

Member Since: May 06, 2007
entire network: 2,713 Posts
KitMaker Network: 159 Posts

Posted: Thursday, September 22, 2016 - 04:02 AM UTC
Nice finnish Eetu
Namerifrats -- you may also want to try 2-part epoxy putty like the ones used to repair / seal plumbing. Am sure you can easily find such in DIY shops.

Namerifrats -- you may also want to try 2-part epoxy putty like the ones used to repair / seal plumbing. Am sure you can easily find such in DIY shops.
Namerifrats
Member Since: May 26, 2014
entire network: 75 Posts
KitMaker Network: 15 Posts
Posted: Thursday, September 22, 2016 - 06:34 AM UTC
That's an awesome looking tank! I may try some of the putty on a model as well. Planning on doing a Stug III at some point, once I find a decent kit, and will have to go the putty/Milliput route for the waffle design. I found another video on Youtube since and the guy was using Elmer's Wood Filler. May try this method. https://www.youtube.com/watch?v=UQAcagNh2I8
 |

WEB HOSTING BY


Copyright ©2021 KitMaker Network and Kitmaker Network, a subsidiary of Silver Star Enterprises
All Rights Reserved. Please read our Conditions of Use and Privacy Policy.
All Rights Reserved. Please read our Conditions of Use and Privacy Policy.