

G;day everyone, well i have been making alot of plaster buildings for my dios lately, ruined ones, and i thought, how could i make a burnt affect along smashed walls etc. so i thought, why not just burn it with a mtach, it works great, that is if your not planning on painting the wall, which im sure most of you do (my buildings were gonna be white anyway so far)
anyone else used this "trick"
cheers
Scratchbuilders!: Armor/AFV
This is a group for armor scratchbuilding questions, topics and projects.
This is a group for armor scratchbuilding questions, topics and projects.
Hosted by Mike Kirchoff
Burnt Buildings

lestweforget

Member Since: November 08, 2002
entire network: 2,832 Posts
KitMaker Network: 680 Posts

Posted: Sunday, January 25, 2004 - 09:08 PM UTC


shonen_red

Member Since: February 20, 2003
entire network: 5,762 Posts
KitMaker Network: 2,610 Posts

Posted: Sunday, January 25, 2004 - 09:46 PM UTC
Pastels or charcoal will do the trick. Try powdering it and apply it to the edges where the burnt area will be.


Graywolf

Member Since: December 01, 2001
entire network: 6,405 Posts
KitMaker Network: 1,013 Posts
Posted: Sunday, January 25, 2004 - 09:54 PM UTC
I remember a recent post with photo of a diorama . a church ruin and Russian Mortar team. the inside of the church was burned in the way you told.It was really good but extra attention is required when doing that because we modelers use some flammable stuff. 

shonen_red
Member Since: February 20, 2003
entire network: 5,762 Posts
KitMaker Network: 2,610 Posts
Posted: Sunday, January 25, 2004 - 10:46 PM UTC
You can also use a candle. Try placing the model above the candle, about 1-3 inches from the tip of the flame and let the soot do it's work.
lestweforget
Member Since: November 08, 2002
entire network: 2,832 Posts
KitMaker Network: 680 Posts
Posted: Sunday, January 25, 2004 - 11:32 PM UTC
Candle is what i use, cheers 

Sealhead

Member Since: May 18, 2003
entire network: 427 Posts
KitMaker Network: 0 Posts

Posted: Monday, January 26, 2004 - 01:01 AM UTC
I go with the candle, too. But, it must be exactly 2 inches in diameter and no less than 3.5 inches tall. It must be made of wax from the Croatian side of the Adriatic Sea. The wick must be made of natural sisal from Sisaland.
Sorry about that. It was a tribute to those of us that get a little too "into" our work.
Sealhead (Kansas Sunflower)
Sorry about that. It was a tribute to those of us that get a little too "into" our work.
Sealhead
(Kansas Sunflower)
jackhammer81
Member Since: August 12, 2003
entire network: 2,394 Posts
KitMaker Network: 0 Posts
Posted: Monday, January 26, 2004 - 01:43 AM UTC
Hello, I like the idea of actually burning part of a dio it brings the sense of smell into it and adds that extra touch of realism. cheers Kevin
Kevin

ambrose82
Member Since: November 15, 2003
entire network: 249 Posts
KitMaker Network: 0 Posts
Posted: Thursday, January 29, 2004 - 04:22 AM UTC
Here's my two cents...
I prefer to use black washes over smoke damaged or burned areas. I thin the paint down to varying degrees and then saturate the area. I follow that up with pastel or charcoal until it looks right. Burning the material only works if you're using non-flammable materials (obviously). I used actual fire to burn the roof beams of a scratchbuilt cottage and I found the fire spread too fast. It did more damage than I wanted it to.
Here's a couple shots of the damage created using washes and pastels...


matt
Member Since: February 28, 2002
entire network: 5,957 Posts
KitMaker Network: 2,626 Posts
Posted: Thursday, January 29, 2004 - 05:04 AM UTC
Quoted Text
used actual fire to burn the roof beams of a scratchbuilt cottage and I found the fire spread too fast. It did more damage than I wanted it to
Don't forget rule no 1.....
When burning ANYTING keep a fire extinguisher or water HANDY!!!!!
ambrose82
Member Since: November 15, 2003
entire network: 249 Posts
KitMaker Network: 0 Posts
Posted: Thursday, January 29, 2004 - 05:42 AM UTC
The fire didn't get out of hand. It was on the balsa wood roof beams. After I blew out the flame, the wood continued to burn internally. I ought to have put the fire out with water to prevent what happened. alas!
However, rule no. 1 is an important one to remember!
However, rule no. 1 is an important one to remember!

GeneralFailure

Member Since: February 15, 2002
entire network: 2,289 Posts
KitMaker Network: 532 Posts
Posted: Thursday, January 29, 2004 - 10:23 AM UTC
Letting fire do the work for you can be good. It can also ruin your model / building / ...
It is pretty difficult to have solid control on the burning process.
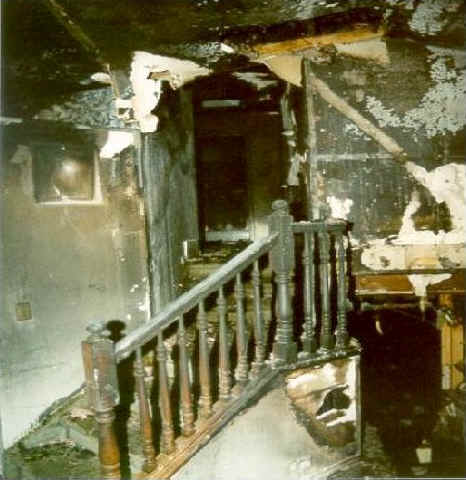
The nicest results (tmho) are created without fire. Use charcoal or black pigment powdering to blacken where needs to be blackened. Then you can add grey, even white pigment. Ashes are not pure white. Look at the embers of a burned fire to see. Walls and ceilings are usually black, (half) burned objects and the floor are black/grey/white colored.
Burned buildings / vehicles are not just black : they can be quite colorful. Your best results will be achieved by looking at pictures of real burned cars and homes. There are thousands of useful pictures on the internet. (do a google check on "burned house", then click images.)
I suggest you look for pictures of real fire to compare color schemes.
THis burned car isn't black at all. Check out the melted dashboard !

other examples :


It is pretty difficult to have solid control on the burning process.
The nicest results (tmho) are created without fire. Use charcoal or black pigment powdering to blacken where needs to be blackened. Then you can add grey, even white pigment. Ashes are not pure white. Look at the embers of a burned fire to see. Walls and ceilings are usually black, (half) burned objects and the floor are black/grey/white colored.
Burned buildings / vehicles are not just black : they can be quite colorful. Your best results will be achieved by looking at pictures of real burned cars and homes. There are thousands of useful pictures on the internet. (do a google check on "burned house", then click images.)
I suggest you look for pictures of real fire to compare color schemes.
THis burned car isn't black at all. Check out the melted dashboard !
other examples :
 |

WEB HOSTING BY


Copyright ©2021 KitMaker Network and Kitmaker Network, a subsidiary of Silver Star Enterprises
All Rights Reserved. Please read our Conditions of Use and Privacy Policy.
All Rights Reserved. Please read our Conditions of Use and Privacy Policy.