_GOTOBOTTOM
Photography
Questions about shooting your models and dioramas? Ask here.
Your photography setup - Pros and cons
Armored76
Visit this Community
Bayern, Germany
Member Since: September 30, 2013
entire network: 1,615 Posts
KitMaker Network: 60 Posts
Posted: Thursday, February 12, 2015 - 04:57 PM UTC
Hello,

Having seen the plethora of excellent images being posted here, I wanted to initiate a discussion about everyone's photography setup including backgrounds, lights and not less importantly the camera and lens(es).

I recall a joke I've heard a few years ago:
- Hey there neighbor! My cow is really sick. What did you do with yours when it was ill?
- Well... I fed it hot coal...
- Great! I'll try that!

Few days later...
- Hey there neighbor! The cow died after trying the hot coal.
- Yeah... same happened to mine...

To avoid a situation like this, I think it would be make sense to also include the ups and downs of each setup for everybody to learn.

So here we go... Let me start...

Some of my images:
http://gallery3.kitmaker.net/member.php?uid=56548&protype=1
https://www.flickr.com/photos/50688795@N05/sets/72157649968993126/

Setup:


- a small table about 1m x 1m
- A2 cardboard backgrounds (white, black, blue, etc)
- four lights with 40W equivalent bulbs
- "turn table" made from an Ikea serving tablet that has a turning foot and a sheet of paper cut to shape

Camera:
Nikon Coolpix S3100

Post-processing:
Yes, in most cases using different applications.

Pros:
- cost-effective

Cons:
- the light is usually not enough which leads to high exposure times and thus higher noise in the images
- the lights are getting really hot so shooting for more than 20 minutes continuously is usually not possible
- the camera while great on it own has its limitations under low light
- no depth of field control due to limited camera features

Possible improvements:
- get better lights => plan to replace the current lights with 2x1200 Lumen LED lights (more light, less heat)
- get a DSLR with dedicated lens => sharper images, lower noise, more control of the image appearance (e.g. depth of field)

Your turn now!

Cheers,
Cristian
RLlockie
Visit this Community
United Kingdom
Member Since: September 06, 2013
entire network: 1,112 Posts
KitMaker Network: 126 Posts
Posted: Thursday, February 12, 2015 - 08:26 PM UTC
Hi Cristian

While I would not profess to be an expert in this or anything else, one thing that occurs to me when looking at your lighting setup is that you seem to be using normal paper as a diffuser in front of the light sources. While a diffuser is very helpful to avoud harsh highlights and shadows, taht paper loosk as though it might reflect quite a lot of the light rather thasn transmitting it. Increasing the amount of light will add to your electric bill and risk heating up the paper to combustion point but won't necessarily achieve the objective of getting more light onto the subject.

Have you considered a light tent? They are made of mesh so you have the lights outside and the walls diffuse the light at a consistent rate. A search for 'light tent photo' will bring up a huge range of sizes to suit a variety of subjects and they are not extortionately priced either. And they fold flat into a pouch for transport and storage.

A good solid tripod is also helpful (if not essential). I have a Kennet Benbo that I bought in the 1980s and it's brilliant - not sure if they are still made but I'm sure second hand ones appear from time to time. It's one iof the few I've found that I can set up spanning an engine deck and a cast turret and get it level easily. It allows you to use longer exposures and thus needs less artificial light and with digital, the dreaded reciprocity failure which can affect colour film at extreme short and long exposures is not an issue.

I don't have adequately wide experience of cameras, having only owned four (none of which was a Nikon, not that I have anything against them) in the last 30 years but an SLR does afford the most flexibility. I invested in a macro lens for mine last year so that I could photograph small details like etched parts but if you just want overall shots of all or parts of your models, it's not really necessary. A good tripod is much more useful in my opinion.
Armored76
Visit this Community
Bayern, Germany
Member Since: September 30, 2013
entire network: 1,615 Posts
KitMaker Network: 60 Posts
Posted: Thursday, February 12, 2015 - 11:12 PM UTC
Thanks for sharing your insights on this, Robert!

You are definitely right about the paper sheets... I can't believe I haven't noticed that all this time!!! Got to try something different over the weekend.

Regarding the light tent, I agree with you. Actually, the two lights at the front are from a set I bought on Ebay that also included a small tripod (good enough for the compact I own) and a 60x60 cm light tent. The problem is that the lights will sit too far from the object and not cast enough light when outside the tent hence the work-around with the paper "reflectors". Plus, the table is too small to fit the light to the side of the tent.

Thanks again!
Cristian
mmeier
Visit this Community
Nordrhein-Westfalen, Germany
Member Since: October 22, 2008
entire network: 1,280 Posts
KitMaker Network: 213 Posts
Posted: Thursday, February 12, 2015 - 11:47 PM UTC
Some basic ideas:

Tripod Nice but a good one is COSTLY. Say 130€+ for a Manfroto and that is only a middle class one. Check if you need it for more than taking shots of your models while indoors. If not - get a cheaper one. A decend low end Cullmann or Mantona (Manfroto copy) can be bought at 30-50€ if you shop around and is "good enough" for indoor use(1). The Benbo looks like really nice one, but starts at 200€ for the complete unit with head/quick mount.

A tripod will definitly get right of high ISO (at least with a DSLR) since you can set exposure time to 30sec if you need (or even more in certain modes) and that will make night into day at 100iso.

Light The question here is "what do you want"?

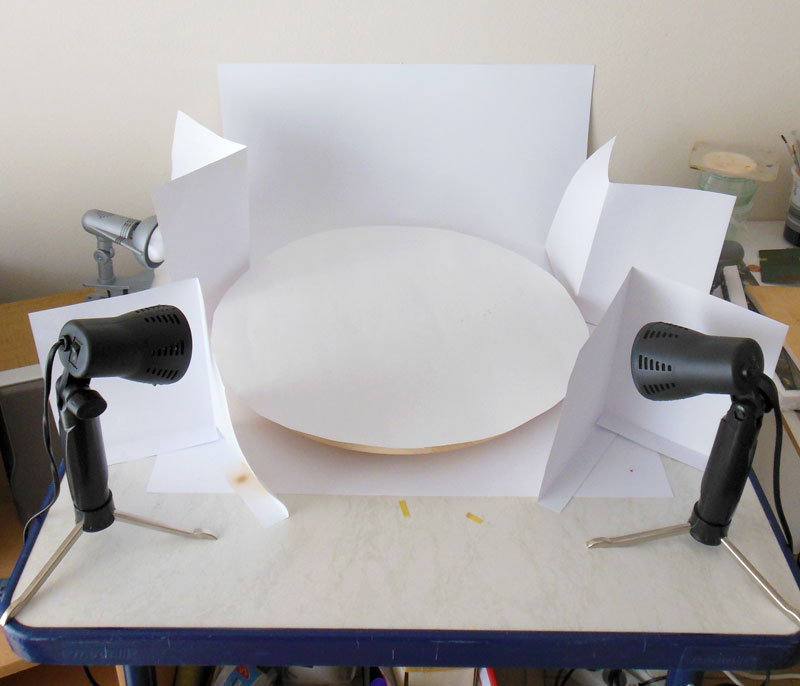
Your setup is the classic "sell it on ebay" shot aiming at reducing/eliminating shadows. In your current setup the paper diffusors definitly eat too much light. A light tent as recommended by Robert is definitly a better alternative. Again costs will vary and depend on how much space you have since the cheaper ones do not like constant set up/take down

An alternate setup is "simulated sun" with a single light source set up above/to the side of the kit. Totally different aims and that works with a light box (Starts at 60€). There you will get (and want) shadows. This is a lamp mounted in a reflector and behind a white diffusor. Versions that use a flash also exist.

Whatever light you use make sure that all lamps have the same (and constant) color temperature. And if you can get one that has a spectrum close to daylight go for those. They'll cost more, even worse in LED!

Flash AHAA..

Well okay, not the Dolph Lundgren movie but a carefully used external flash or three is an alternative light source. A DSLR can control multiple flashes so you can achive a similar light setup as in your example without permanent light. The setup costs a bit more, Yognuo Flashes start at 50-70€/piece depending on what you want. It's called Strobist. If you plan on a DSLR and using flash for any pictures you'll want an external flash anyway rather quickly(2)

Camera Canon user myself, first a 1100D entry level now a 60D prosumer so can not say much about Nikon/Sony/Pentax.

Even a used entry level DSLR with 12MP like the old 1100D is good enough for model shots. And if shooting kit is your main target take a look at high end compacts/bridges as well, cheaper and less of an addiction factor(3). Same for the lens, you are using a tripod so for the start the kit lens (typically an 18-55mm with a minimum 4-5.6 f-stop) should be good enough, just add some exposure time. And at least with Canon the current kit(s) are very good and cheap if bought with the cam

Depth of field control gets better, the bigger the sensor is. The inverse is true for price. An entry level 36mm DSLR comes in at 1600€ new, a more common entry level APS-C (22.5mm) at 350€. That is a lot of glass one can buy for the difference.

Lens Lens over body is the common tip when buying DSLR. A good lens on a low end body is better that the other way round. Boy was I supprised what my old "Chinese pig" could do when I put it on the 60D. Do not ditch the kit(4) but if that is not good enough for you, there are two schools for "next lens".

a) Prime lenses

Primes only have one focal length (say 50mm) and generally are lighter and often faster. F-Stops 1.8 or better can be had and for 1/5th the price of a f/1.8 Zoom. The offer the shortest depth of field since the smaller the f-Stop the bigger the lens opening (It's actually a fraction so 1/1. and the smaller the DoF. But you pay for that with reduced comfort and/or needing more than one lens. And GOOD primes can easily cost 350€+

b) Zooms

The best affordable zooms are f/2.8. Anything better starts at 600+€ if you can get it at all. And the 2.8er can get heavy. Still they offer a decend control over the DoF and a lot of flexibility. If you can get and afford one(5), get a stabilised lens (Unless your camera has a build in stabiliser, one camera family has).

Me, I went zoom and did not look back. Partially because Canon primes are either C&A or costly as hell.

Makro A makro lens is often on the shopping list. Before you go there check if you have more uses for it than shooting kit. Otherwise try a set of screw-on makro lenses. They are often enough for the task and the cost a lot less.

Shoot RAW If the cam can do it (and some upper end compacts can) shoot in RAW or digital negative format and "develop" on your computer. This allows for change of white balance and other processing without loosing quality. The pictures need more storage space but you have total control over the outcome.

Think about Lightroom While cameras come with a RAW processor, I have found that Lightroom (I use 5.x) is a lot better at developing the shots and gives me quite a few more options than the cam supplies DPP software (that is not bad in itself btw). And as soon as the lens reads "Tamron/Sigma/Tokina" the vendor supplied program will no longer be able to correct for the lens profile(6) since they lack the data. Lightroom has. Free alternatives (Lightzone i.e) exist but even a miser like me switched to LR after two weeks of side by side testing. It was the dark side (and I got cookies )

(1) I use a Cullman Primax 180 that I got for 28€ in a sale. Works nicely for a 2kg Kombination of DSLR and Lens (The system is rated at 3.5kg)

(2) The internal one is a) to weak b) only flashes straight ahead and c) has problems with certain lenses/flare protectors

(3) I bought the 1100D and the 18-55"Kit" lens for "shooting models" and "occasional museum pictures". No further lenses etc. planned. Two years later fotography is a major hobby of mine, I own four lenses (and plan on two more), a new (well used) body and...

(4) With current gen Canons the STM series is the kit lens to go for since it works well for taking videos.

(5) Stabilised 70-200: 1200€, unstabilised: 500€...

(6) And some 3rd party lenses are a better price/capability choice or even flat out better than the vendor ones. A Sigma Art 50/f1.4 beats the Canon counterpart like a Ferrari racing a Model T.
Armored76
Visit this Community
Bayern, Germany
Member Since: September 30, 2013
entire network: 1,615 Posts
KitMaker Network: 60 Posts
Posted: Friday, February 13, 2015 - 01:17 AM UTC
Wow, MBR!!! Just... wow!!! I cannot tell you how much I appreciate the effort and information you put into your posting!

Thank you SO MUCH for all the details! I was never hoping you guys will get this deep in explaining a rookie all the technical bits and bytes.

IT'S GREATLY APPRECIATED!!!

Thank you! Thank you! Thank you!
Armored76
Visit this Community
Bayern, Germany
Member Since: September 30, 2013
entire network: 1,615 Posts
KitMaker Network: 60 Posts
Posted: Friday, February 13, 2015 - 09:20 AM UTC
Speaking of which... What would you guys consider to be "enough" light?

I saw setups using lights that would deliver in the range of 2x1000 to 2x1500 Lumen, the equivalent of about 2x100W or 2x150W incandescent bulbs, respectively. I know that more is better but there is a probably limit which makes sense.

Thanks!
Armored76
Visit this Community
Bayern, Germany
Member Since: September 30, 2013
entire network: 1,615 Posts
KitMaker Network: 60 Posts
Posted: Thursday, February 19, 2015 - 10:58 PM UTC
I finally set up my new "studio". Basically, a 60x60x60 cm lightbox and two Ikea lamps with 1055 lm LED lights.


And here a first shot, right out of the camera with only the resizing for web.


And this one is with some minimal post-processing applied:


Thoughts anyone?

Thank you!

Cristian
RLlockie
Visit this Community
United Kingdom
Member Since: September 06, 2013
entire network: 1,112 Posts
KitMaker Network: 126 Posts
Posted: Thursday, February 19, 2015 - 11:24 PM UTC
Looks splendid. I'd say you've cracked it.

With light, I'd say it's more about quality (diffused good) than quantity, once you have enough to illuminate what is required.
Armored76
Visit this Community
Bayern, Germany
Member Since: September 30, 2013
entire network: 1,615 Posts
KitMaker Network: 60 Posts
Posted: Thursday, February 19, 2015 - 11:37 PM UTC
Thank you, Robert! I think I still need to play around some more with the light positioning and camera settings but it's a promising start... if I might say about my own work
mmeier
Visit this Community
Nordrhein-Westfalen, Germany
Member Since: October 22, 2008
entire network: 1,280 Posts
KitMaker Network: 213 Posts
Posted: Friday, February 20, 2015 - 11:07 AM UTC
Looks good.

Only thing that I might try is a third light to remove the shadow under the car. Set low on the tent like this here in a scalemodelguide article
Armored76
Visit this Community
Bayern, Germany
Member Since: September 30, 2013
entire network: 1,615 Posts
KitMaker Network: 60 Posts
Posted: Friday, February 20, 2015 - 11:11 AM UTC
Thank you! The third light is indeed something I should consider...
 _GOTOTOP