

Hi,
as announced in my say hello post,
I would like to introduce my 1/10 Sd.Kfz 9 Famo scratch built project. Please turn a blind eye regarding my grammar and vocabulary.
The goal of my project is to create a very detailed scale model but I dont know how good I could create it. When I started I had no experience with machining and so on. But Im ready to invest lot of time and I dont want a ready model very soon. To make a long story short but to give you the chance to unterstand the first pictures I've to explain what happend until now.
The project has 3 phases until today.
Phase 1: Around 2007. The Famo should be 1/16 to fit to my Tiger. A lot of 3D files has been created. I intended to cast the tracks by myself with a homemade rotation cast machine. So i had to create a prototype of a track link.
Phase 2: Around 2009. Rumours told me there is a 1/16 Famo model in preparation to be trown on the market. So my motivation to continue with this scale was'nt the same as before. Additionally i found that creating a steering gear working like the original Famo very attractive. Ok, lets start over with 1/10. Main activities in this phase are focused on the steering gear. Some difficult details and a move and becoming a father stopped the project.
Phase3 : Around 2014. Although i worked on the front wheels in the meantime, the concentrated work continued in summer of 2014. To continue my project without being confronted with hard bodied problems i decided to work on the 3D-Model of the front tyre to be printed an manufactured by a professional model company. I also decided to order a company to cast the tracks.
Because it takes lot of time to explain every picture in detail with English, I only comment short and you are welcome to ask if you need more information.
So lets start with phase 1 in the next post.
Bye Matt
Scratchbuilders!: Armor/AFV
This is a group for armor scratchbuilding questions, topics and projects.
This is a group for armor scratchbuilding questions, topics and projects.
Hosted by Mike Kirchoff
WIP Scratch built 1/10 Sd.Kfz 9 Famo
FamoGuy

Member Since: November 03, 2014
entire network: 9 Posts
KitMaker Network: 9 Posts
Posted: Monday, November 03, 2014 - 01:25 AM UTC
FamoGuy
Member Since: November 03, 2014
entire network: 9 Posts
KitMaker Network: 9 Posts
Posted: Monday, November 03, 2014 - 01:52 AM UTC
Phase 1:
As a basis i use a Tamiya 1/35 model (with Sd.Anh 116) and the following books:
- "Halbkettenfahrzeuge des deutschen Heeres"
- Nuts & Bolts Vol. 12
- Military Machine Famo 18t
- Waffenarsenal Band 36
- Copy of Maintainance book D671/1 D671/2
- lot of pictures from the internet
I would like to build the early F3 version of the Sd.Kfz 9.
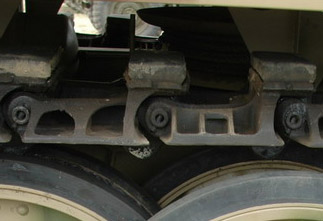
Difference of the early (left) and the later right) track link for example:
I create 1/1 in CAD. Some pictures of 3D parts:
Front axle and rim:
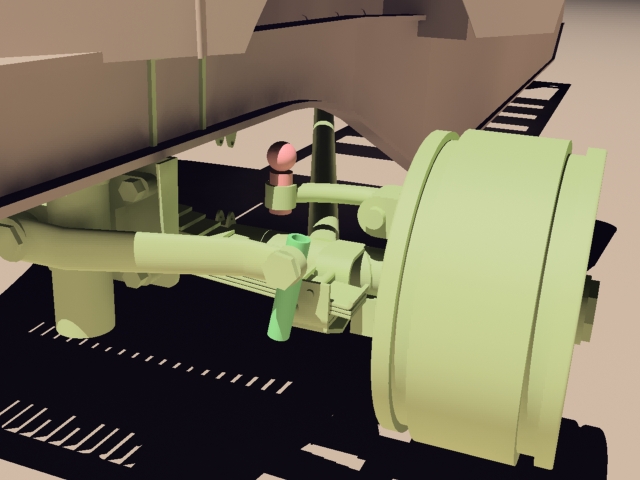
Front axle:
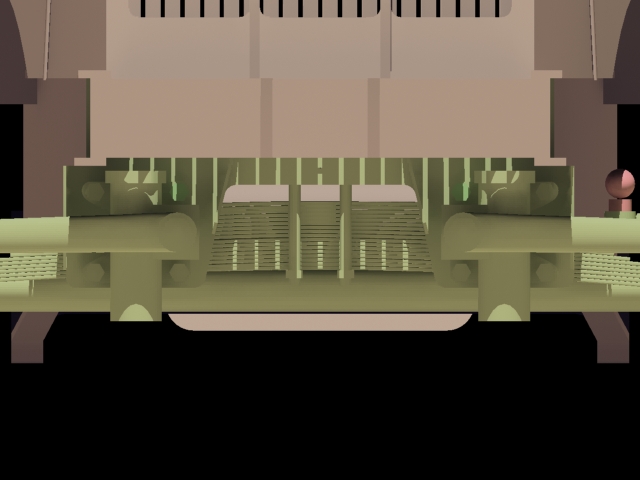
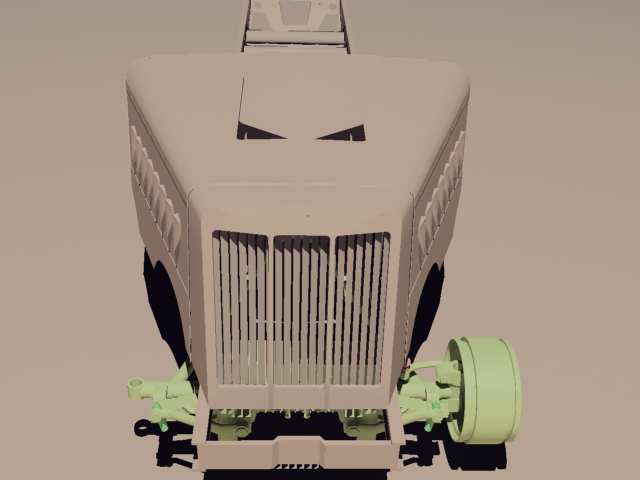
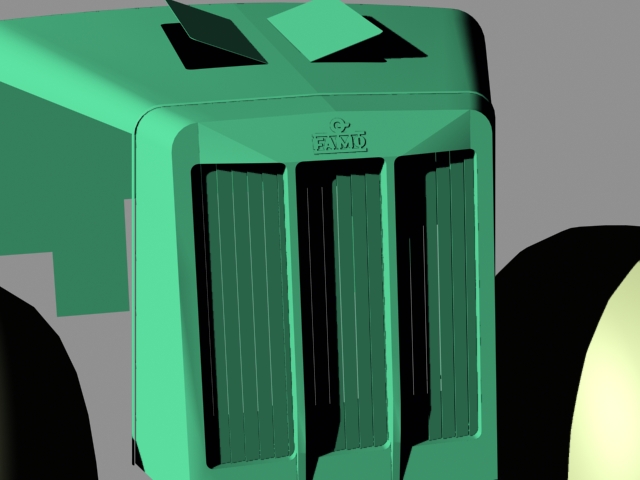
Hood and grill:
Grill with Famo-Logo:
Early draw of track links and drive wheel to check dimensions:
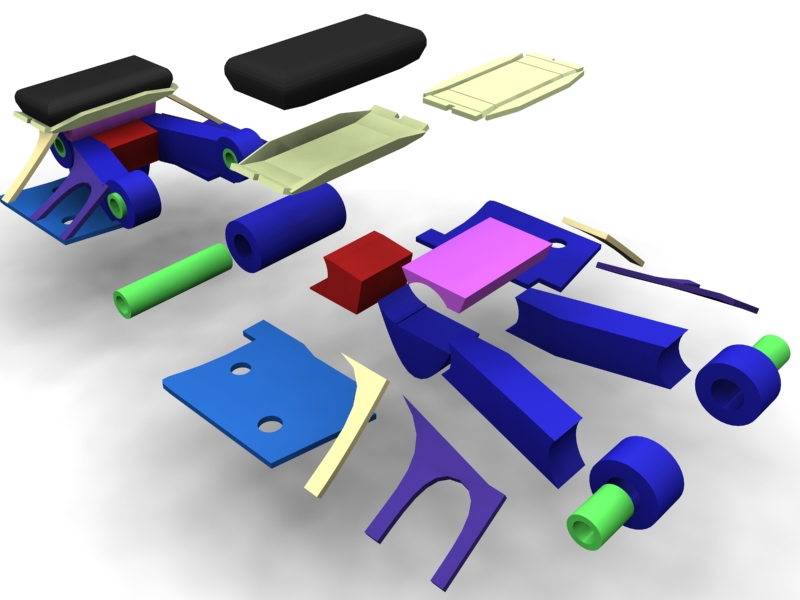
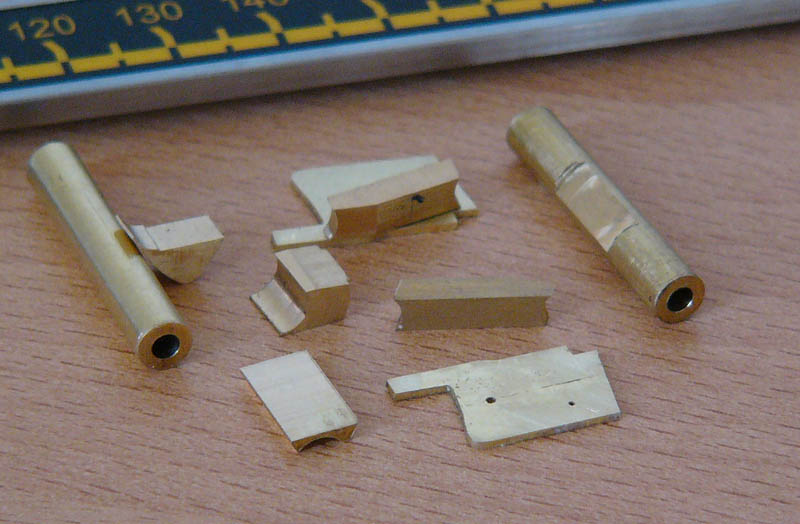
3D prototype of the track link. To create a mold for casting i had to create a prototype. The design takes into account that i could create the parts easely.
Parts of the 3D prototype:
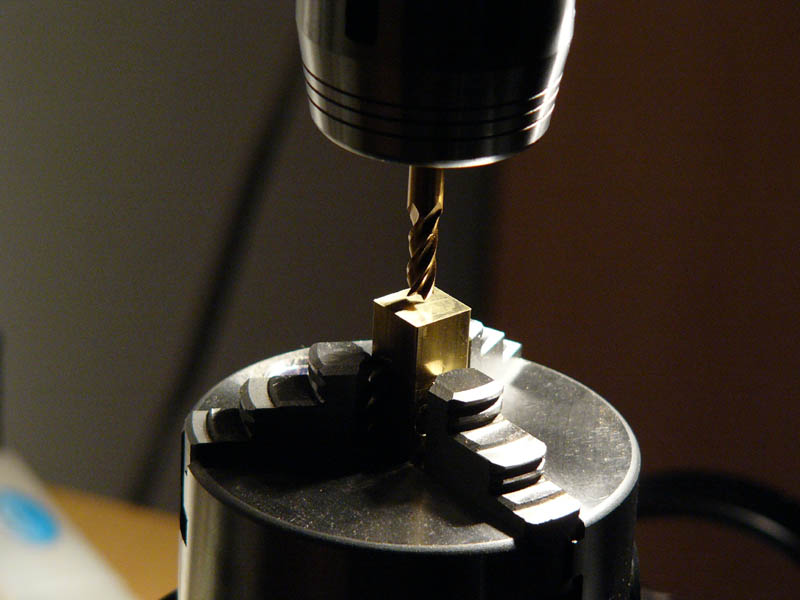
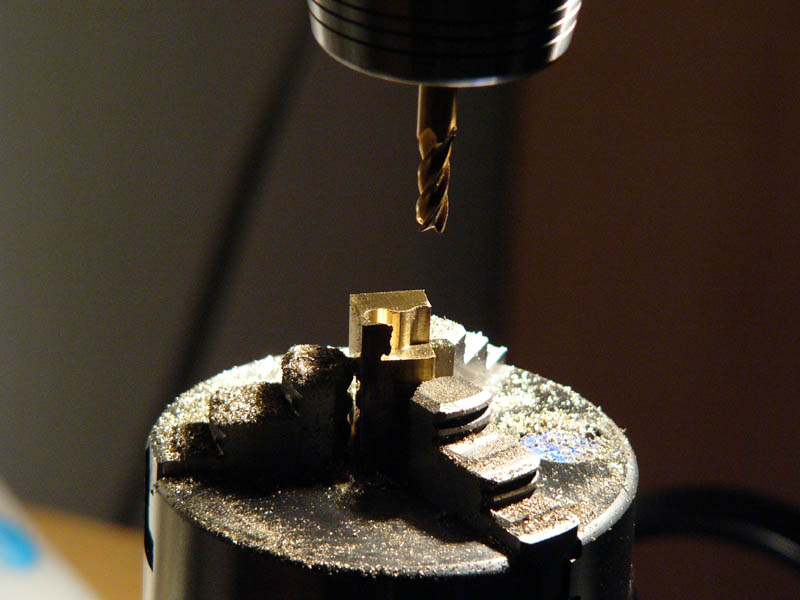
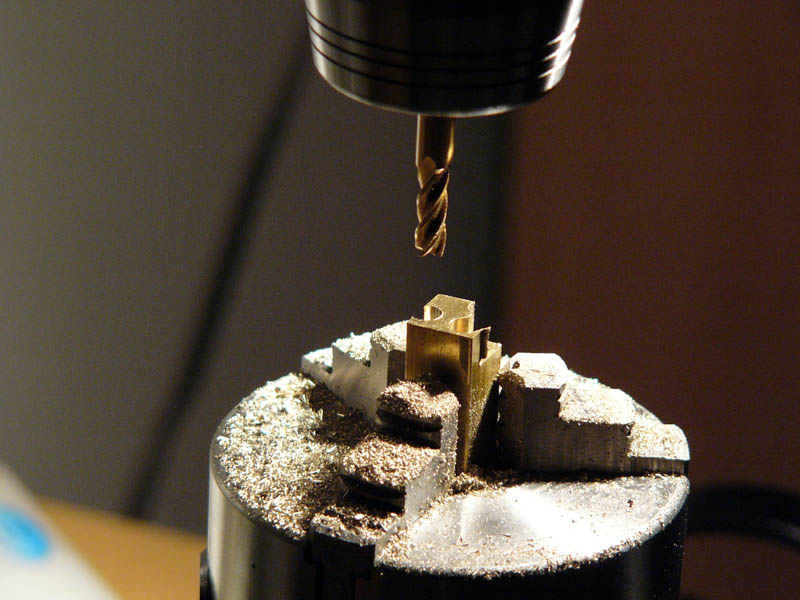
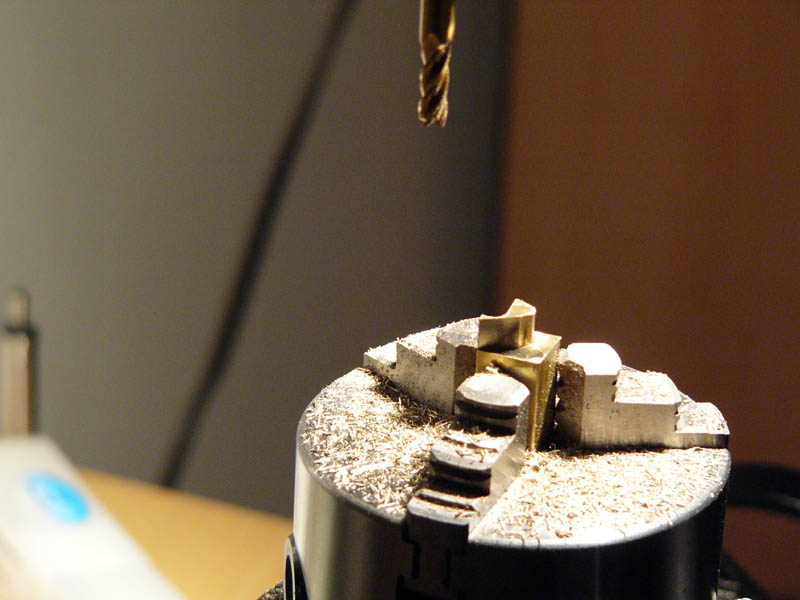
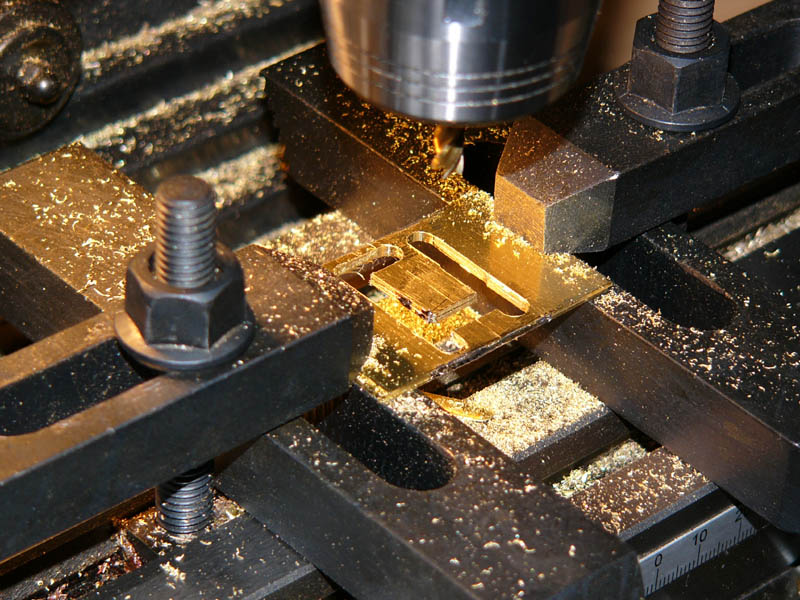
After planning and supplying with material i have startet my milling machine (Minimill X2).
Step by step milling of the guiding tooth:
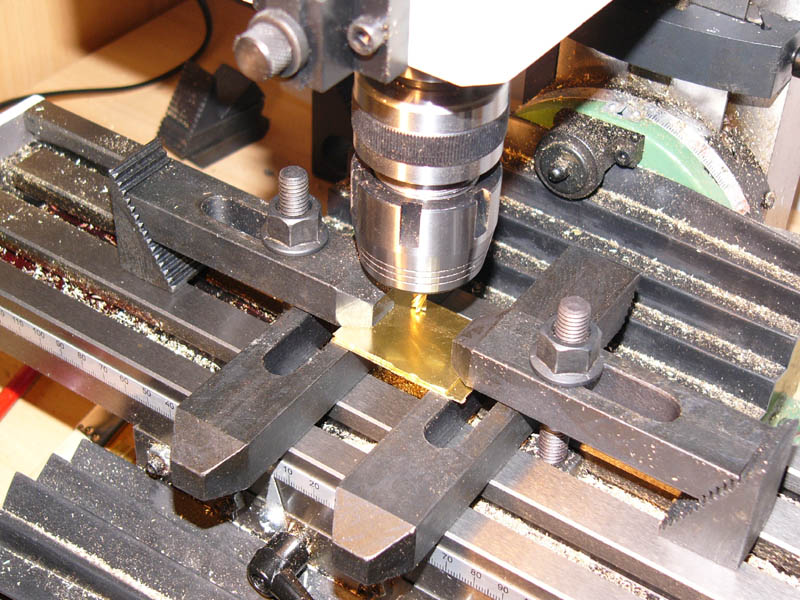
The flat part of the link:
So far all parts until now:
Assembling has been startet.
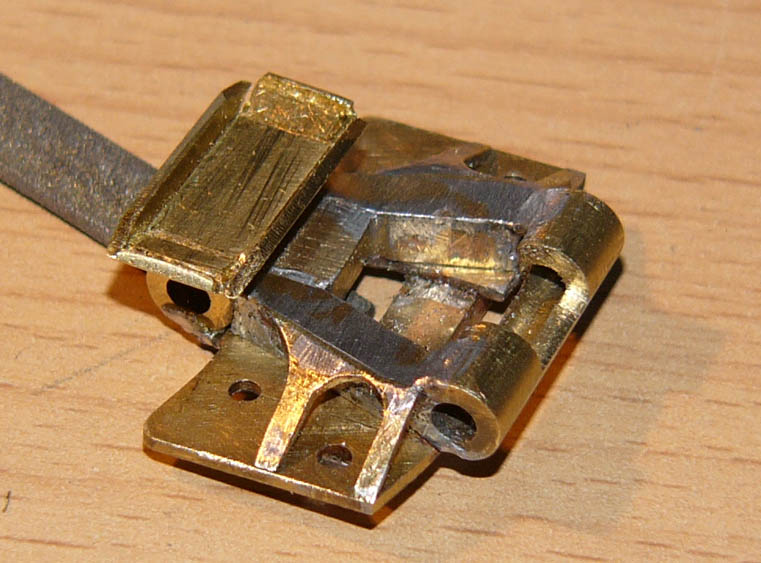
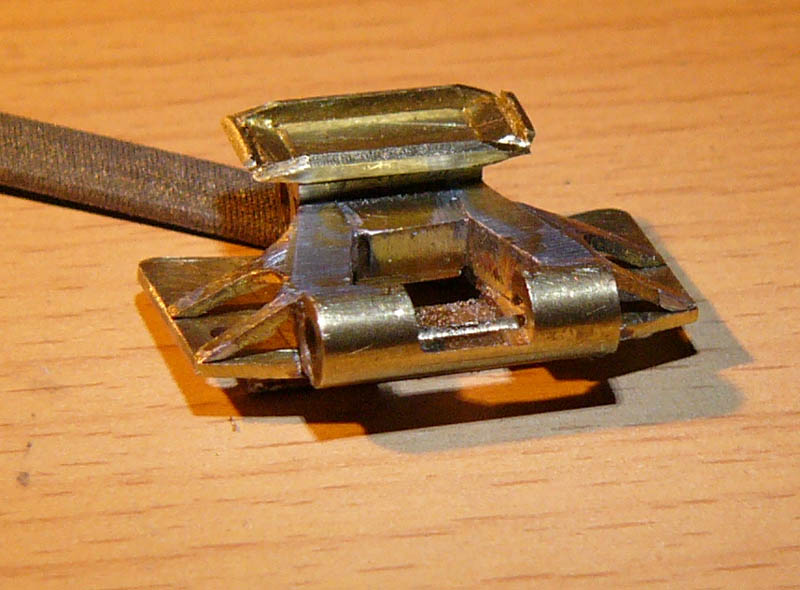
To see more details a primer has been applied:

The flat parts can be disconnected to enable the creation of a sillicon mold.
Thats phase 1. Remember, lot of things will change in the next phase...
As a basis i use a Tamiya 1/35 model (with Sd.Anh 116) and the following books:
- "Halbkettenfahrzeuge des deutschen Heeres"
- Nuts & Bolts Vol. 12
- Military Machine Famo 18t
- Waffenarsenal Band 36
- Copy of Maintainance book D671/1 D671/2
- lot of pictures from the internet
I would like to build the early F3 version of the Sd.Kfz 9.
Difference of the early (left) and the later right) track link for example:
I create 1/1 in CAD. Some pictures of 3D parts:
Front axle and rim:
Front axle:
Hood and grill:
Grill with Famo-Logo:
Early draw of track links and drive wheel to check dimensions:
3D prototype of the track link. To create a mold for casting i had to create a prototype. The design takes into account that i could create the parts easely.
Parts of the 3D prototype:
After planning and supplying with material i have startet my milling machine (Minimill X2).
Step by step milling of the guiding tooth:
The flat part of the link:
So far all parts until now:
Assembling has been startet.
To see more details a primer has been applied:
The flat parts can be disconnected to enable the creation of a sillicon mold.
Thats phase 1. Remember, lot of things will change in the next phase...
FamoGuy
Member Since: November 03, 2014
entire network: 9 Posts
KitMaker Network: 9 Posts
Posted: Monday, November 03, 2014 - 02:51 AM UTC
Phase 2:
The prototype of the track link was lot of work and it hurts to throw it away.
Changing the scale from 1/16 to 1/10 ! Why?
I demand a lot from this project without knowing whether I'm able to get it to a satisfying end. I invest time and money (I did it and I'm willing to continue) but I knew there will be 1/16 models of the Famo on the market very soon. This increased my motivation not to much.
Another reason was the idea of creating the steering gear with the same function as the original. And this needs a bigger scale than 1/16!
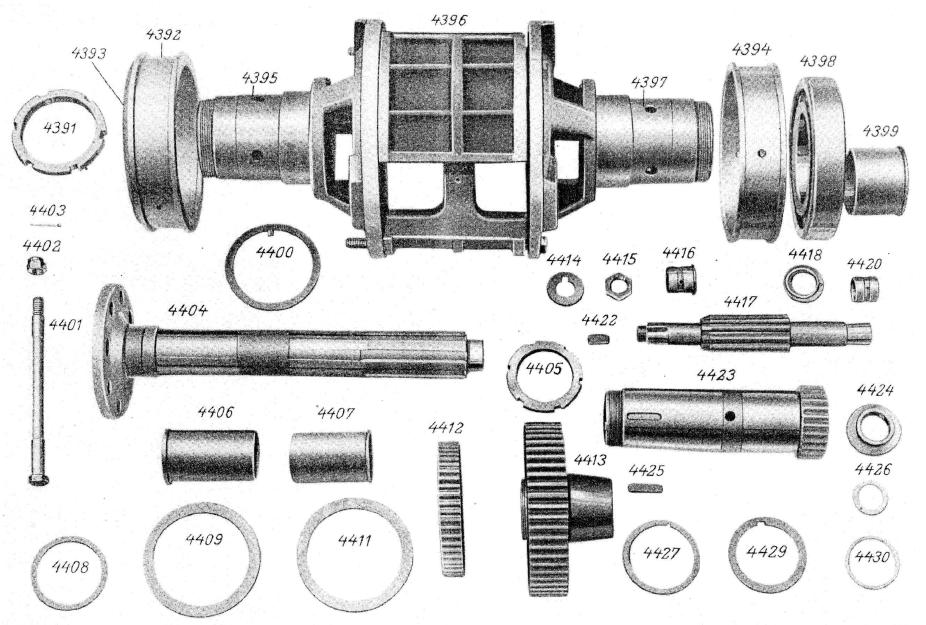
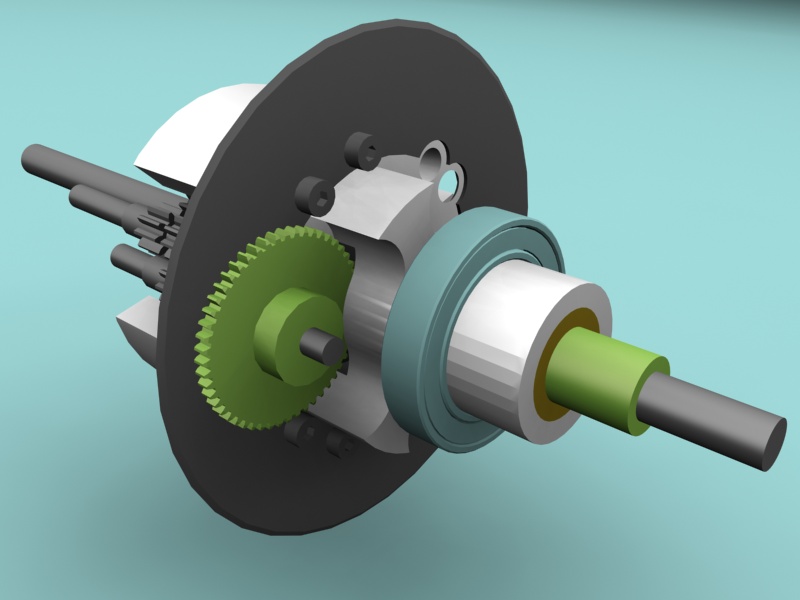
So lets focus on the principal accused - the steering gear:
I spent hours to analyse my documentation - mainly the maintainance manuals. The gear is like a Torsen differential where the gear ratio inside can be influenced with brakes outside the gear.
Original parts of the steering gear:
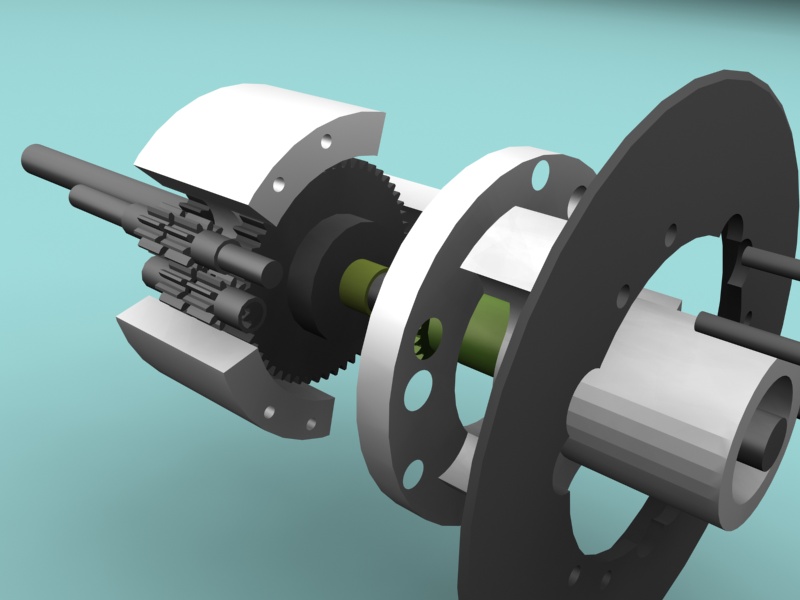
My 3D model :
Reworking of a steel gear to fit to the rotating diff housing:
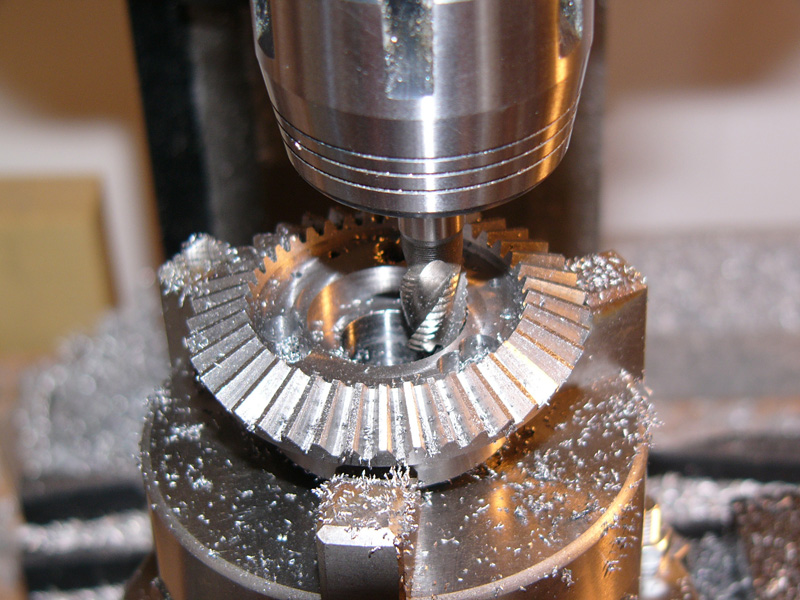
Because I had no experience with maching lots of parts where made for the trashcan. But I improved over time..
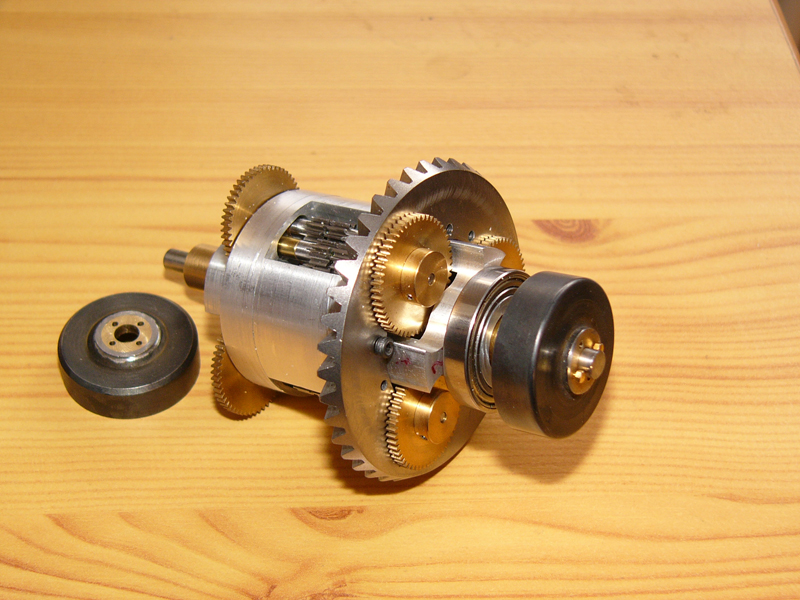
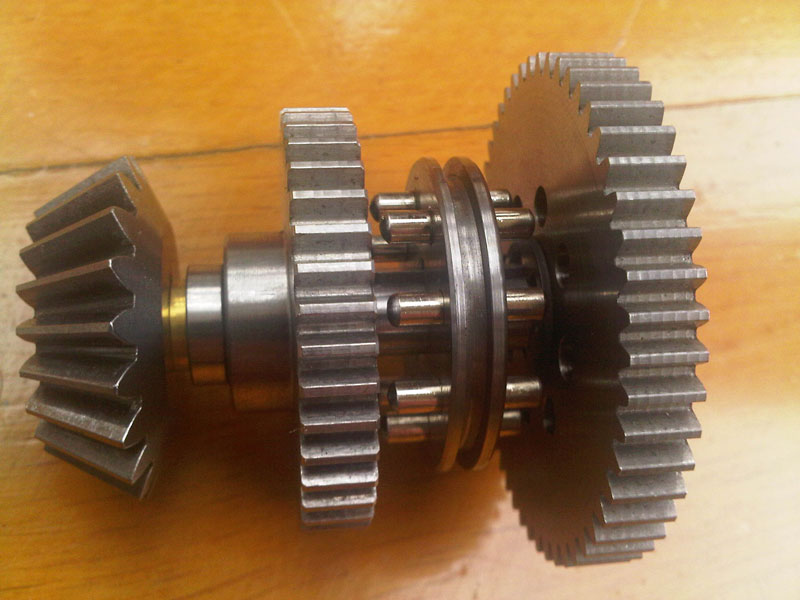
After weeks of machining I had a couple of part:
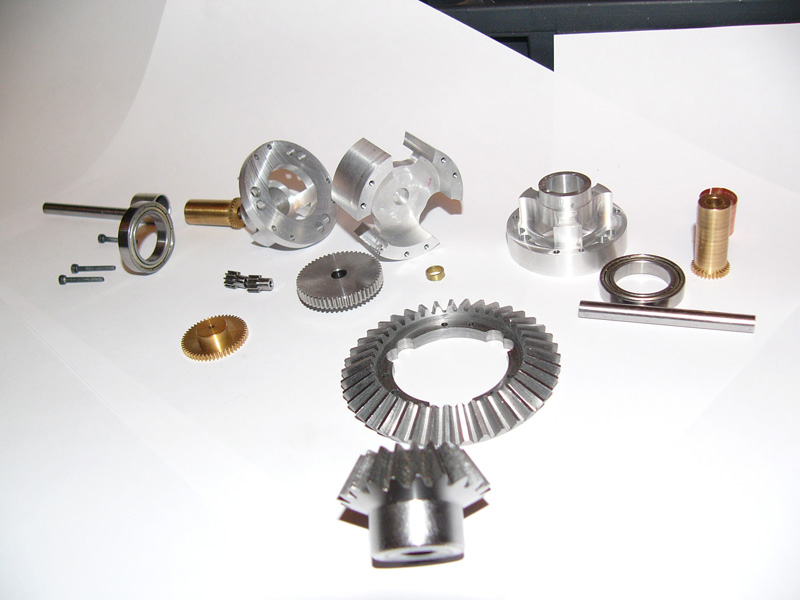
First assembling:
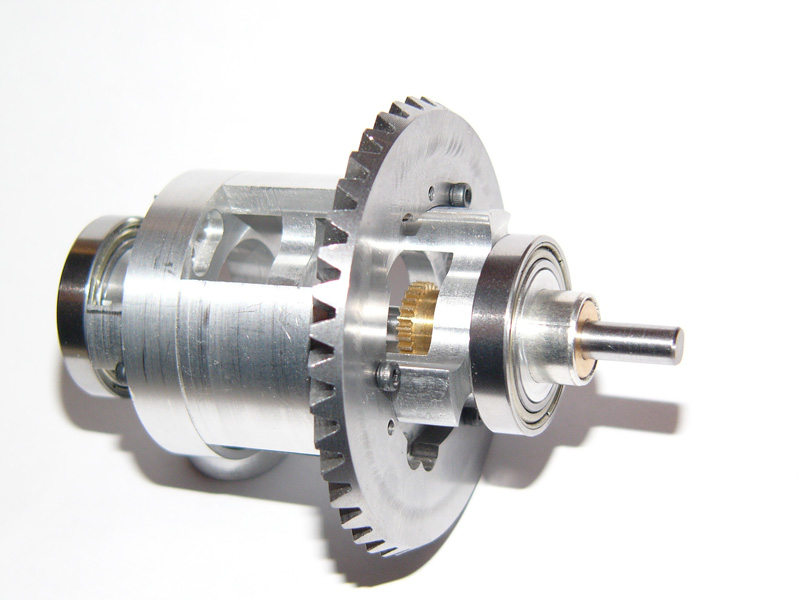
Looks not too bad and it fits very well.
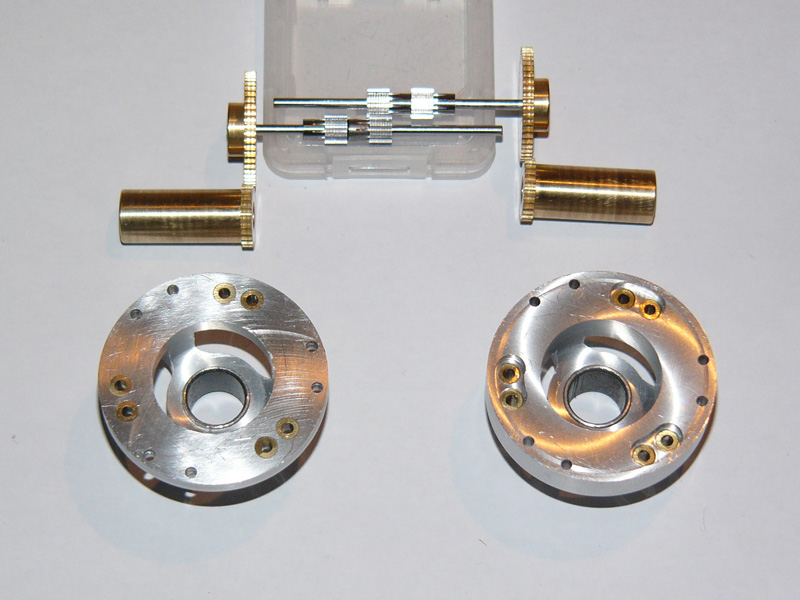
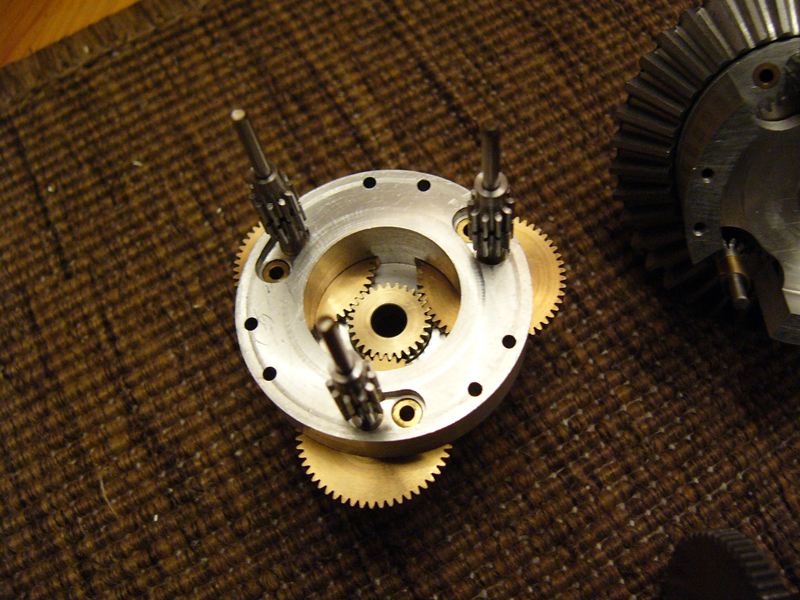
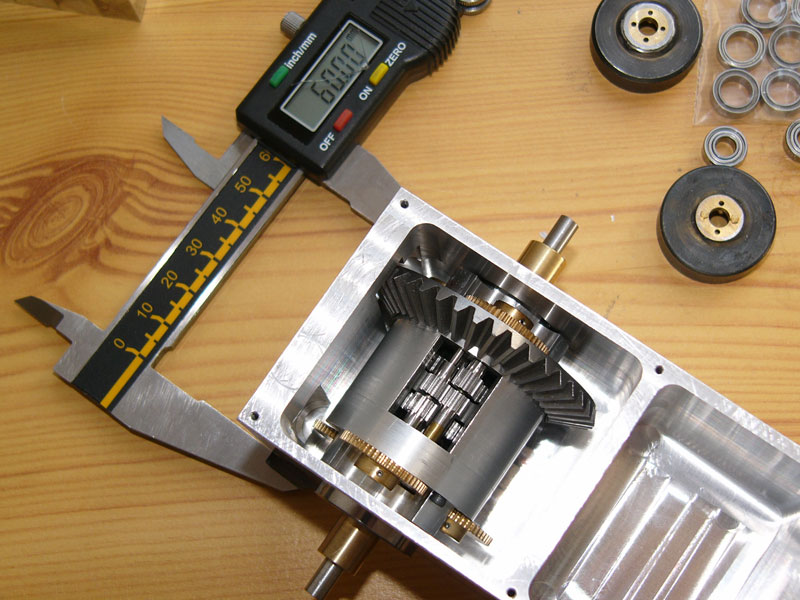
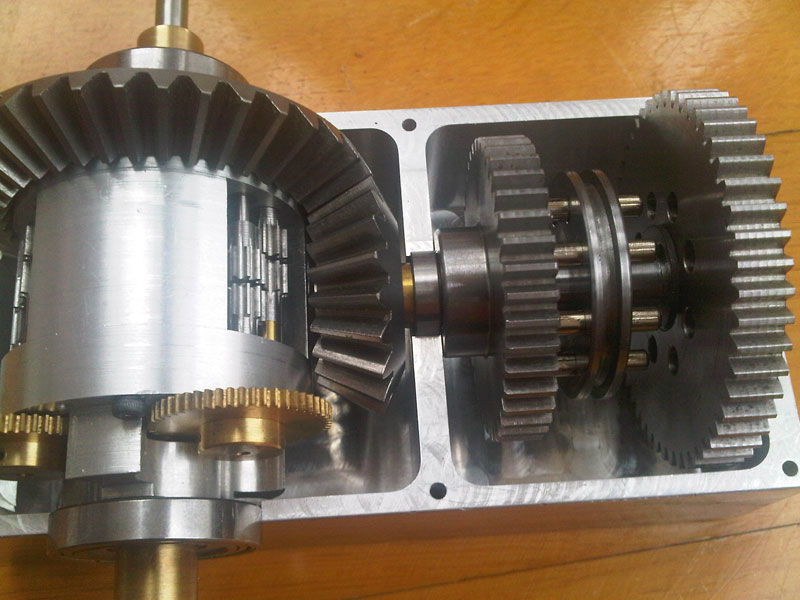
How the pinions and the axles are related inside the diff:
After additional days of working i could assemble all the parts i had until now. Fits good - although the clearance could be a little bit greater.
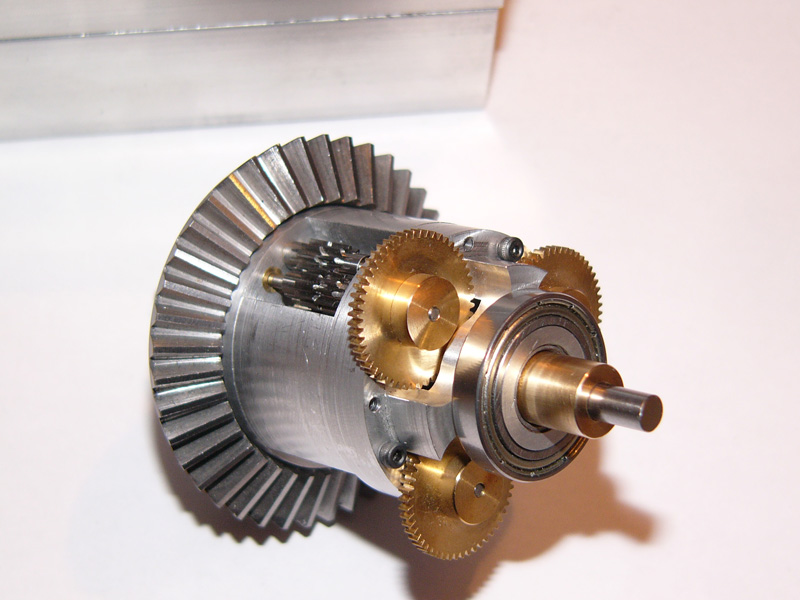
Inside view:
In the meantime I focused on the brakes. To get close to the original brakes I wanted to have drum brakes. I found that I could rework clutches from nitro car model engines.
After I got rid of the pinion I used solder (dont know the name in Englisch, maybe hard soldering ?) to fix a brass disk:
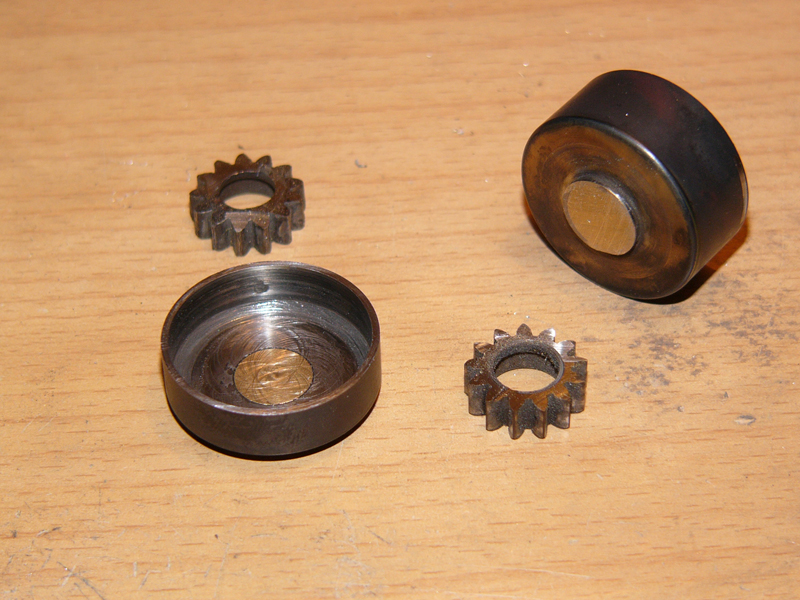
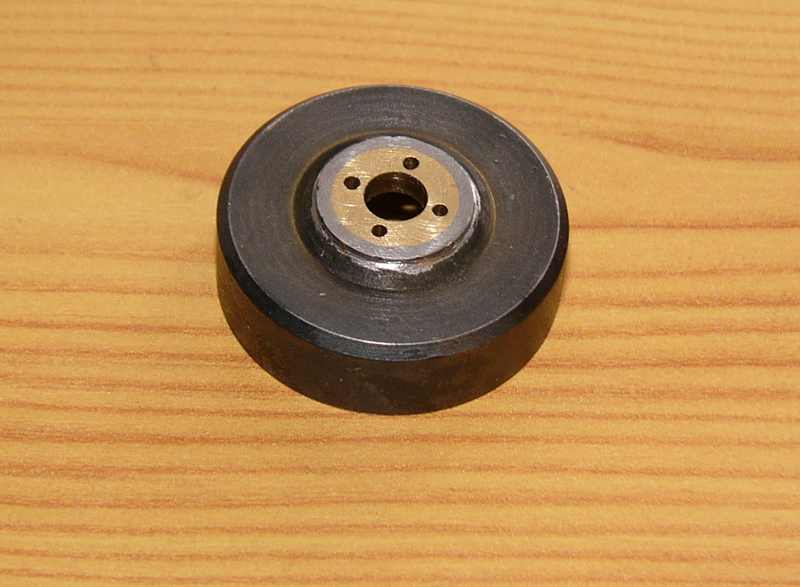
Fitting:
I realised that my diff-gear was in need of a housing. Like the original it consists of 3 main parts wich enclose 2 chambers: one for the diff gear and the other for the switching gear (is it called gear box ?). Althouh not in mind when I startet with the gear now i wanted a switching gear with at least 2 gears.
After checking the room it was clear: no space for 3 gears.
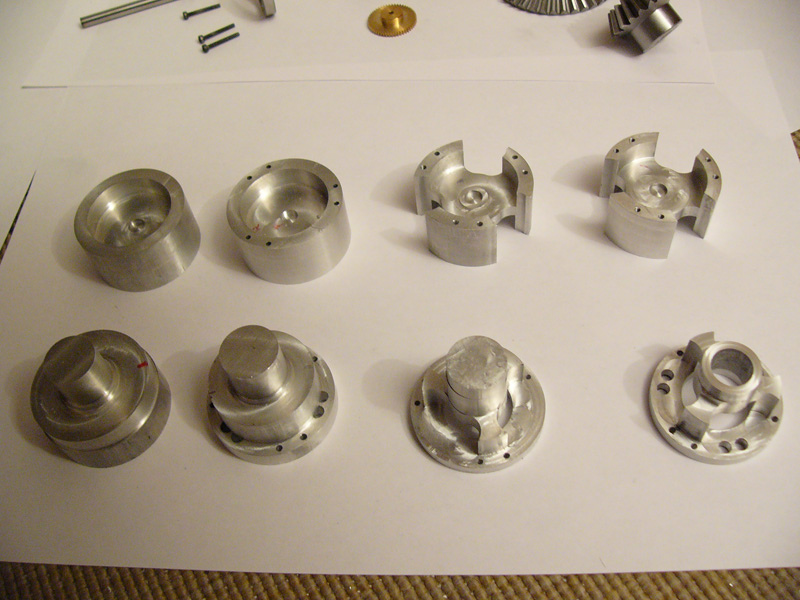
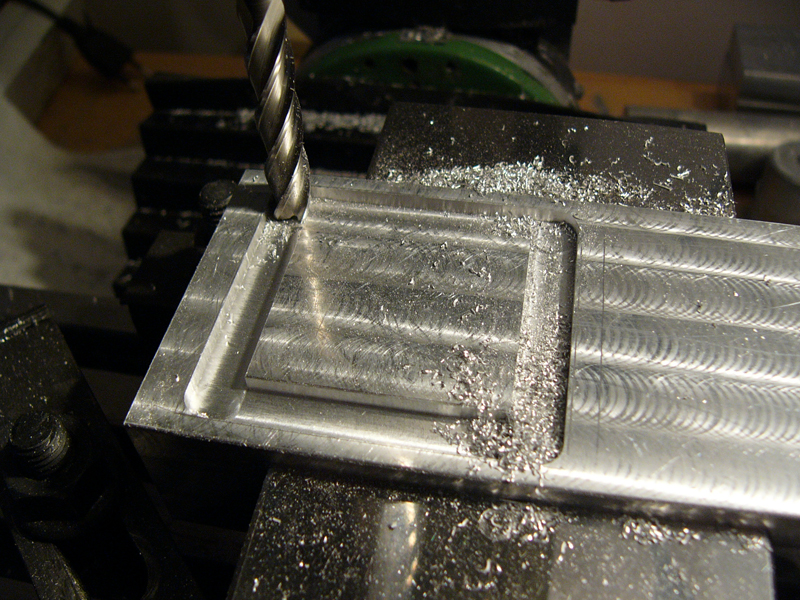
Preparation of the 3 massive aluminum blocks.
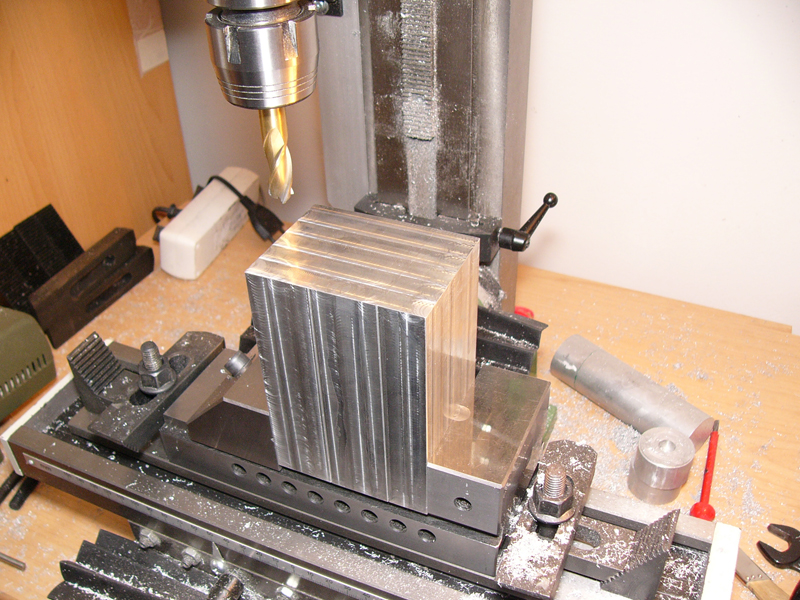
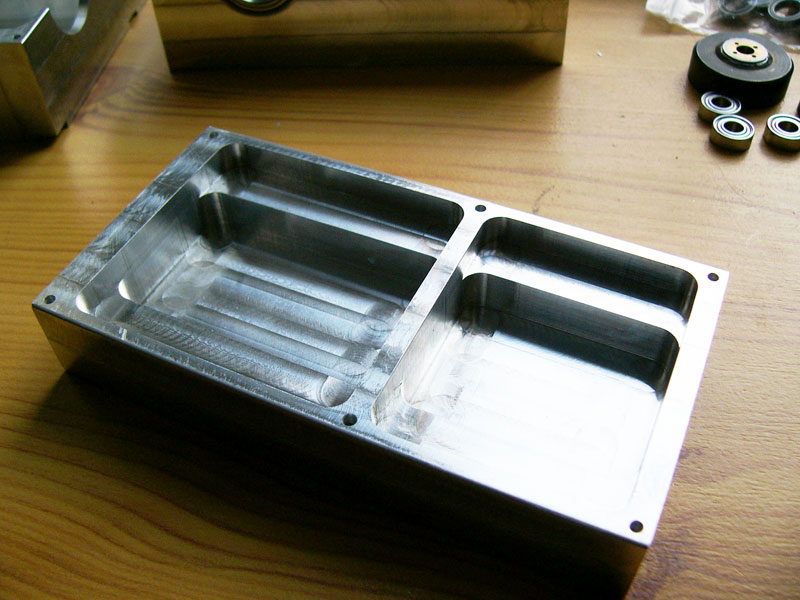
After 8 hours of milling - the middle part:

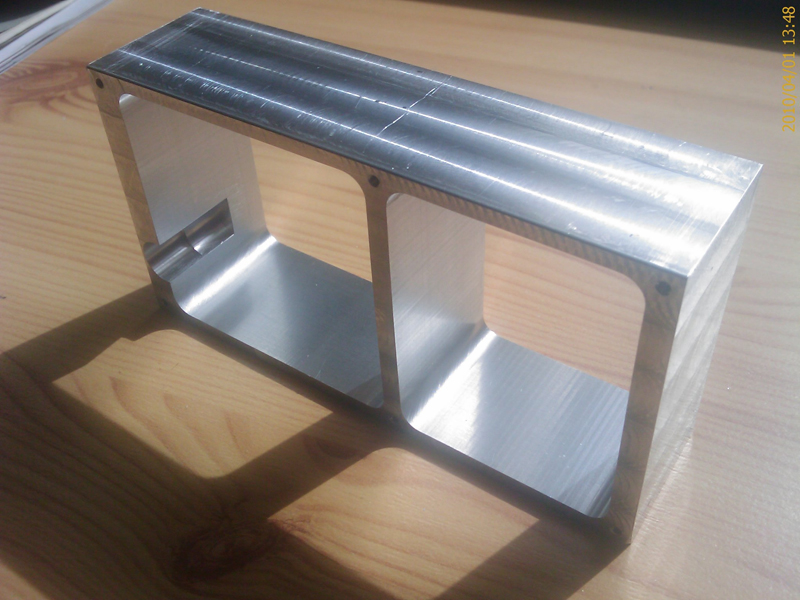
The cover of the housing:
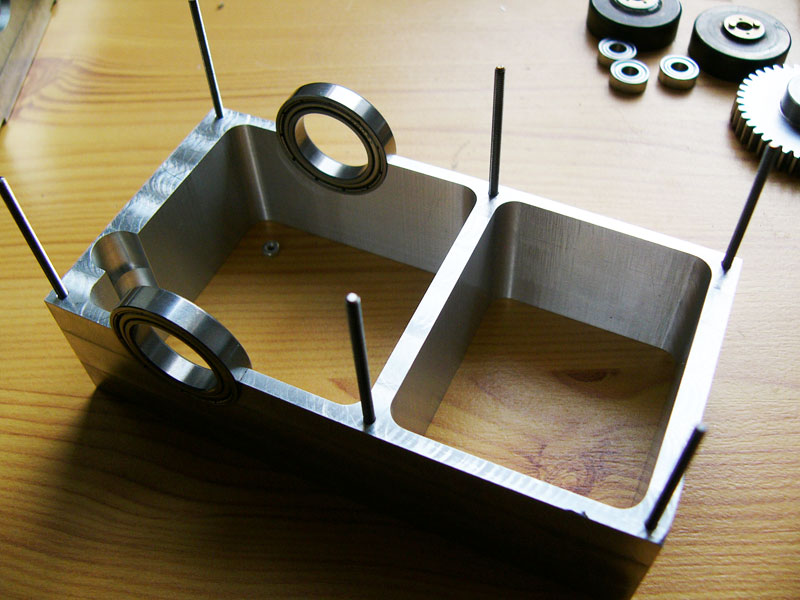
All 3 parts with the first holes for the ball bearing:
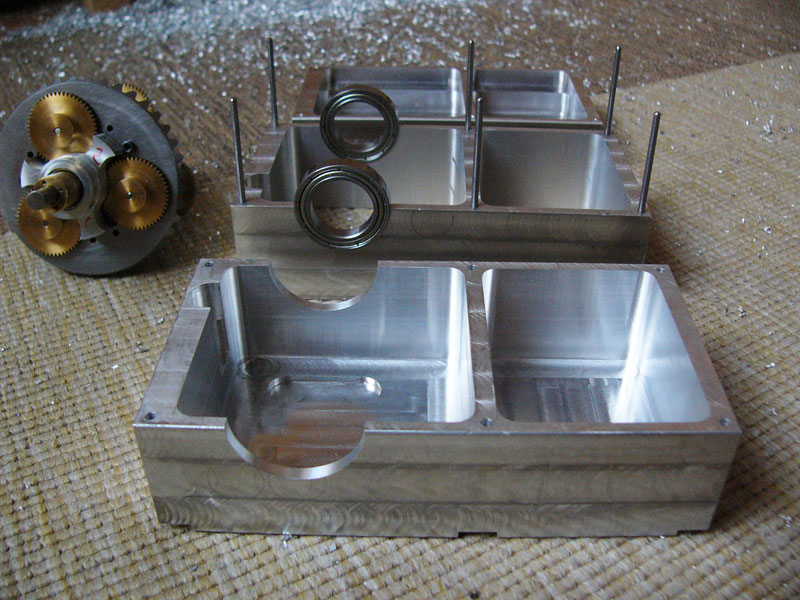
Time to place the gear within the housing.
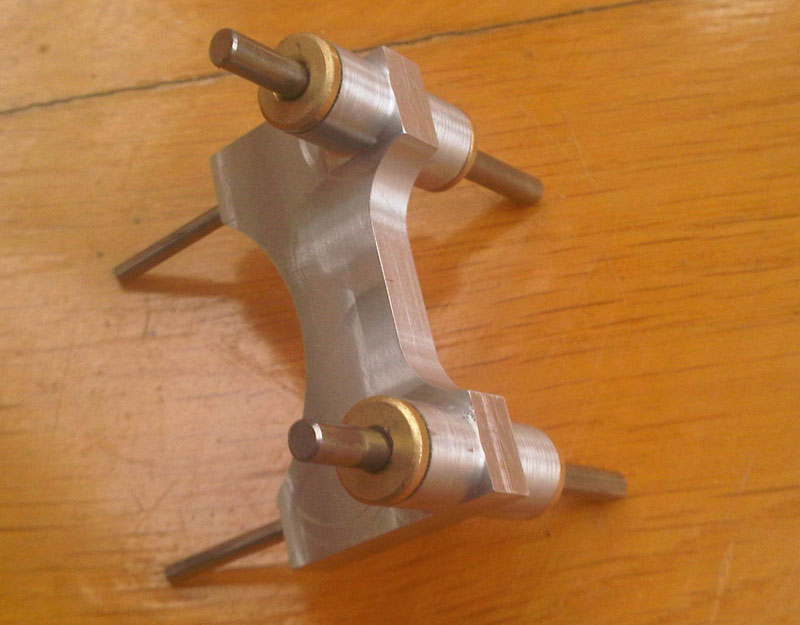
Now for the gear box:
A lot of work with this little part:
This part is to hook into the turning disk and to move the disk to the one or another ond gear.
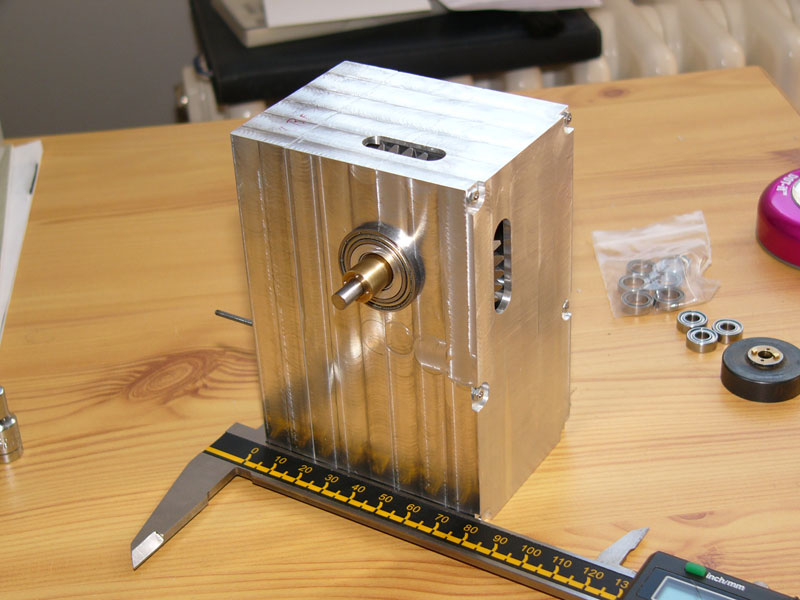
All togehter:
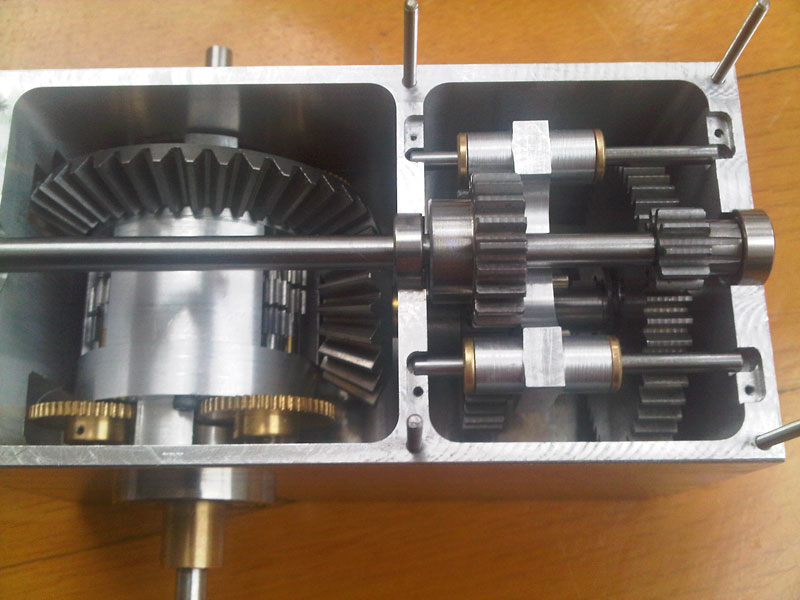
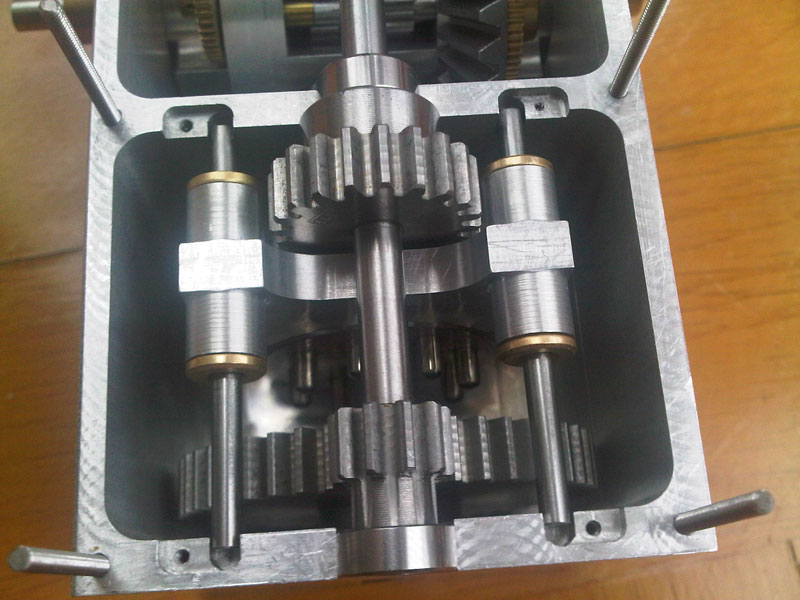
So far so good. Now I had to create the base for the brakes or care about some fixations of the brass gears.
But I had to move to a new flat ... then my wife and me got our son ... No time for gears
Thats the end of phase 2. Lets see how it continues...
Bye Matt
The prototype of the track link was lot of work and it hurts to throw it away.
Changing the scale from 1/16 to 1/10 ! Why?
I demand a lot from this project without knowing whether I'm able to get it to a satisfying end. I invest time and money (I did it and I'm willing to continue) but I knew there will be 1/16 models of the Famo on the market very soon. This increased my motivation not to much.
Another reason was the idea of creating the steering gear with the same function as the original. And this needs a bigger scale than 1/16!
So lets focus on the principal accused - the steering gear:
I spent hours to analyse my documentation - mainly the maintainance manuals. The gear is like a Torsen differential where the gear ratio inside can be influenced with brakes outside the gear.
Original parts of the steering gear:
My 3D model :
Reworking of a steel gear to fit to the rotating diff housing:
Because I had no experience with maching lots of parts where made for the trashcan. But I improved over time..
After weeks of machining I had a couple of part:
First assembling:
Looks not too bad and it fits very well.
How the pinions and the axles are related inside the diff:
After additional days of working i could assemble all the parts i had until now. Fits good - although the clearance could be a little bit greater.
Inside view:
In the meantime I focused on the brakes. To get close to the original brakes I wanted to have drum brakes. I found that I could rework clutches from nitro car model engines.
After I got rid of the pinion I used solder (dont know the name in Englisch, maybe hard soldering ?) to fix a brass disk:
Fitting:
I realised that my diff-gear was in need of a housing. Like the original it consists of 3 main parts wich enclose 2 chambers: one for the diff gear and the other for the switching gear (is it called gear box ?). Althouh not in mind when I startet with the gear now i wanted a switching gear with at least 2 gears.
After checking the room it was clear: no space for 3 gears.
Preparation of the 3 massive aluminum blocks.
After 8 hours of milling - the middle part:
The cover of the housing:
All 3 parts with the first holes for the ball bearing:
Time to place the gear within the housing.
Now for the gear box:
A lot of work with this little part:
This part is to hook into the turning disk and to move the disk to the one or another ond gear.
All togehter:
So far so good. Now I had to create the base for the brakes or care about some fixations of the brass gears.
But I had to move to a new flat ... then my wife and me got our son ... No time for gears
Thats the end of phase 2. Lets see how it continues...
Bye Matt

WARDUKWNZ

Member Since: June 01, 2011
entire network: 1,716 Posts
KitMaker Network: 76 Posts

Posted: Monday, November 03, 2014 - 03:34 PM UTC
HOLY FREAKIN HELL!!!! ,,, as a serious lover of WW2 German half tracks ( i have three Famo's and nearly 30 others ) this is the sort of thing which really gets my attention .
This is utterly amazing and you can trust me in this ..i will be watching with eyes wide open thats for sure ..
Keep it up Matt cause this is going to be phenomenal
Phill
This is utterly amazing and you can trust me in this ..i will be watching with eyes wide open thats for sure ..
Keep it up Matt cause this is going to be phenomenal
Phill

FamoGuy
Member Since: November 03, 2014
entire network: 9 Posts
KitMaker Network: 9 Posts
Posted: Monday, November 03, 2014 - 08:38 PM UTC
@Phill, thanks for the nice words. I try my best to keep on working on this ambitious project.
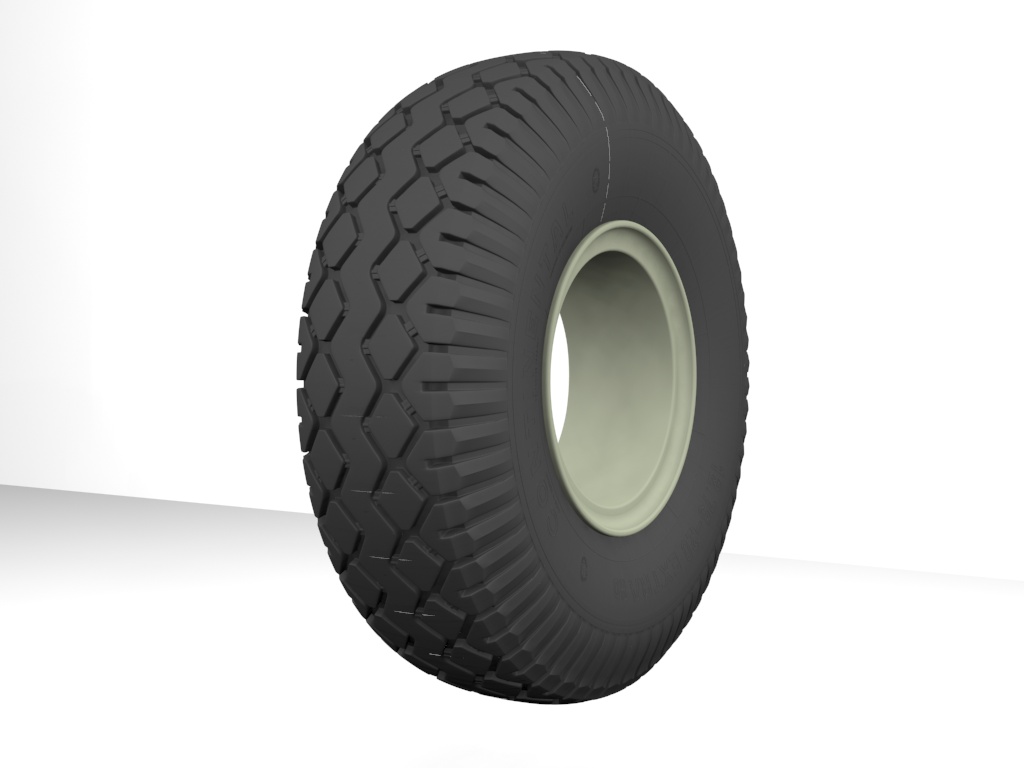
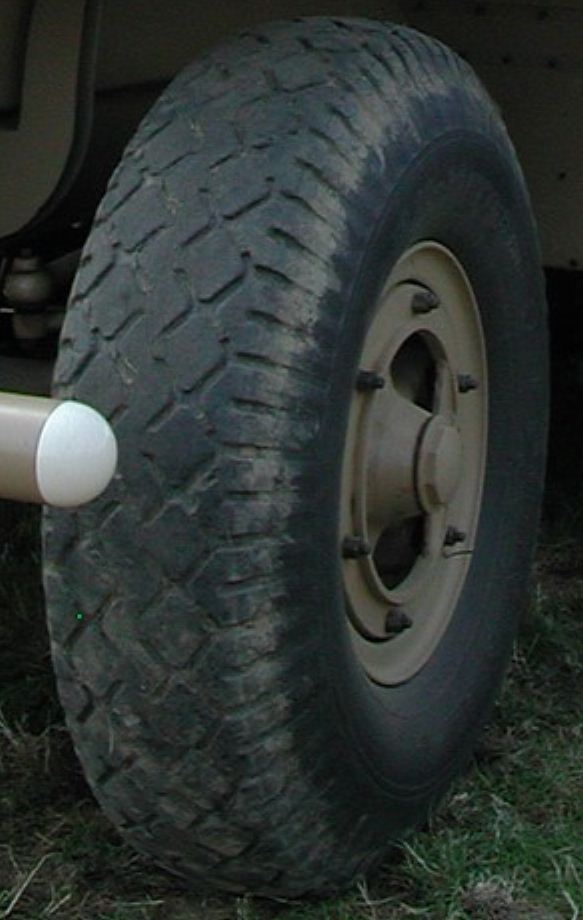
Phase 3: The front tyres! Holy Jesus, I'm sure I cannot explain enough how much time I spent with theese chunks of rubber. As I mentioned before I want a very accurate model and in my opinion the front tyres of the Famo have a significant impact of the overall impression. There are some 1/10 tyres I found in some shops but they look ... to be polite : not so good (terrible). With the books and pictures I had until this time and the tyre from the 1/35 Tamiya kit I startet to create a 3D model of the tyre. But the longer I analysed this the more I found there are more details which I could'nt recognize enough. There are details on the pattern itself, the overall shape of the tyre with the dimensions and bends had to be transfered to the model and the signs and markings on the sidewall where important. I spent hours of research in the internet, requested information from museums and the company who produced the tyre in the thirties (Continental) but no luck. But one american museum answered my request with pictures which caused my pulse went to 180. They have shown me the writings under the Continental writing.
Now I think I've enough information but I'm not 100% sure. On the other hand if there would be more little writings on the side wall, the question is could this be printet with a 3D printer with the desired accuracy.
If one of you could provide information about this tyre I would highly appretiate it !!! Its from Continental and the dimension is 12.75 - 20 Extra HD
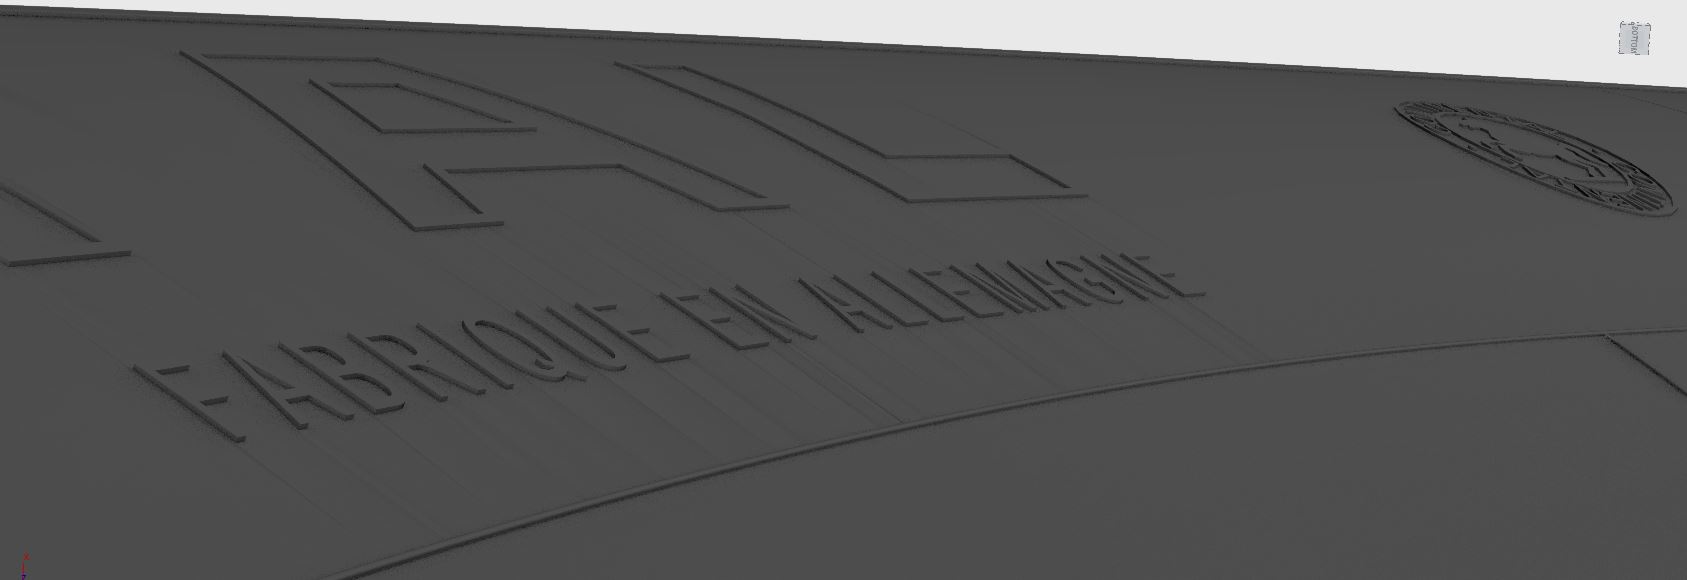
Some pictures from my model (with some rendering errors) and one from the original tyre to compare:
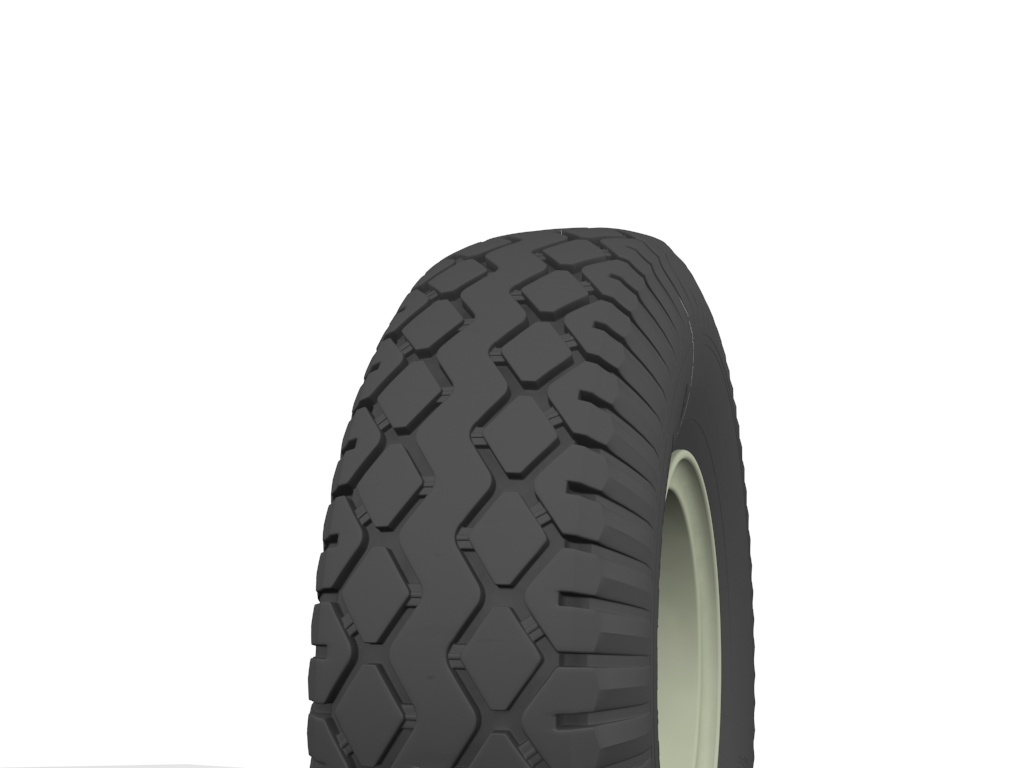
Here you can see the 3D model behind the renderings:
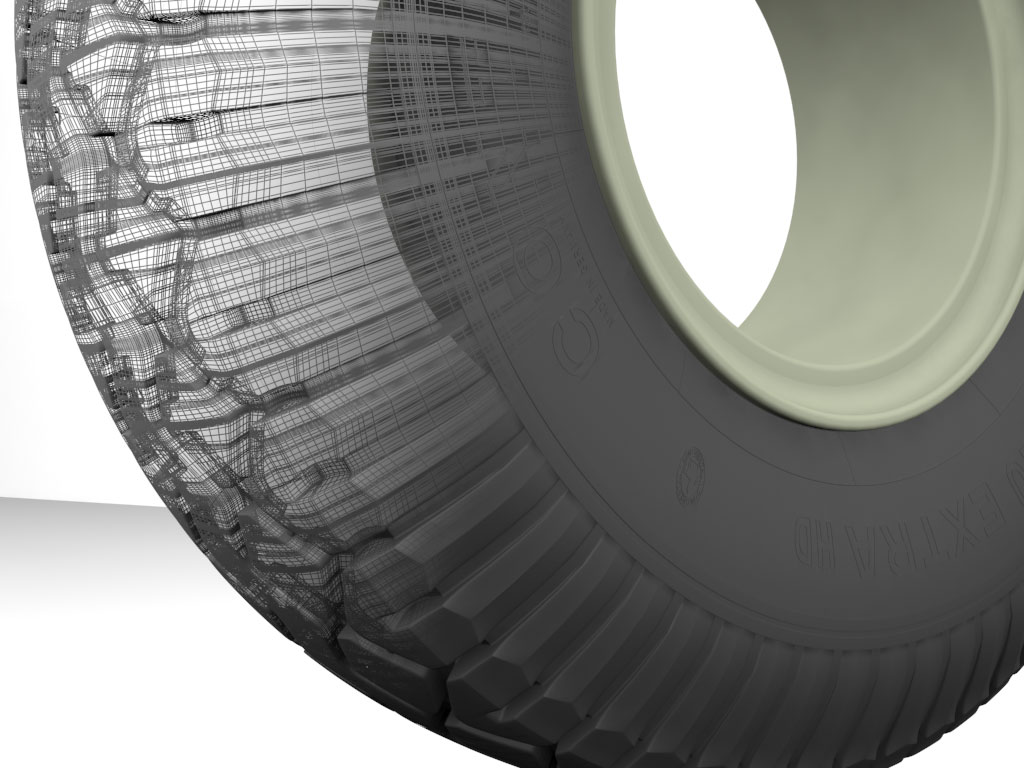
One of the mysterious writings. The others are "MADE IN GERMANY" and "DEUTSCHES FABRIKAT". In the background the Continental sign can bee seen:
I'm really happy with this because it looks almost like the original. I think (actually I'm sure) there is no other model of this tyre with this details and the overall impression like the original - anyway, I,ve not seen any other. But this is important because the production of the tyre will be very expensive.
Now I prepare for 3D printing and do very little corrections on the overall shape.
Thats it for now folks. Hope that there will be no such big breaks in the future like the 2 before. So stay tuned....
Bye Matt
Phase 3: The front tyres! Holy Jesus, I'm sure I cannot explain enough how much time I spent with theese chunks of rubber. As I mentioned before I want a very accurate model and in my opinion the front tyres of the Famo have a significant impact of the overall impression. There are some 1/10 tyres I found in some shops but they look ... to be polite : not so good (terrible). With the books and pictures I had until this time and the tyre from the 1/35 Tamiya kit I startet to create a 3D model of the tyre. But the longer I analysed this the more I found there are more details which I could'nt recognize enough. There are details on the pattern itself, the overall shape of the tyre with the dimensions and bends had to be transfered to the model and the signs and markings on the sidewall where important. I spent hours of research in the internet, requested information from museums and the company who produced the tyre in the thirties (Continental) but no luck. But one american museum answered my request with pictures which caused my pulse went to 180. They have shown me the writings under the Continental writing.
Now I think I've enough information but I'm not 100% sure. On the other hand if there would be more little writings on the side wall, the question is could this be printet with a 3D printer with the desired accuracy.
If one of you could provide information about this tyre I would highly appretiate it !!! Its from Continental and the dimension is 12.75 - 20 Extra HD
Some pictures from my model (with some rendering errors) and one from the original tyre to compare:
Here you can see the 3D model behind the renderings:
One of the mysterious writings. The others are "MADE IN GERMANY" and "DEUTSCHES FABRIKAT". In the background the Continental sign can bee seen:
I'm really happy with this because it looks almost like the original. I think (actually I'm sure) there is no other model of this tyre with this details and the overall impression like the original - anyway, I,ve not seen any other. But this is important because the production of the tyre will be very expensive.
Now I prepare for 3D printing and do very little corrections on the overall shape.
Thats it for now folks. Hope that there will be no such big breaks in the future like the 2 before. So stay tuned....
Bye Matt

Thudius

Member Since: October 22, 2012
entire network: 1,194 Posts
KitMaker Network: 96 Posts
Posted: Monday, November 03, 2014 - 11:36 PM UTC
Absolutely insane. I love it.
Kimmo
Kimmo

captfue

Member Since: September 02, 2006
entire network: 785 Posts
KitMaker Network: 210 Posts
Posted: Wednesday, November 05, 2014 - 10:46 AM UTC
Cool toys... great work will it actully run when finished?

Giovanni1508

Member Since: April 17, 2014
entire network: 652 Posts
KitMaker Network: 18 Posts

Posted: Tuesday, January 13, 2015 - 10:39 PM UTC
Hi Matt Pa,
I've found this tread because I'm building the FAMO in 1:35 (!) scale and I was looking within our community to find some new useful information.
Then I found your tread: I'm astonished.
Now I would like to know: HOW IS GOING the job ????
Cheers
Giovanni

Sleepwalker71

Member Since: August 30, 2012
entire network: 265 Posts
KitMaker Network: 2 Posts

Posted: Wednesday, January 14, 2015 - 11:32 AM UTC
HOLY... whatever... It is a pure but beautiful madness! 
FamoGuy
Member Since: November 03, 2014
entire network: 9 Posts
KitMaker Network: 9 Posts
Posted: Friday, February 06, 2015 - 07:11 PM UTC
Hi,
That's the big question that I cant answer until now but it is intended to run.
In the meantime I prepared some samples of the tyre model to be printed with shapeways most detailed material "Ultra Frosted Detail".
Here you can see the results:
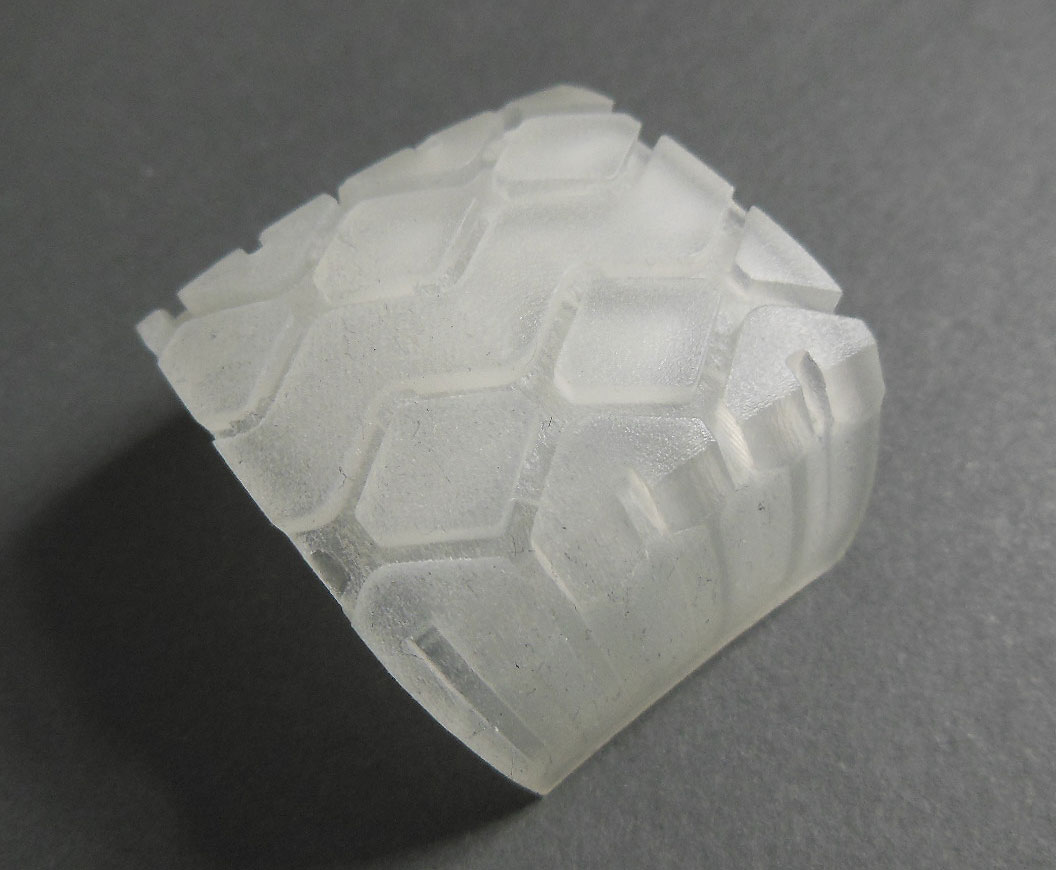
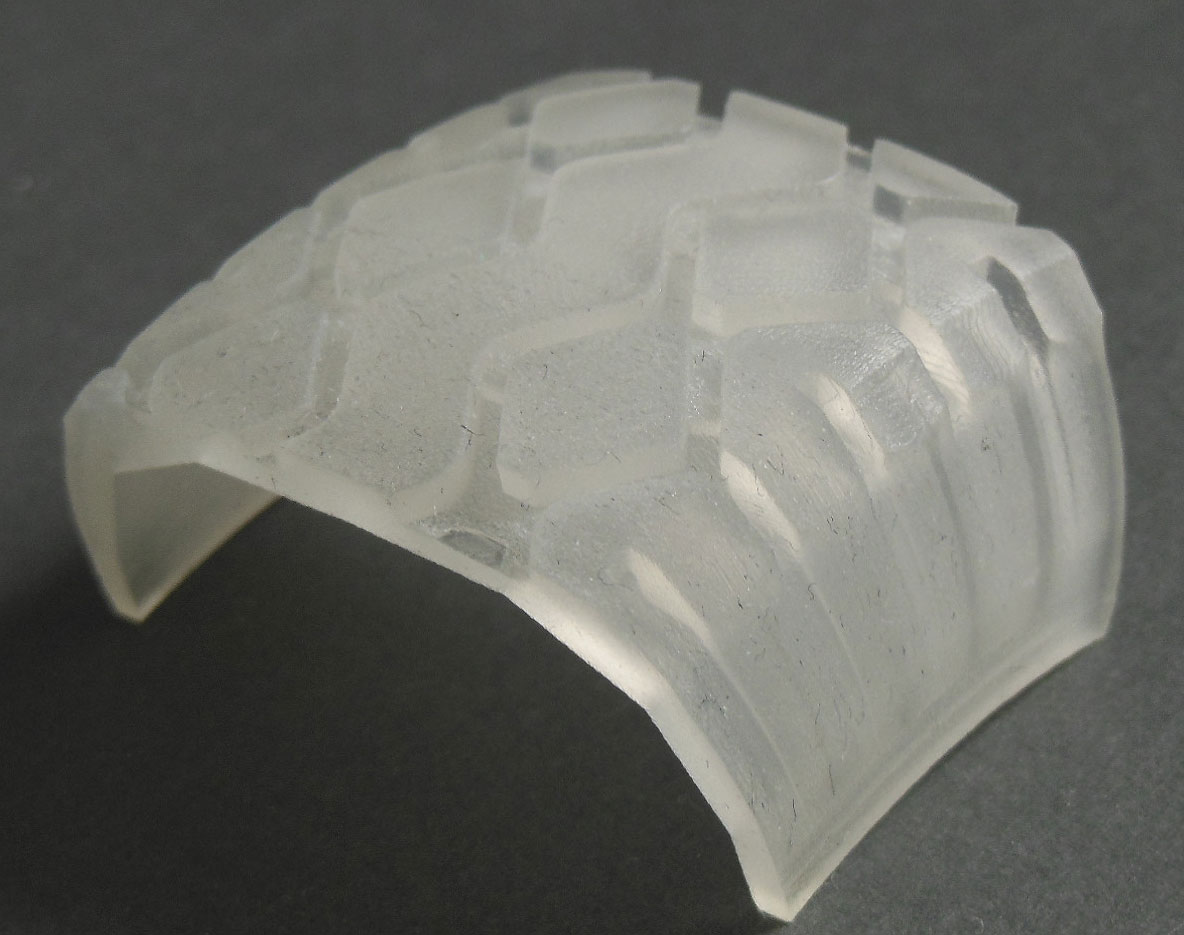
I'm contended with the pattern, all details and round parts are printed in a satisfying quality.
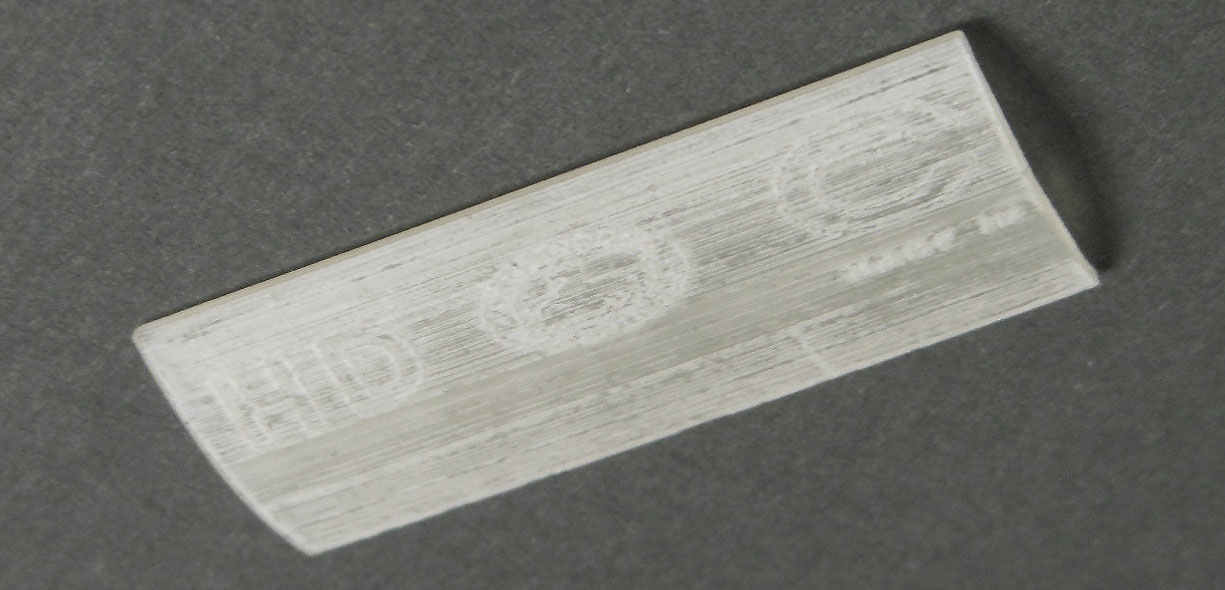
But the markings on the sidewall you can hardly see even less feel the structures.
Until now I've been looking for a solution. Maybe a better printing technology could help...
To continue on the project I'm working on other 3D models, parts of the front axle or the track link for example.
With this models I can check the price of 3d printing and casting.
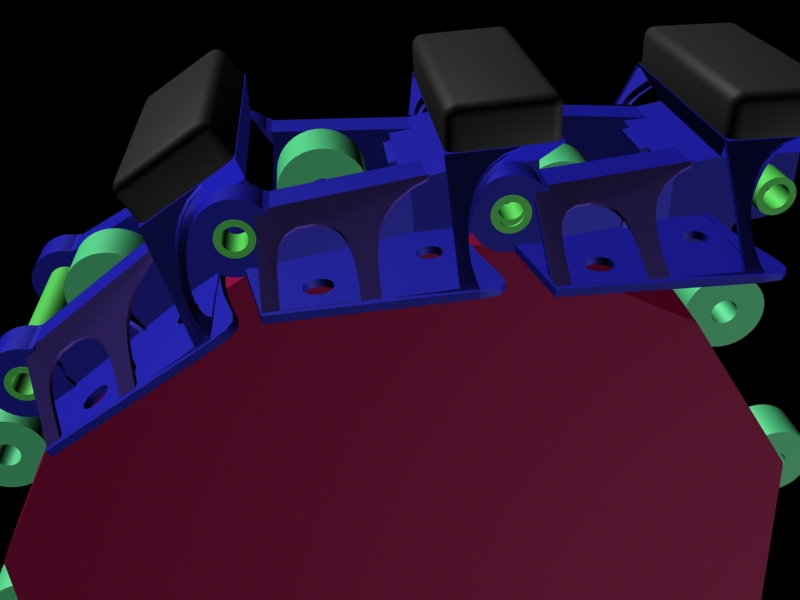
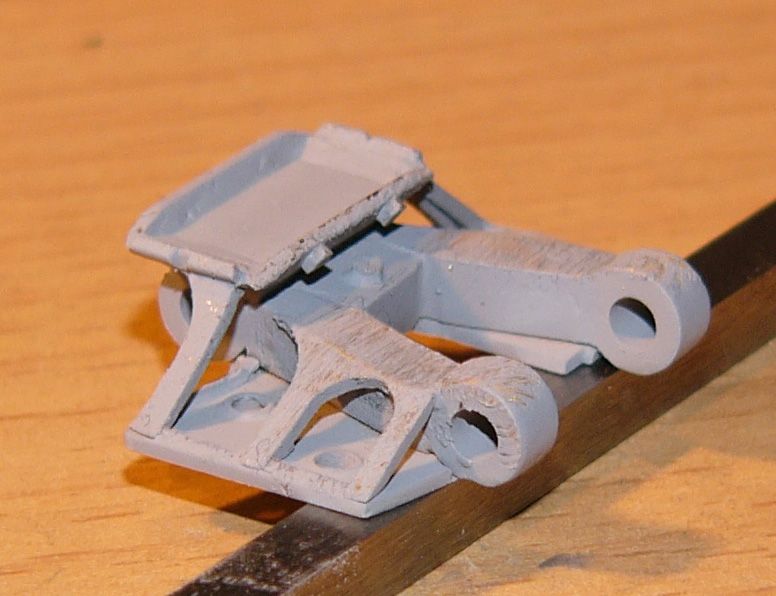
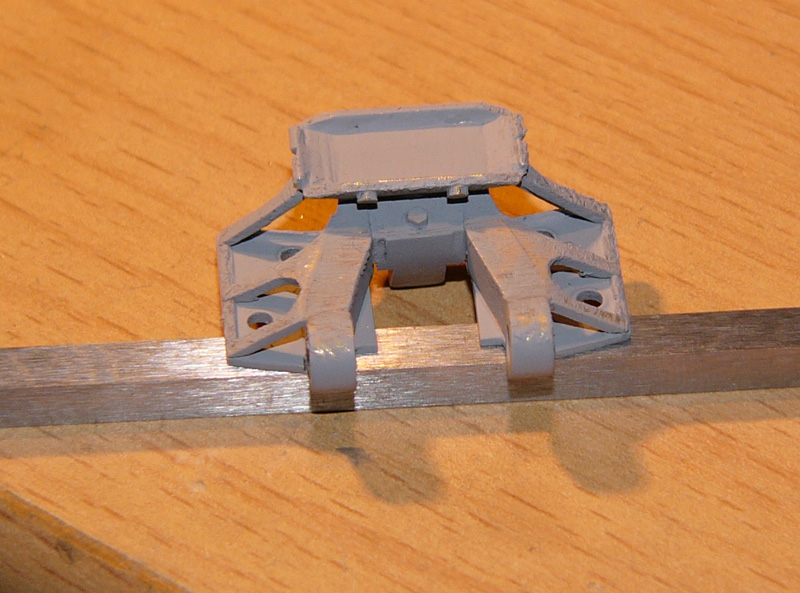
The following part is a mount for the leaf spring at the axle.
3D printing is under 10 EUR but creation of the casting mold costs about 80 EUR. Each brass casted part is about 5 EUR and I need 2 for one Famo.
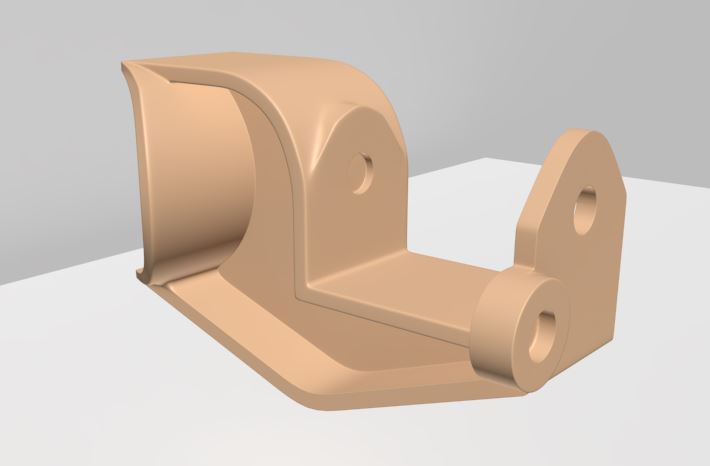
Now I can weigh up the options: pay the money and get very good parts very easely, save the money and turn on the mill and solder. Maybe one additional option is to think about a group build where more people could share the cost. But I fear it's not easy to find enough people who are as nuts as me...
I'll finish the track link very soon and because I'll need lots of links the cost for the casting mold is much cheaper for each casted link.
So stay tuned.
Bye Matt
Quoted Text
Cool toys... great work will it actully run when finished?
That's the big question that I cant answer until now but it is intended to run.
In the meantime I prepared some samples of the tyre model to be printed with shapeways most detailed material "Ultra Frosted Detail".
Here you can see the results:
I'm contended with the pattern, all details and round parts are printed in a satisfying quality.
But the markings on the sidewall you can hardly see even less feel the structures.
Until now I've been looking for a solution. Maybe a better printing technology could help...
To continue on the project I'm working on other 3D models, parts of the front axle or the track link for example.
With this models I can check the price of 3d printing and casting.
The following part is a mount for the leaf spring at the axle.
3D printing is under 10 EUR but creation of the casting mold costs about 80 EUR. Each brass casted part is about 5 EUR and I need 2 for one Famo.
Now I can weigh up the options: pay the money and get very good parts very easely, save the money and turn on the mill and solder. Maybe one additional option is to think about a group build where more people could share the cost. But I fear it's not easy to find enough people who are as nuts as me...
I'll finish the track link very soon and because I'll need lots of links the cost for the casting mold is much cheaper for each casted link.
So stay tuned.
Bye Matt

flippen_waffles
Member Since: June 01, 2010
entire network: 143 Posts
KitMaker Network: 26 Posts
Posted: Wednesday, September 23, 2015 - 11:27 AM UTC
This is beyond scratch building, this is outstanding!

Thirian24
Member Since: September 30, 2015
entire network: 2,493 Posts
KitMaker Network: 147 Posts
Posted: Tuesday, October 13, 2015 - 08:49 AM UTC
This is amazing! How is this coming along?

turtle65
Member Since: September 17, 2012
entire network: 266 Posts
KitMaker Network: 69 Posts
Posted: Tuesday, October 13, 2015 - 11:36 AM UTC
You guys might want to check his stats:
last post: 08 Feb
last logon: 20 April

last post: 08 Feb
last logon: 20 April

ColinEdm

Member Since: October 15, 2013
entire network: 1,355 Posts
KitMaker Network: 19 Posts
Posted: Wednesday, October 14, 2015 - 05:30 AM UTC
You sir, are insane. I respect that. 

JClapp

#259
Member Since: October 23, 2011
entire network: 2,265 Posts
KitMaker Network: 225 Posts

Posted: Thursday, October 15, 2015 - 12:07 AM UTC
That is some outstanding machinery work!
There is plenty of this kind of work done in the live steam and narrow gauge railway world, but not often in military road vehicles.
I always wanted to be a machinist, but it cannot be in this life time for me, so I watch with envy your every operation.
cheers!
There is plenty of this kind of work done in the live steam and narrow gauge railway world, but not often in military road vehicles.
I always wanted to be a machinist, but it cannot be in this life time for me, so I watch with envy your every operation.
cheers!

FamoGuy
Member Since: November 03, 2014
entire network: 9 Posts
KitMaker Network: 9 Posts
Posted: Tuesday, October 20, 2015 - 11:12 PM UTC
Quoted Text
You guys might want to check his stats:
last post: 08 Feb
last logon: 20 April
I'm still online and want to continue this project. But the lack of time because dealing with the everyday life slows down my building speed. Hope I can report about new progress very soon.

165thspc

#521
Member Since: April 13, 2011
entire network: 9,465 Posts
KitMaker Network: 176 Posts
Posted: Thursday, July 07, 2016 - 07:03 PM UTC
Sir:
The work you did on the differential and transmission is so beautiful it hurts to look at your photographs!
In my world that is the highest compliment I can offer!
Very High Regards
Michael Koenig
The work you did on the differential and transmission is so beautiful it hurts to look at your photographs!
In my world that is the highest compliment I can offer!
Very High Regards
Michael Koenig

 |

WEB HOSTING BY


Copyright ©2021 KitMaker Network and Kitmaker Network, a subsidiary of Silver Star Enterprises
All Rights Reserved. Please read our Conditions of Use and Privacy Policy.
All Rights Reserved. Please read our Conditions of Use and Privacy Policy.