_GOTOBOTTOM
Modeling in General
General discussions about modeling topics.
removing ejector pin marks - hobbyboss 2a4
t-bolt
Visit this Community
Indonesia
Member Since: October 30, 2013
entire network: 13 Posts
KitMaker Network: 4 Posts
Posted: Monday, November 04, 2013 - 07:30 PM UTC
Hi Guys,

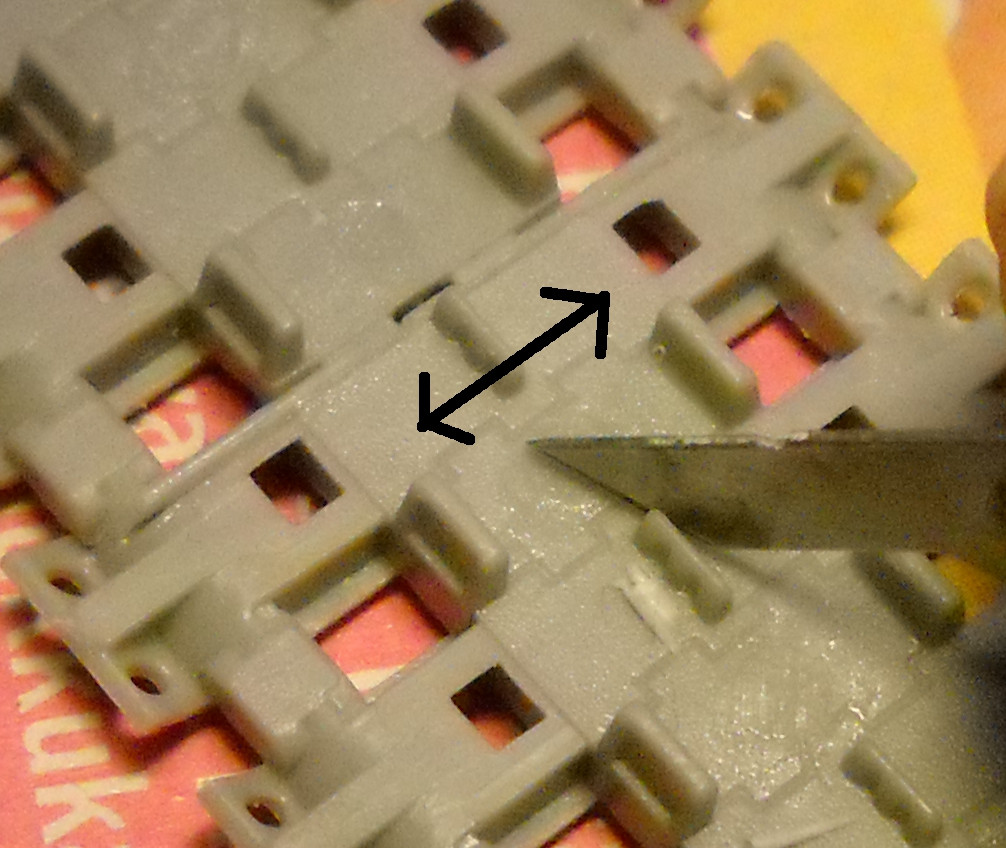
I am having difficulties on removing ejector pin marks from these very small parts:


these are parts from this hobbyboss kit:


I have tried small files and abrasive paper, but the result is not good.

Anybody has faced similar problems before?
Any advices / tips are appreciated.
Thanks.
Thudius
Visit this Community
Uusimaa, Finland
Member Since: October 22, 2012
entire network: 1,194 Posts
KitMaker Network: 96 Posts
Posted: Monday, November 04, 2013 - 09:33 PM UTC
Howdy,

Get some stencil/chisel blades for scraping like this http://shop.excelblades.com/p/16-stencil-edge-blade-5pcs?referring_products=pdp|d173c555d0052f8b9f069f76633da3ba You can find smaller and larger blades too. This blade is also very good for removing parts from sprues or cutting molding nubs off.

If the pin mark is recessed, the easiest way to fill is with a water based putty like Perfect Putty or Liquid Green Stuff. Just thin with water, apply a small drop, let it set for a minute or so and wipe the excess away with a moist q-tip.

Kimmo
t-bolt
Visit this Community
Indonesia
Member Since: October 30, 2013
entire network: 13 Posts
KitMaker Network: 4 Posts
Posted: Tuesday, November 05, 2013 - 09:41 PM UTC
Hi Kimmo,

Thanks for the reply.


I have that kind of blade.
It is ok if the marks are on the side (the right two parts).
However, if the marks are on the middle and surrounded by raised details (the left two parts),
the blade is impossible to use.
Can you show me how?

I can not find Perfect Putty or Liquid Green Stuff in my area,
Can you give me the links?
retiredyank
Visit this Community
Arkansas, United States
Member Since: June 29, 2009
entire network: 11,610 Posts
KitMaker Network: 3,657 Posts
Posted: Wednesday, November 06, 2013 - 02:07 AM UTC
I would recommend you use the tip of a new #11 blade to remove as much of the lip as you can.
Thudius
Visit this Community
Uusimaa, Finland
Member Since: October 22, 2012
entire network: 1,194 Posts
KitMaker Network: 96 Posts
Posted: Wednesday, November 06, 2013 - 07:16 AM UTC

Quoted Text

Hi Kimmo,

Thanks for the reply.


I have that kind of blade.
It is ok if the marks are on the side (the right two parts).
However, if the marks are on the middle and surrounded by raised details (the left two parts),
the blade is impossible to use.
Can you show me how?

I can not find Perfect Putty or Liquid Green Stuff in my area,
Can you give me the links?


Hi, use the blade in a scraping motion, move from side to side like you were giving the piece a shave. If the blade is too big for those tight areas, you could sharpen a small screwdriver tip and scrape with that. A last resort option could be to drill through the part with a bit bigger than the ejector mark, and then fill it with rod or stretched sprue that sits level with face of the piece. If that's not really clear, I can try to take a few pictures tomorrow. Here's a link to Perfect Putty distributors http://www.deluxematerials.com/distributors.html

Kimmo
tankmodeler
#417
Visit this Community
Ontario, Canada
Member Since: March 01, 2004
entire network: 3,123 Posts
KitMaker Network: 330 Posts
Posted: Wednesday, November 06, 2013 - 10:27 AM UTC
OT

Kimmo - Love your avatar photo; not too many people remember Bob & Doug outside Canada anymore!

Touque's off to another northern hoser! Good day, eh?

Paul
Thudius
Visit this Community
Uusimaa, Finland
Member Since: October 22, 2012
entire network: 1,194 Posts
KitMaker Network: 96 Posts
Posted: Wednesday, November 06, 2013 - 12:07 PM UTC

Quoted Text

OT

Kimmo - Love your avatar photo; not too many people remember Bob & Doug outside Canada anymore!

Touque's off to another northern hoser! Good day, eh?

Paul


Thank you very many, eh? I am a transplanted repatriated expatriate. Or something. And it's not quite Doug

Kimmo
ivanhoe6
Visit this Community
Wisconsin, United States
Member Since: April 05, 2007
entire network: 2,023 Posts
KitMaker Network: 626 Posts
Posted: Wednesday, November 06, 2013 - 06:59 PM UTC
How can we forget the McKenzie Bros. ? I sure wish it would pop up on TV sometime !
Kimmo, thanks for sharing your PzIV build log. I'm a lurking follower on that baby.
Thudius
Visit this Community
Uusimaa, Finland
Member Since: October 22, 2012
entire network: 1,194 Posts
KitMaker Network: 96 Posts
Posted: Thursday, November 07, 2013 - 01:42 AM UTC

Quoted Text

How can we forget the McKenzie Bros. ? I sure wish it would pop up on TV sometime !
Kimmo, thanks for sharing your PzIV build log. I'm a lurking follower on that baby.


Lurkers are always welcome. Anyways, back to the item at hand. Hopefully this shows a little more clearly what I was getting at. The blade is vertical, perpendicular to the piece and the movement is side to side. After scraping, smooth with liquid cement if necessary. Hope that helped?

Kimmo

CMOT
Staff MemberEditor-in-Chief
ARMORAMA
Visit this Community
England - South West, United Kingdom
Member Since: May 14, 2006
entire network: 10,954 Posts
KitMaker Network: 1,873 Posts
Posted: Thursday, November 07, 2013 - 02:05 AM UTC
I have another suggestion which is to remove the cross detail and glue them to some sheet styrene cut to the right size.
chumpo
Visit this Community
United States
Member Since: August 30, 2010
entire network: 749 Posts
KitMaker Network: 225 Posts
Posted: Friday, November 08, 2013 - 02:10 PM UTC
The Squadron Shop has a seam scrapper in their inventory and mission models makes a chisel with two different blades .
t-bolt
Visit this Community
Indonesia
Member Since: October 30, 2013
entire network: 13 Posts
KitMaker Network: 4 Posts
Posted: Saturday, November 09, 2013 - 07:36 AM UTC
@Kimmo
Thanks for the picture.
It really make your idea very clear to understand.
I have tried it and it works, the only catch is the blade must be small enough and very sharp to get good result.

@Darren and Edmund
Thanks for your advices.
I am sure going to try it if I ever have similar problems like these again in the future (I am sure I will).

BTW I am curious what is those small rectangle piece does in the real tanks?
does anybody knows?
Jessie_C
Visit this Community
British Columbia, Canada
Member Since: September 03, 2009
entire network: 6,965 Posts
KitMaker Network: 609 Posts
Posted: Saturday, November 09, 2013 - 09:39 AM UTC
If you're brave enough those parts look quite easy to scratchbuild from plastic card.
 _GOTOTOP