

I've come back to the hobby after about 30 years. When I last built (as a teenager) tracks were rubber and had to be melted to join - you could paint them off the tank and then with care stretch them over the wheels.
I have built up quite a stash and these all have different tracks than I used in my past - either rubber ones that you can glue, a mixture of long runs and links, or just individual links.
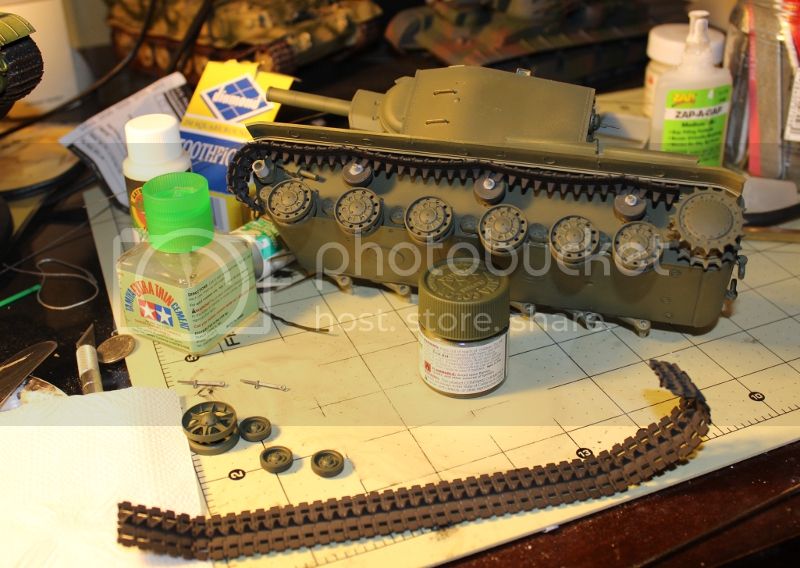
I'm starting with a cheap(ish), easy(ish) model - a Trumpeter KV-1 Ehkranami. This has 'link and run' tracks - two full length runs upper and lower, and individual links to go round the drive and idler wheels.
Would it be best to completely assemble and then paint afterwards. Or is it possible to assemble the tracks but not glue the final link, paint off the tank and then fit and make the final glue joint - is there enough flex?
My other thought is to make two sections - top run with the links round the idler, and bottom run with the links round the drive. Then I would have two glue joints to complete.
Appreciate any advice.
Many thanks,
Nigel
Hosted by Jim Starkweather
How best to assemble and paint these tracks??

nheather

Member Since: November 12, 2007
entire network: 295 Posts
KitMaker Network: 90 Posts
Posted: Wednesday, December 05, 2012 - 10:19 PM UTC

Hangelafette

Member Since: April 22, 2012
entire network: 344 Posts
KitMaker Network: 17 Posts

Posted: Thursday, December 06, 2012 - 01:47 PM UTC
Nigel,
I'm working on the Trumpeter KV-II and followed the two section top/bottom run strategy. Since I had already added the fenders, I did not glue the idler wheels together yet. This makes it easier to add the top run. The space between the drive sprocket and fender is pretty tight.
I always paint the tracks separately. I am also working on a Dragon StuG with individual (magic) tracks. In that case, I plan to paint the wheels, tracks and bottom hull before I add the fenders.
 Nate
Nate
I'm working on the Trumpeter KV-II and followed the two section top/bottom run strategy. Since I had already added the fenders, I did not glue the idler wheels together yet. This makes it easier to add the top run. The space between the drive sprocket and fender is pretty tight.
I always paint the tracks separately. I am also working on a Dragon StuG with individual (magic) tracks. In that case, I plan to paint the wheels, tracks and bottom hull before I add the fenders.
Nate
rebelsoldier
Member Since: June 30, 2004
entire network: 1,336 Posts
KitMaker Network: 570 Posts

Posted: Sunday, December 09, 2012 - 03:59 PM UTC
its a bit of work, but this is what i do for my tracks. i measure the roadwheels width and heigth. i trace this on a furring strip, cut it to size and use a small stapler to attach the tracks to the wood. then i'm free to paint the tracks, age them, etc. also i label the type tracks that were painted/tank name for future use. just a thot to pass along.
reb

reb

Spiderfrommars

Member Since: July 13, 2010
entire network: 3,845 Posts
KitMaker Network: 209 Posts
Posted: Sunday, December 09, 2012 - 09:50 PM UTC
Quoted Text
Nigel,
I'm working on the Trumpeter KV-II and followed the two section top/bottom run strategy. Since I had already added the fenders, I did not glue the idler wheels together yet. This makes it easier to add the top run. The space between the drive sprocket and fender is pretty tight.
I always paint the tracks separately. I am also working on a Dragon StuG with individual (magic) tracks. In that case, I plan to paint the wheels, tracks and bottom hull before I add the fenders.
Yes, that's the way
 |

WEB HOSTING BY


Copyright ©2021 KitMaker Network and Kitmaker Network, a subsidiary of Silver Star Enterprises
All Rights Reserved. Please read our Conditions of Use and Privacy Policy.
All Rights Reserved. Please read our Conditions of Use and Privacy Policy.