

Because my modelling is done on a tight budget I've chosen to make a few things myself instead of buying them. None of them use 'cutting edge' technology (to say the least!) and I think anybody could make them themselves, should they need to.
I thought I'd share them here for anyone in the same boat as myself. Lack of cash doesn't need to hold you back - a bit of improvisation and imagination works wonders. Having said that, there's nothing new in these concepts - if you trawl the net you'll find similar items.
However I hope the few items I show in the thread encourage someone to get their saw and drill out the cupboard.
Tools & Supplies
Discussions on the latest and greatest tools, glues, and gadgets.
Discussions on the latest and greatest tools, glues, and gadgets.
Hosted by Matt Leese
DIY Airbrush Accessories & PE Tool

Nerazzurri

Member Since: May 16, 2012
entire network: 51 Posts
KitMaker Network: 17 Posts
Posted: Tuesday, June 19, 2012 - 10:11 AM UTC
Nerazzurri
Member Since: May 16, 2012
entire network: 51 Posts
KitMaker Network: 17 Posts
Posted: Tuesday, June 19, 2012 - 10:24 AM UTC
First up, a spray booth.
It measures approximately L590mm, D420, H400. I cut it all from a sheet of 1220x600 MDF which cost £8; the 10 angle brackets and nuts/bolts cost £12.
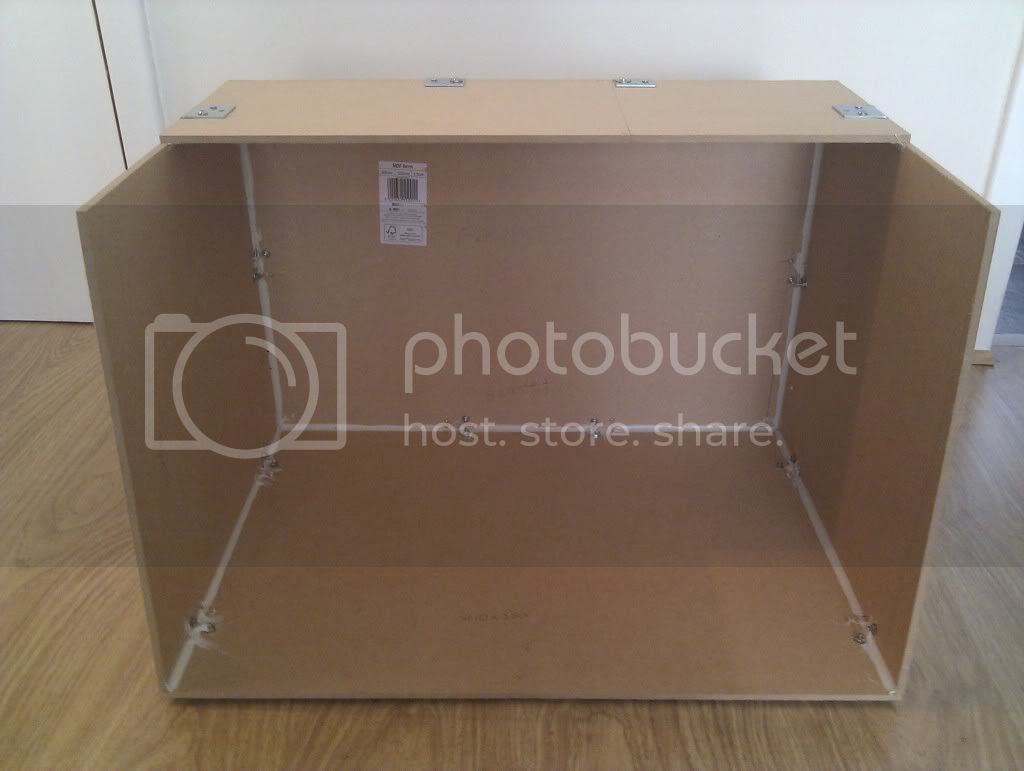
It didn't need a bead of NoNails along the edges, I just went for a belt and braces approach for a bit more rigidity. I wasn't too fussy with it either as there'll be lining paper going over the inside.

The lining wallpaper isn't to protect the MDF - it's for increased light reflection in the cavity. There's a small LED light on the roof too; I had it lying around and you can pick them up from the poundstores.
What you see in the middle is a bit of scrap I had. I squared it up a bit and put a pan head screw in the middle underneath. Voila - a turntable LOL.
Granted, I haven't fitted an extractor fan - but I'm not too bothered as I'll be using almost exclusively acrylics. If I spray near an open window and use a dust mask it should be OK. And if a used fan crosses my path it can always be fitted at a later stage.
When you're starting modelling like I am and there's so much to buy at once, I don't think you can grumble at a booth for £20. It's much more fun making it yourself too!
Hope that's of use to someone. I'll post something else tomorrow.
It measures approximately L590mm, D420, H400. I cut it all from a sheet of 1220x600 MDF which cost £8; the 10 angle brackets and nuts/bolts cost £12.
It didn't need a bead of NoNails along the edges, I just went for a belt and braces approach for a bit more rigidity. I wasn't too fussy with it either as there'll be lining paper going over the inside.
The lining wallpaper isn't to protect the MDF - it's for increased light reflection in the cavity. There's a small LED light on the roof too; I had it lying around and you can pick them up from the poundstores.
What you see in the middle is a bit of scrap I had. I squared it up a bit and put a pan head screw in the middle underneath. Voila - a turntable LOL.
Granted, I haven't fitted an extractor fan - but I'm not too bothered as I'll be using almost exclusively acrylics. If I spray near an open window and use a dust mask it should be OK. And if a used fan crosses my path it can always be fitted at a later stage.
When you're starting modelling like I am and there's so much to buy at once, I don't think you can grumble at a booth for £20. It's much more fun making it yourself too!
Hope that's of use to someone. I'll post something else tomorrow.
Nerazzurri
Member Since: May 16, 2012
entire network: 51 Posts
KitMaker Network: 17 Posts
Posted: Tuesday, June 19, 2012 - 09:36 PM UTC
Quoted Text
I cut it all from a sheet of 1220x600 MDF which cost £8
EDIT: It struck me this morning that it wasn't from the same board - DOH! The bottom, top and sides were; but the back was a leftover from a previous job.
Nerazzurri
Member Since: May 16, 2012
entire network: 51 Posts
KitMaker Network: 17 Posts
Posted: Wednesday, June 20, 2012 - 09:56 AM UTC
Here's an airbrush holder I made. The main item is a clamp from a poundstore. Not seen them there for a while (I already had it lying around) but Aldi have them for 2 for £5 at the moment.
I bolted the wood (that's the big silver thing in the middle that's hard to define) through a hole that's already in these types of clamps, and just threaded a cable-tie through as well to keep it level.
Then 2 brass hooks hold the AB at the correct angle so the cup is level, and another around the base of the cup just in case the AB wanted to roll to the side.
The benefit of this for me is the quick and easy portability. When not in use I can store it inside the spray booth in a cupboard, and have it ready in seconds for use as well.

I'll post something else tomorrow.
I bolted the wood (that's the big silver thing in the middle that's hard to define) through a hole that's already in these types of clamps, and just threaded a cable-tie through as well to keep it level.
Then 2 brass hooks hold the AB at the correct angle so the cup is level, and another around the base of the cup just in case the AB wanted to roll to the side.
The benefit of this for me is the quick and easy portability. When not in use I can store it inside the spray booth in a cupboard, and have it ready in seconds for use as well.
I'll post something else tomorrow.

majjanelson

Member Since: December 14, 2006
entire network: 1,355 Posts
KitMaker Network: 336 Posts
Posted: Wednesday, June 20, 2012 - 01:35 PM UTC
Keep 'em coming, Gavin! These are helpful and also can lead others to additional or alternative ideas.

Nerazzurri
Member Since: May 16, 2012
entire network: 51 Posts
KitMaker Network: 17 Posts
Posted: Thursday, June 21, 2012 - 09:06 AM UTC
This is a PE bending tool and cutting surface I made.
I don't plan on doing much PE (just what comes with OOB kits), so I wasn't going to spend any money on a proprietary tool. And I'm not happy with sprue cutters, apart from rare occasions, so I needed a good surface to use a craft knife on.
OK, the base is a bit of scrap chipboard from old furniture I had stashed. The ceramic tile (and hence the whole affair) is bigger than I need really but I didn't have any means of trimming the the large ones I had left over. And the metal part for the folding was part of a packet of 4 spreaders I bought from the poundstore specifically for this (oh the expense!).
First up I marked up the tile and drilled the 2 holes. When you drill tiles I find patience is the key. Start with a smaller drill for a pilot and don't lean too much on it - let the tool do the work and don't overdo the revs; that's my method anyway.
Next, open out the hole to the size of your bolts - again, don't rush the drilling. Then I made two cut outs on the chipboard to accept the bolts and fibre washers. You want to use softish material to face the tile on either side with your metal washer on top of those otherwise you risk cracking the tile.
The same on top. I used an old mouse mat I had already started cutting up, to go next to the tile surface. Then some harder vinyl type material. And lastly you can go for the metal washer and nut.
I didn't tighten these madly, just enough to be firm. And the shape of the spreader meant there's actually indentations where I have the bolts, so that'll keep the arrangement in place.
Next I spread generous beads of NoNails on the board to cover the entire area of the tile, placed the tile and gently pushed down to spread the beads, and then filleted the excess with my finger. Stuck some tins and bottles on it overnight and it was ready to go the next day.
It's a little bigger and heavier than I'd like, but it'll do the job for the rest of my days - unless I want to do more PE and it justifies a proper tool.
Hope that's of help to someone.

Thank you for the encouragement Jeff
I don't plan on doing much PE (just what comes with OOB kits), so I wasn't going to spend any money on a proprietary tool. And I'm not happy with sprue cutters, apart from rare occasions, so I needed a good surface to use a craft knife on.
OK, the base is a bit of scrap chipboard from old furniture I had stashed. The ceramic tile (and hence the whole affair) is bigger than I need really but I didn't have any means of trimming the the large ones I had left over. And the metal part for the folding was part of a packet of 4 spreaders I bought from the poundstore specifically for this (oh the expense!).
First up I marked up the tile and drilled the 2 holes. When you drill tiles I find patience is the key. Start with a smaller drill for a pilot and don't lean too much on it - let the tool do the work and don't overdo the revs; that's my method anyway.
Next, open out the hole to the size of your bolts - again, don't rush the drilling. Then I made two cut outs on the chipboard to accept the bolts and fibre washers. You want to use softish material to face the tile on either side with your metal washer on top of those otherwise you risk cracking the tile.
The same on top. I used an old mouse mat I had already started cutting up, to go next to the tile surface. Then some harder vinyl type material. And lastly you can go for the metal washer and nut.
I didn't tighten these madly, just enough to be firm. And the shape of the spreader meant there's actually indentations where I have the bolts, so that'll keep the arrangement in place.
Next I spread generous beads of NoNails on the board to cover the entire area of the tile, placed the tile and gently pushed down to spread the beads, and then filleted the excess with my finger. Stuck some tins and bottles on it overnight and it was ready to go the next day.
It's a little bigger and heavier than I'd like, but it'll do the job for the rest of my days - unless I want to do more PE and it justifies a proper tool.
Hope that's of help to someone.
Quoted Text
Keep 'em coming, Gavin! These are helpful and also can lead others to additional or alternative ideas.
Thank you for the encouragement Jeff
Nerazzurri
Member Since: May 16, 2012
entire network: 51 Posts
KitMaker Network: 17 Posts
Posted: Monday, June 25, 2012 - 02:24 AM UTC
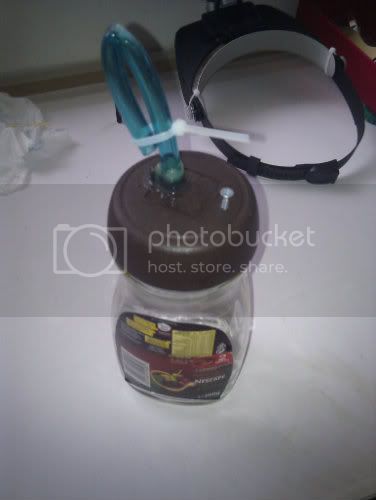
This is a container I made for collecting fluid when cleaning the airbrush - cleaner, distilled water, etc.
I started with a coffee jar and pierced the lid in 2 places. In the bigger hole I fed through some plastic tubing I had kept for a rainy day, and the other hole was just large enough to take a small self-tapping screw.
The screw can be removed to provide a vent hole when you're firing the fluid in and replaced to prevent fumes. The plastic pipe is held in place on either side of the lid by cable ties; theses are then covered in a thick layer of epoxy glue and will be sturdy enough to hold the pipe in place. If you make the pipe long enough it can be folded and held in place, again to prevent fumes when you're finished.
That's all I have. It might help out another beginner who's got lots to buy at once but is short of funds like me.
*an edit for folder/cutting board - I forgot to say I've got 3 strips from cable ties glued into place between the tile and folder, just to make it easier to get the PE in there and so the folder can't rub on the tile.
 |

WEB HOSTING BY


Copyright ©2021 KitMaker Network and Kitmaker Network, a subsidiary of Silver Star Enterprises
All Rights Reserved. Please read our Conditions of Use and Privacy Policy.
All Rights Reserved. Please read our Conditions of Use and Privacy Policy.