_GOTOBOTTOM
Scratchbuilders!
Built a model or part from your own materials lately?
Hosted by Mike Kirchoff
Help on scratchbuilding suspension part
HILBERT
Visit this Community
Zuid-Holland, Netherlands
Member Since: August 07, 2004
entire network: 4,808 Posts
KitMaker Network: 360 Posts
Posted: Tuesday, November 09, 2010 - 05:45 AM UTC
Dear Modelers,

Working on my M60 lately I managed the details are well... terrible. Especially the suspension parts are to cry for. So, I decided to scratch these. I just want to know how to scratch this part.


Source: prime-portal

Can somebody help me out?

Thanks
okdoky
Visit this Community
Scotland, United Kingdom
Member Since: April 30, 2007
entire network: 1,597 Posts
KitMaker Network: 673 Posts
Posted: Tuesday, November 09, 2010 - 07:03 AM UTC
Hi Hilbert

A chap called Steve Cruickshank (BARV) showed me a technique he used in 1/35 for making working hydraulic rams and pivot points for them.

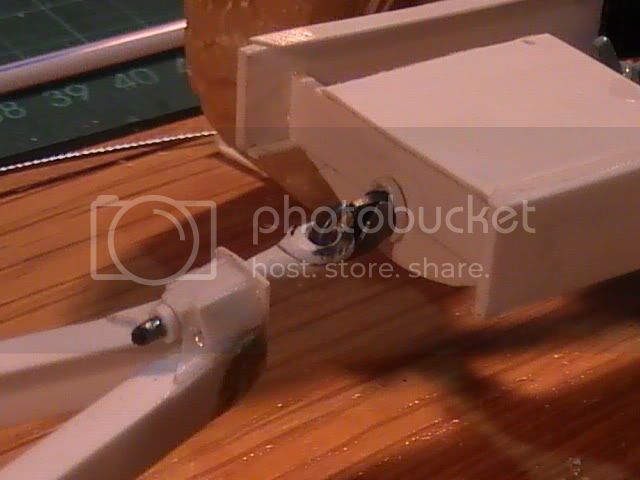
I used it for making the hitches for the Sanky and King trailers


He used either solid spare plastic sprue or hollow tube and simply heated the end of it over a match or lighter flame to soften the plastic.

When soft, take two fingers and spit on them and pinch the softened end to mold it to the rough shape you nead, It does take practice and feels hot at first which seems a bit off-putting at first.

With the end flattened or shaped roughly as required, the plastic cools and holds that shape.

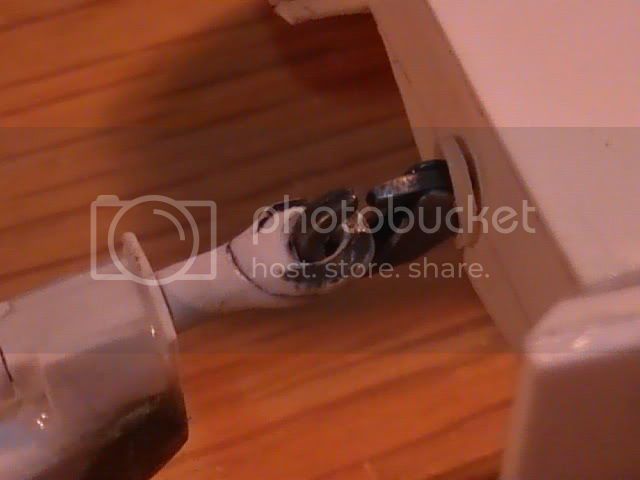
My trailer hitches were solid sprue rounded with my fingers, drilled, sanded to be rounded and the other end sanded to the correct diameter to fit into a receiving tube.

Looks as if you would need to do subtle carving to shape before drilling the pivot hole.

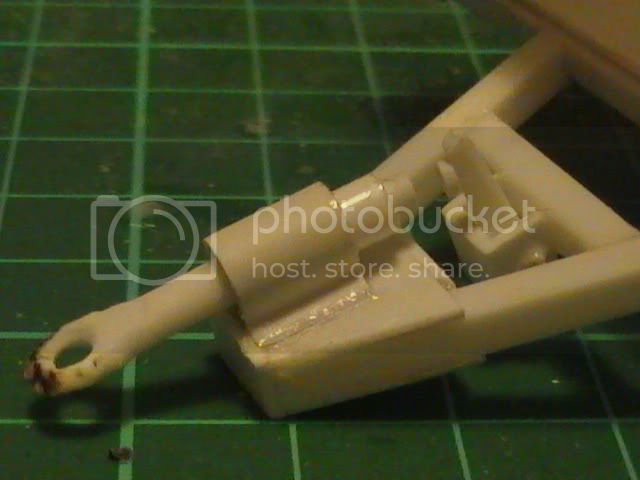
This end piece could be formed to rough square shape, then drilled, filed, carved and sanded to form the more complicated shape you need.

Solid sprue version can act as the ram with its pivot point and the hollow version can be the tube with its pivot point.

Remember to form the end before you cut the length as this allows you to correct the pivot point shape if first attempts don't work. If you cut length first then form end you run risk that ram and tube are too short to be used.

Hope this helps. Look up BARV's work as you might see how he did his connections. He was a master scratchbuilder.

Nige

HEINE-07
Visit this Community
Ohio, United States
Member Since: February 28, 2007
entire network: 392 Posts
KitMaker Network: 35 Posts
Posted: Friday, November 19, 2010 - 06:13 PM UTC
BARG and Nige both have some fine scratch-building to be seen on this net-work.

From what may be seen on your source photograph, it seems that your part is not hollow at the circled end, and, the curve there has sharp edges. Therefore, I would make it like this, in 1/35th scale:

Find a styrene rod about 1/16th inch diameter, to use as a jig. Find a strip of styrene .10 x .60. Bend the end of the strip around the middle of the rod, and glue. When dry, saw the over-hanging ends of the rod flush with the .60 width of the strip.

Lastly, get a thin saw, or just carefully handle a most sharp, pointed blade, to open a channel down the middle of the .60 strip tag--that tag part which has not been curved around the rod. Now glue another piece of the .10 x .60 strip down through the opened slit, at a right angle. When dry, carefully sand, or file, or scrape, the piece to get the slight bevel to be seen in your source photograph.

Now, this crisp end is ready to insert into a hollow tube of greater diameter.
HawkeyeV
Visit this Community
Wisconsin, United States
Member Since: September 20, 2006
entire network: 319 Posts
KitMaker Network: 184 Posts
Posted: Wednesday, December 01, 2010 - 04:07 AM UTC
This might give you some ideas.

http://hawkeyes-squawkbox.com/2010/11/19/thats-tubular-dude/
 _GOTOTOP