_GOTOBOTTOM
Photography
Questions about shooting your models and dioramas? Ask here.
The El-Cheap photobooth!
metooshelah
#011
Visit this Community
Jerusalem, Israel
Member Since: February 06, 2009
entire network: 1,507 Posts
KitMaker Network: 195 Posts
Posted: Friday, July 30, 2010 - 07:41 AM UTC
just something I thought I'd share (and give me an opportunity to fill my subscriber gallery with photos ). This is My version of a very cheap, easy to build photobooth.

you will need:
- 3 sheets of plain white A4 sized pages.
-1 half of a model box. I recommend the lower half, as it is sturdier.
- sellotape
- something sharp


start by cutting one of the wider sides of the box:


place one of the pages width-wise on the the box, next to the opening. attache with one stripe of sellotape


this is a rear-side view of the box. important: do not attach the paper to the corner of the box. it need to retain a sort of circular angle


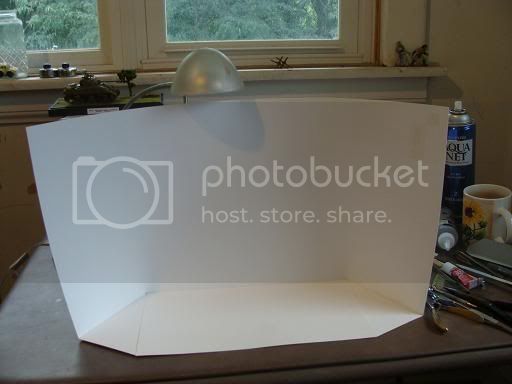
do the same on the other side. you should have something like this:


now place the third sheet in between the others, covering their ends. attach with sellotape gently at the back


and you're done!
#027
Visit this Community
Louisiana, United States
Member Since: April 13, 2005
entire network: 5,422 Posts
KitMaker Network: 146 Posts
Posted: Friday, July 30, 2010 - 08:08 AM UTC
Very nice Matan.
exer
Visit this Community
Dublin, Ireland
Member Since: November 27, 2004
entire network: 6,048 Posts
KitMaker Network: 845 Posts
Posted: Friday, July 30, 2010 - 11:00 AM UTC
Good step by step Matan I often use something like this
jimb
Visit this Community
New York, United States
Member Since: August 25, 2006
entire network: 2,539 Posts
KitMaker Network: 263 Posts
Posted: Wednesday, August 04, 2010 - 05:16 AM UTC
Interesting. I'll have to give it a try.

Jim
metooshelah
#011
Visit this Community
Jerusalem, Israel
Member Since: February 06, 2009
entire network: 1,507 Posts
KitMaker Network: 195 Posts
Posted: Wednesday, August 04, 2010 - 08:21 AM UTC
glad you liked it
jimb
Visit this Community
New York, United States
Member Since: August 25, 2006
entire network: 2,539 Posts
KitMaker Network: 263 Posts
Posted: Wednesday, August 04, 2010 - 08:31 AM UTC
Do ou have any examples of photos of models you've taken with your "photo booth"? Do the seams in the paper show?

Jim
metooshelah
#011
Visit this Community
Jerusalem, Israel
Member Since: February 06, 2009
entire network: 1,507 Posts
KitMaker Network: 195 Posts
Posted: Thursday, August 05, 2010 - 11:21 AM UTC
hey,
these are pictures taken using the photo booth.
the seams may appear, but if you station your model correctly and take pictures properly then either they won't show, or will be almost unnoticeable.


here for an example you can see the seam:

jimb
Visit this Community
New York, United States
Member Since: August 25, 2006
entire network: 2,539 Posts
KitMaker Network: 263 Posts
Posted: Friday, August 06, 2010 - 03:06 AM UTC
Thanks for posting those. You really don't notice the seam.

Nice Panzer, by the way.

Jim
DT61
Visit this Community
Ontario, Canada
Member Since: September 18, 2005
entire network: 1,226 Posts
KitMaker Network: 399 Posts
Posted: Friday, August 27, 2010 - 05:12 AM UTC
Great tip, thanks I will try it.

Darryl
goldenpony
Visit this Community
Zimbabwe
Member Since: July 03, 2007
entire network: 3,529 Posts
KitMaker Network: 422 Posts
Posted: Monday, August 30, 2010 - 07:07 AM UTC
It doesn't get any easier than that.

I have a big printer at work so I can use one big sheet of paper.

Amazing how the simplests ideas are lost at time. thanks!

bmikk1
Visit this Community
Utah, United States
Member Since: February 15, 2008
entire network: 199 Posts
KitMaker Network: 48 Posts
Posted: Tuesday, September 14, 2010 - 10:22 AM UTC
Just built one and it works great!! Thanks for the tip!
metooshelah
#011
Visit this Community
Jerusalem, Israel
Member Since: February 06, 2009
entire network: 1,507 Posts
KitMaker Network: 195 Posts
Posted: Tuesday, September 14, 2010 - 08:33 PM UTC
sure. glad you liked it
panzerbob01
Visit this Community
Louisiana, United States
Member Since: March 06, 2010
entire network: 3,128 Posts
KitMaker Network: 169 Posts
Posted: Friday, September 24, 2010 - 02:07 AM UTC
Matan / all:

Cool! I LOVE CHEAP and this is it! And REALLY NICE DEMO!

I do something very similar, save I use a large piece of paper propped in the box - bends around L & R behind the model for no seams.

If I may suggest; try using some light shades - light grey or pale blue - for a softer colour contrast and less glare, depending on the kit colours. I pref light blue and tinker with the white Balance depending on light-source used.

Here's an example:


Cheers! Bob
metooshelah
#011
Visit this Community
Jerusalem, Israel
Member Since: February 06, 2009
entire network: 1,507 Posts
KitMaker Network: 195 Posts
Posted: Tuesday, September 28, 2010 - 09:54 AM UTC
Well done Bob!
just one thing: It looks like your photo is misted / unclear or something like that if you get me. like looking at something through dirty glasses. try and shut the flash off (if you're using it)
panzerbob01
Visit this Community
Louisiana, United States
Member Since: March 06, 2010
entire network: 3,128 Posts
KitMaker Network: 169 Posts
Posted: Tuesday, September 28, 2010 - 03:15 PM UTC
Matan:

The kit is one of my fav recent builds. And I am sorta proud of it as it has won some local contest prizes. The pic is not the crispest - but no flash!

The pic was shot free-hand at a modest speed without any prep (simply grabbed the camera, turned on the lights and plopped the model down) and so not the best I ever took, and the pasted copy is a true low-res reduction from the orig jpg. I wouldn't make any claims as to the lens I used, either- truly the cheapest kind!

I could sharpen it and add some contrast via a photo-editor- but didn't go there, yet!

Mostly, it's just to illustrate the softening of colours and, of course, the seamless backdrop!

Cheers! Bob
mother
Visit this Community
New York, United States
Member Since: January 29, 2004
entire network: 3,836 Posts
KitMaker Network: 1,121 Posts
Posted: Tuesday, September 28, 2010 - 03:43 PM UTC
Now thats a cool idea, I must definitely will remember this in the near future.

Happy Modeling,
Joe
metooshelah
#011
Visit this Community
Jerusalem, Israel
Member Since: February 06, 2009
entire network: 1,507 Posts
KitMaker Network: 195 Posts
Posted: Wednesday, September 29, 2010 - 12:49 AM UTC

Quoted Text

Matan:

The kit is one of my fav recent builds. And I am sorta proud of it as it has won some local contest prizes. The pic is not the crispest - but no flash!

The pic was shot free-hand at a modest speed without any prep (simply grabbed the camera, turned on the lights and plopped the model down) and so not the best I ever took, and the pasted copy is a true low-res reduction from the orig jpg. I wouldn't make any claims as to the lens I used, either- truly the cheapest kind!

I could sharpen it and add some contrast via a photo-editor- but didn't go there, yet!

Mostly, it's just to illustrate the softening of colours and, of course, the seamless backdrop!

Cheers! Bob


oh, I see now. i don't recommend shooting pics free hand. always use a tripod, or a leveled surface to take pictures! it's also recommended to use the 3 sec timer for shooting, to eliminate any stutter of the camera
UncaBret
Visit this Community
Illinois, United States
Member Since: May 11, 2008
entire network: 767 Posts
KitMaker Network: 89 Posts
Posted: Thursday, September 30, 2010 - 04:02 AM UTC
I made this from a sheet of poster board. A few cuts and some staples;

rholmstr
Visit this Community
Oregon, United States
Member Since: September 30, 2010
entire network: 28 Posts
KitMaker Network: 1 Posts
Posted: Thursday, October 28, 2010 - 09:17 PM UTC
Wow! I have to try this. Basically I have just been using foam board but need to get something better and this just may be the solution. Heres how mine come out with foam board as the base and back drop.


Next round of photos I have to take I am without a doubt making one of these. Thanks

Bob
 _GOTOTOP