

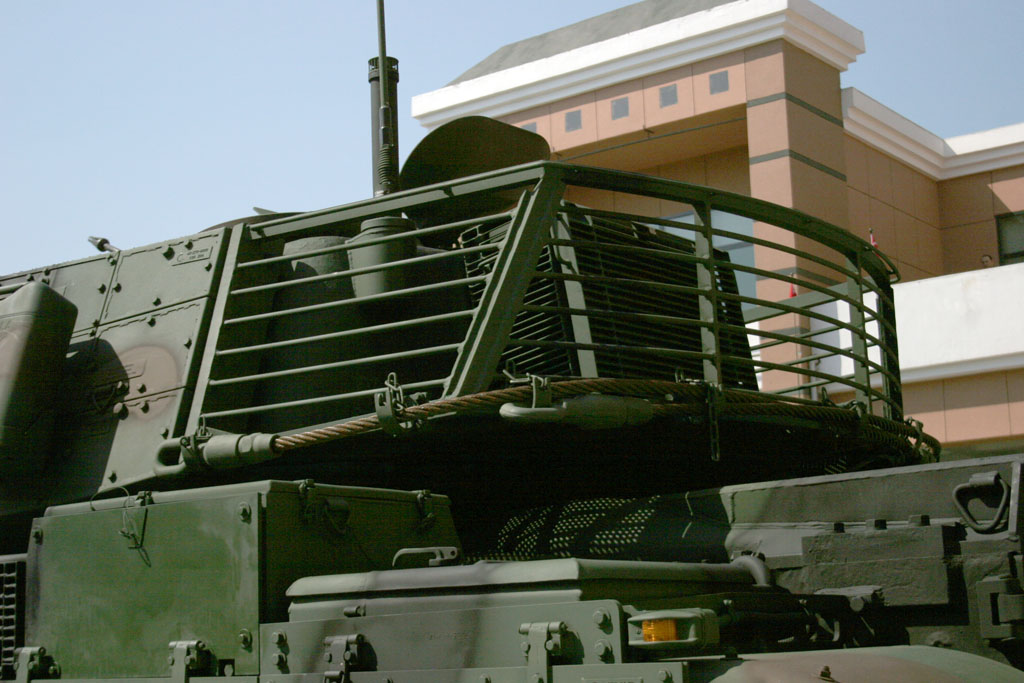
I am trying to scratchbuild what I think is an AC unit on the M-60T shown in this photo, right behind the turret:
http://www.modelsitesi.com/referanslar/m60/028.jpg
I tried everything I could think of, and I am at my wit's end. Short of designing custom PE parts (which will look 2D anyway), what is the best way to scratchbuild grilles like these?
Scratchbuilders!
Built a model or part from your own materials lately?
Built a model or part from your own materials lately?
Hosted by Mike Kirchoff
How to scratchbuild APU/ACgrilles?

KursadA

Member Since: July 23, 2006
entire network: 70 Posts
KitMaker Network: 10 Posts
Posted: Monday, December 07, 2009 - 09:55 AM UTC
Cuhail
Member Since: February 10, 2004
entire network: 2,058 Posts
KitMaker Network: 787 Posts

Posted: Monday, December 07, 2009 - 10:20 AM UTC
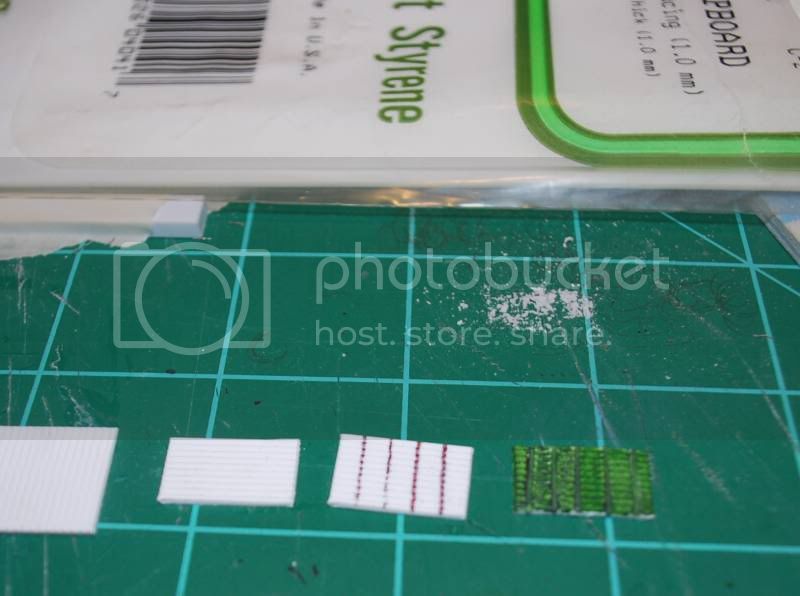
I'd say start out with some .040 spacing Clapboard siding (Evergreen # 4041). Make some scribing lines and cross the clapboard with some .020 rod at intervals.
Hope I've helped.
Cuhail


Removed by original poster on 12/24/09 - 16:30:08 (GMT).
Removed by original poster on 12/24/09 - 16:31:03 (GMT).

okdoky

Member Since: April 30, 2007
entire network: 1,597 Posts
KitMaker Network: 673 Posts

Posted: Wednesday, December 09, 2009 - 01:37 AM UTC
Kursad
I hope I haven't miss interpretted what it is you are looking at, but is it the texture of the actual grills of the air conditioning equipment that is fixed to the rear of the turret rather than the slat and bar protection or basket which is around the equipment?
If it the equipment grills then you could find a kit part or some household item with similar to scale texture and use the tin foil method of rubbing the surface detail into the foil with a cocktail stick or other blunt tool. Cut the pieces to the right size and fix to a box of plastic to the right sizes.
Hope this might help.
Nige
KursadA
Member Since: July 23, 2006
entire network: 70 Posts
KitMaker Network: 10 Posts
Posted: Wednesday, December 09, 2009 - 05:50 AM UTC
Quoted Text
Kursad
I hope I haven't miss interpretted what it is you are looking at, but is it the texture of the actual grills of the air conditioning equipment that is fixed to the rear of the turret rather than the slat and bar protection or basket which is around the equipment?
Absolutely: as I said in the original post I want to replicate the AC equipment at the rear of the turret. I already took care of the turret basket.
Quoted Text
If it the equipment grills then you could find a kit part or some household item with similar to scale texture and use the tin foil method of rubbing the surface detail into the foil with a cocktail stick or other blunt tool. Cut the pieces to the right size and fix to a box of plastic to the right sizes.
Nige
I have looked high and low for a household item with a similar texture (including some miniaturized electronics heatsinks with similar construction), but could not find anything suitable. I will keep looking, thanks for the suggestion.
Cuhail
Member Since: February 10, 2004
entire network: 2,058 Posts
KitMaker Network: 787 Posts
Posted: Wednesday, December 09, 2009 - 06:28 AM UTC
Kursad, I made the part you're talking about and will take pics of the process. I followed the same instructions I gave you above and it's coming out fine.
My only issue right now is I left the camera on after uploading some pictures and now the battery needs charging.
Keep an eye out.
EDIT-
I hope this forwards the idea.
Cuhail
My only issue right now is I left the camera on after uploading some pictures and now the battery needs charging.
Keep an eye out.
EDIT-
I hope this forwards the idea.
Cuhail
KursadA
Member Since: July 23, 2006
entire network: 70 Posts
KitMaker Network: 10 Posts
Posted: Thursday, December 10, 2009 - 02:25 AM UTC
Quoted Text
Kursad, I made the part you're talking about and will take pics of the process. I followed the same instructions I gave you above and it's coming out fine.
My only issue right now is I left the camera on after uploading some pictures and now the battery needs charging.
Keep an eye out.
Thanks, this looks very promising! I would probably like to have a little more depth to the grille, but I ordered the necessary stuff from Evergreen and Plastruct and will give this a shot next week. Thanks again!!
Cuhail
Member Since: February 10, 2004
entire network: 2,058 Posts
KitMaker Network: 787 Posts
Posted: Thursday, December 10, 2009 - 02:36 AM UTC
Now, ya gotta remember, I spent a whopping 8 minutes or so whipping that thing out. I little more time and some black wash will make it look a lot better and "deeper".
Good luck, man! Glad I could help.
Cuhail

VonCuda
Member Since: November 28, 2005
entire network: 2,216 Posts
KitMaker Network: 399 Posts
Posted: Thursday, December 10, 2009 - 10:27 AM UTC
You could also get some more depth and definition by rescribing the lines already in the plastic. Sort of like rescribing airplane panel lines. One more idea is to use the existing lines and highlight the recessed areas with a fine tip sharpie before the wash.
Hermon
Hermon

 |

WEB HOSTING BY


Copyright ©2021 KitMaker Network and Kitmaker Network, a subsidiary of Silver Star Enterprises
All Rights Reserved. Please read our Conditions of Use and Privacy Policy.
All Rights Reserved. Please read our Conditions of Use and Privacy Policy.