

1⁄35Scratchbuilding a 1/15 M577A2!
I was very excited when the Verlinden M113 kit on 1/15 hit the market. It would make a great combination with the 120 mm figures, and it looked good. Only the price tag kept me from buying it. Then last year, I stumbled across it in a sale, really cheap compared to the normal retail price.
Only when I came home and dry-ran the assembly, I realized that probably something was wrong with this kit. Maybe it had been badly conserved (could temperature mess up the resin?), but all large parts were bent. A tight fit was impossible, even a jar of putty wouldn't help me here. The roof was caved in, several millimeters in the center.
It took me many hours of fitting, filing, sanding and filling, but in the end I managed to straighten out the sides with plasticard and polyester putty. The outside view was saved, but I had to abandon my intentions to detail the interior: the interior was all messed up. I guess I could have scratchbuilt a new floor (that was bent, too) and the inside ceiling, but what would have been the point of buying a kit if I had to remodel everything?
I tried to straighten the roof by heating it in boiling water. This had worked in the past to reshape resin parts. This time, my efforts did not pay off. I decided to build a new roof plate. The next morning, in the traffic jam on my way to the office, my thoughts started drifting
If I had to make a new rooftop, why not refer to pictures of the real thing instead of just copying the original kit? My thoughts started jumping from one M113 type to another. The ACAV, a vulcan on top? A tow launcher? Or the new M113A3 version?
Then I remembered I had my own pictures of the M577A2, taken in the early nineties when the US army sent hundreds of AFV's and trucks from bases in Germany elsewhere in the world (the Gulf?) through the port of Antwerp.
Making the Conversion
There are many changes between the M113 and the M577, but the hardest parts to scratchbuild, like the tools, were already present in the M113 kit. I didn't have to change the wheels or the tracks (except for the spare wheels, where bolts were replaced by holes). Several extra details were added, but the main challenge was in the rooftop, the tent stucture and the generator.I had good pictures of the generator outside view, but no details of the inside. So that was mostly guesswork, based on what I could see on the few pictures I could find. Those who mess around with M577's for a living, must by laughing their heads off, I guess. Well, if anyone can get me proper pictures I might redo that generator.
The rooftop was fairly easy to recreate. I was puzzled by a structure on the left side I could see on some of my own M577's on the pictures, though. Wim Vink (who runs the excellent www.mil-mod.nl site), sent me a few pages from the original tech manual. It seems these structures are intended to contain metal ballast plates that can be added added to counterbalance the weight of the radio equipment inside the vehicle. Depending on the number of radio sets inside, plates can be added or removed. The M577 tech manual offers clear drawings of that.
Extra mesh wire was added on the grille cover sections and several details were changed to adapt the original M113 to the M577 pictures I had.
Creating the generator enclosure was an interesting challenge. Drilling dozens of holes, all alike and neatly lined up took some trial and error. I had to discard a few, but in the end it seemed to work.
The rest of the roof was easy : The antennas, lifting hooks come straight from the Verlinden kit. Only a different (but easy) cover lid, a few latches, brackets and hooks had to be made. The rounded structures on top were bent from copper strip. Straps are made from lead foil.
The tent frame structure was cut from soft metal tubing and copper sheet. I made a nice looking tent canvas too, applying the old "white glue and tissue paper" trick. But when all was fitted, the tent covered most of the tent poles structure from view. Since none of the M577's in my pictures carry the canvas, I decided not to add it to the completed model.
Painting
For painting, I had a choice. My pictures showed both versions of the new black/green/chocolate camo scheme, and older four color versions in two green shades, with buff and black. Since I only could find a copy of the newest version of the TB43-0209 paint schemes, I decided to paint by the book (I am still looking for a 1976 version, if anyone can help out?!). When I compare the M577's in my pictures it strikes me that some are painted almost precisely to prescription, others deviated from that quite a bit (were they painted on Monday mornings?).The white letters and figures chalked on the side are shiploading instructions, added by transport officers in the port docks. If I remember correctly, they refer to the ship number and loading date for the vehicle's transport. Reflecting orange tape was added to most vehicles, probably on the spot, to avoid collisions in the dark with any of the hundreds of other armored vehicles in the poorly lit port docks.
As the hull is made from non-ferro alloys, no rust was added there. the rust colors of tracks were copied from original pictures, and I added rust to the metal counterweight plates on the rooftop as well.
The Verlinden mud-skirts were slightly twisted. Since I had to redo them, I made them less high than the original kit's, like the ones I photographed in Antwerp. Their basic structure is plasticard, the skirts are lead foil.
Project Parts List
(Mostly "evergreen") polystyrene plasticard, rods, strips and tubes.PU resin to make a spare wheel (copied from the other wheels). The brand I use is locally bottled, so I don't know who the original manufacturer is.)
Filler : I'm really happy with polyester putty that is used for car repair. This is a two-component putty that comes in 500 g jars. Its nowhere as expensive as those special modeling-putties and it dries (depending on the mixture) in anything between two and thirty minutes. In the beginning it can be cut with a hobby knife, afterwards it gets hard as a rock. It doesn't shrink it's just perfect. The brand is "Auto 5", which is European (French?), but I'm sure similar car repair polyester putties must exist elsewhere too.
Transparent resin for the lights. Now here's a tricky one. I tried several - often horribly expensive - two-component clear resins. I finally swear by Poly-Optik clear casting resin, produced by Polytek (Easton, PA, USA). The trouble with clear resins is that they take ages to cure. For small parts (smaller is slower), you often have to wait several weeks. If you're just a little too hasty to start over, they are still a bit sticky when you un-mold them and your fingerprints are all over the result. First thing I do with a new kit is making a mold of all transparent parts (lamps and mirrors) and poor clear resin copies. The horribly painted headlights on the M577 (I know, I know) will be replaced in a few weeks by the final ones, when I can be sure the resin is properly cured.
Glue : pink and green Zap cyano-acrylate "super glue" for metal and resin parts.
Glue : "Humbrol liquid polly", tri-chlorine-ethylene and cellulose-thinner for polystyrene.
Paint : All base paint for the camouflage pattern is acrylic (Tamiya). Weathering and dry-brushing is in oil colors. I paint with the Aztec A430. I used to have a classic paintbrush before that. Both have their advantages. I used the cheapest compressor (a small "Puma") I could get my hands on - but I'm quite happy with it.
Decals : I used good old-fashioned "lettraset" rub-on letters and figures for the license plates. Another company that was badly hurt by the evolution digital printing.
Lead foil : For side-skirts I use the (.6mm thick) led foil that is used for roof-repair. It can be made thinner by bashing on it with a plain hammer. For finer applications like belts, I use the lead wrappings from old wine or champagne bottles. Old paint tubes do the trick, too. I tried to get original empty tubes from the pharmacy. They are not as flexible as lead (which would poison their content) but can be used for some modeling applications, too.
Wire in several thickness. NEVER throw away any kind of electric/electronic/other metal wire before pondering on its possible use for scratchbuilding.
And of course, there's always the old recycling box with parts of broken models and sprues with parts that can find a new life, even in another scale.
 M577 - Antwerp docks 1992 I decided to use this vehicle as an inspiration to paint the model. Some details are different (license plates, etc), since I used several other m577 vehicles as a reference too.
 M577 - Antwerp docks 1992. Since I noticed these vehicles didn't "wear" their folded tent canvas, I decided to discard mine, too.
 M577 rooftop ballast
 Aaah, the tent structure. Good thing the technical manual shows good graphics on that subject. I redid the tent eave poles at least four times. I used metal-colored soft metal. Scraping some paint away made them look a bit used. Still, I'm only half happy with the final result.
 Quite a few changes to Verlinden's M113 original here.
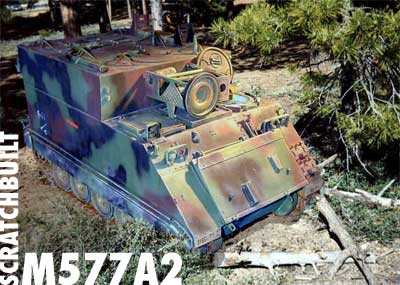
 The spare is a resin copy of a regular wheel. Bolts are replaced by holes. I thought the spare on the original picture looked quite cool. There's new grille covers, too. Drilling the holes at equal distance in the generator grille was possibly the hardest bit of this whole conversion.
 The "R55/5" mark is a loading instruction to indicate what boat this vehicle is sailing on. Sideskirts are lead.
 Pictures taken with artificial light. Dumb, dumb, dumb. I didn't have the patience to wait till the weekend to photograph by dailight... I might redo them when the transparent headlights are added (and when someone sends me a proper picture of the generator inside, forcing me to remodel it. Please don't do that to me!).


About the Author


FROM: EUROPEAN UNION
I live in Belgium, Europe. Though modeling was big on my list of hobbies, I spent all my time refurbishing the home we bought a few years ago. I promised I'd be back some day. That day can't be far off, now.


All Rights Reserved. Please read our Conditions of Use and Privacy Policy.